Logging the Aging of the Battery
With increasing age of the battery, its performance will degrade. The value for maximum capacity, corresponding with the amount of energy the battery can hold, will decrease, deviating more and more from the original capacity of a brand-new battery. Because the amount of stored energy is getting smaller, you won’t be able to operate your mobile computer disconnected from mains as long as before.
Aging of the battery depends on chemical and physical processes within the battery cells. It can accelerate by false treatment, e.g. temperatures too high or too low. Aging processes are usually gradual and can only be detected by monitoring over several months.
Battery Monitor can help you to review the capacity of a battery unit over long time intervals. For this purpose, no action is required of you. You only need to take care that Battery Monitor is running as often and as long as possible. For this reason, it is recommended to let the program start automatically.
Displaying the Log
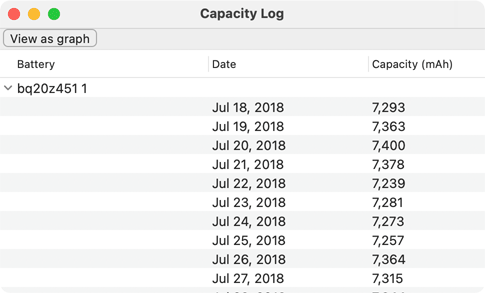
When Battery Monitor is running, the program will record the present value for maximum capacity once a day in a log. You can review the log using the menu item Window > Capacity Log, or by pressing ⌘ + 2, respectively. The log is shown in form of a table. The left column shows model name and serial number of the battery used, the center column the respective date, and the right column the capacity of the battery at that time. The table is automatically sorted by battery and date. Values for a specific battery can be hidden or shown using a disclosure triangle.
Battery Monitor is recording values for any number of battery units. This is important if you have a computer with replaceable batteries and you are using multiple battery packs, or if a built-in battery had to be swapped, or if you are using multiple mobile computers in a network with a centrally stored home folder.
Note that the monitoring processor in the battery unit is regularly calibrating itself to enhance accuracy of its readings. This can lead to capacity readings sometimes increasing, although the usual wear and tear will normally result in decreasing values.
The readings can be transferred to other applications if needed.
Presenting the Log Graphically
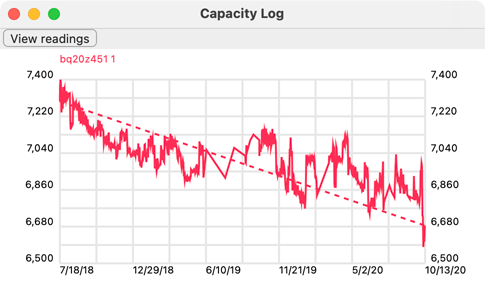
The log of capacity values can also be shown in a graphic representation. By pressing the button View as graph at the top border of the capacity window, you can toggle between the textual and graphical view. It also possible to open the capacity log directly in graph mode by selecting the menu item Window > Capacity Graph, or by pressing ⌘ + ⇧ + 2, respectively. The history of each battery is presented in a different color. An additional dotted line shows the general downhill trend noted usually for batteries. “Today’s” capacity is shown at the right hand side of the window, the oldest recorded state can been seen on the left.
Choosing a Better Name for a Capacity Log
Battery Monitor uses the internal device names and serial numbers of batteries to refer to the different modules you have used in the past. Depending on manufacturer, these names may not always be readable well. You can specify a customized name for the log entries of a battery if you like. For example, you could decide to give the battery you have purchased in August 2016 the name Batt 08/2016. Perform the following steps to rename a battery in the capacity log:
- Make sure the window Capacity Log is open and is showing readings, not the graphs.
- In the column Battery, click onto the line with the battery you like to rename.
- Right-click the entry and select the item Rename Battery… in the context menu.
- Enter the new name for the battery and press the OK button.
Deleting the Log of an Old Battery
When you had to replace a battery unit by a new one, because the old one reached the end of its life, you might decide to no longer keep the log of the replaced battery. You can delete all log entries of a specific battery unit as follows:
- Make sure the window Capacity Log is open and is showing readings, not the graphs.
- In the column Battery, click onto the line with the battery you like to remove.
- Right-click the entry and select the item Delete Battery… in the context menu.
- Confirm that you actually want to delete all log entries that have been recorded for this battery unit.
Splitting a Log of Battery Units with Identification Problems
There are specific cases where it can be difficult for Battery Monitor to detect that the battery unit has been replaced by a new one. Different units might identify with an identical serial number although this is not fully compliant with the Smart Battery industry standard. As a result, these battery units are recorded in the same log rather than in two separate logs.
Built-in batteries made by Apple may additionally identify by Apple serial numbers which can be helpful to resolve such a problem. Typically, a built-in battery is replaced after it has reached its expected lifetime, and you will no longer use the old one. In this particular case, Battery Monitor can offer to split the capacity log into two parts, one for the previous, and one for the current battery unit. This feature is only available under the following circumstances:
- The two affected battery units identify with the same Smart Battery serial number, but different Apple serial numbers.
- Battery Monitor has recorded a single capacity log for both units.
- The “newer” battery is currently installed in your computer.
Perform the following steps to split the log at the date where the battery has been replaced, but has not been detected as a different one:
- Make sure the window Capacity Log is open and is showing readings, not the graphs.
- In the column Battery, click onto the line with the battery for which the log should be split.
- Right-click the entry and select the item Split Log… in the context menu.
- Select the date where the log should be separated. This date will become the first entry of the log of the currently installed battery.
- Specify the new name for the second part of the log. This name should be related to the currently installed battery.
- Press the OK button.
Merging the Logs of two Battery Units
The identification problems mentioned in the previous section can also have the opposite effect: If an operating system update changed the way how a battery is identified, the same battery may mistakenly be seen as two different ones, causing multiple capacity logs to be created. In such a case, it can be helpful to merge the two logs. This is only possible if the logs don’t contain contradicting entries. The time intervals of the two logs must only overlap for one day. (The day at which the battery identification policy of macOS changed.) Perform the following steps for a merge operation:
- Make sure the window Capacity Log is open and is showing readings, not the graphs.
- In the column Battery, click onto the line with the name of one of the battery units whose log should be merged with another one. The merged log will keep the name of the first battery selected.
- Right-click the entry and select the item Merge Log… in the context menu.
- If there is only one possible candidate to be merged, Battery Monitor will immediately ask you whether you like to continue. Answer Yes to combine the two logs. If there are multiple candidates, use the pop-up button in the dialog sheet to select the other battery for the merge operation and click OK.
Restoring the Capacity Log
If you have moved to a new user account on the same computer, or if parts of your private home folder have been lost for some reason, Battery Monitor won’t find the capacity log any more. In this case, you can restore the recorded data from your previous account, or from a backup copy, respectively.
macOS stores the data of Battery Monitor in the folder Library within your private home folder. Note that this folder is invisible by default when using the Finder, and this might also apply for backup copies of that folder. To navigate into your personal Library folder with the Finder, use the following steps:
- Hold down the ⌥ (option) key.
- In the Finder, open the menu Go and select the menu item Library. You can release the option key now.
You can also make the Library folder permanently visible. For your own copy, this is possible as follows:
- In the Finder, select the menu item Go > Home or press ⇧ + ⌘ + H.
- Open the menu item View > Show View Options or press ⌘ + J.
- In the option panel, set a check mark at Show Library folder.
Making other copies of Library folders visible is beyond the scope of this manual. To transfer the capacity log file, perform the following steps:
- Ensure Battery Monitor is currently not running.
- Search for the file ~/Library/Containers/com.bresink.app.batterymonitor/Data/Library/Application Support/Battery Monitor/BatteryCapacityLog.plist in the previous copy of your private home folder. In the Finder, this file is visualized at the location Library > Containers > Battery Monitor > Data > Library > Application Support > Battery Monitor > BatteryCapacityLog.plist in the backup of your home folder.
- Copy this file to the very same location in your current home folder. If the file already exists, replace it.
- Launch Battery Monitor. It will continue operation with your previous logs.