The Pane Login
The pane Login controls system preference settings for the login screen that shows the entry fields for name and password before an actual user session can begin. macOS will only use a login if you haven’t configured it to perform an automatic login with a predefined user account. You can enable the login by using the sequence Users & Groups > Automatically log in as… > Off in System Settings.
macOS also uses automatic login if you have enabled the FileVault feature to encrypt the system disk. In this case, the firmware uses its own built-in login screen, asking for the password, which is then used to decrypt and start the operating system. The password is hereby passed from the firmware to the system, avoiding that it has to be entered twice. You cannot disable automatic login in this case, so the login screen won’t be used. The alternative login screen is not part of macOS and cannot be customized via TinkerTool System.
Options you modify on the Login pane of TinkerTool System will take effect immediately. To return the login screen settings to the factory settings defined by Apple, click the button Reset all to defaults at the lower right corner of the window. Note that clicking this button will affect the options on all tab items offered by the Login pane, not only the options visible in the front item. The only exception are the “hide” settings for local user accounts, because resetting them requires a special type of login. More details can be found in the following sections.
Settings
The first tab controls the basic style and advanced features of the login screen. You can switch between using
- Name and password text fields and
- List of users able to use this computer.
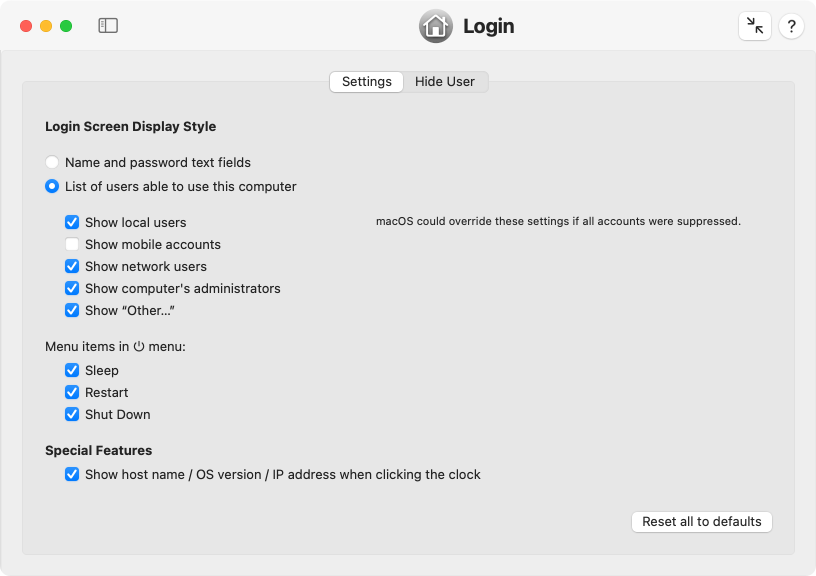
If the latter option is selected, you will be able to further influence which users should be included in the list:
- Show local users: the “normal” user accounts configured on the current computer.
- Show mobile accounts: these are special users, managed by a directory service, which are using both a home folder on a central file server, and an automatically synchronized home folder on a mobile notebook computer.
- Show network users: the user accounts known in your network. Your computer must be configured to use a network directory service with a search path for user accounts in order to use this feature.
- Show computer’s administrators: the user accounts configured on the current computer which have administrative permission.
- Show “Other…”: a special button with the label “Other” which can be used to manually switch to name and password text fields.
Depending on the list of user accounts found on the local system and in network directory services, the login screen may choose to ignore one or all of the above settings. This is necessary to guarantee that at least one user can successfully log in. Otherwise, it could happen that the list is empty and the login screen would become unusable.
However, you should not rely on this safety feature. Depending on operating system version and the user accounts available on your computer, disabling too many user categories could cause the system to no longer offer “useful” logins. In case of emergency, you can use the utility TinkerTool System for Recovery Mode to reset the login screen to factory defaults.
Power control settings in macOS Ventura
If you are using macOS Sonoma or later, please skip to the next section.
Additional options allow the control which buttons should be displayed at the bottom of the window:
- Show Sleep button: the button used to manually switch to sleep mode,
- Show Restart button: the button used to restart the operating system,
- Show Shut Down button: the button used to switch the computer off.
While the user is logged in, the items for restart and shut down are available via the Apple menu as well. You can also switch the corresponding menu items on or off, using the check marks at Menu items in Apple menu. All settings are independent of each other.
Power control settings in macOS Sonoma
If you are using macOS Ventura, please see the previous section.
Additional options allow the control which menu item should be shown in the power menu in the upper right corner of the login screen:
- Sleep: the menu item used to manually switch to sleep mode,
- Restart: the menu item used to restart the operating system,
- Shut Down: the menu item used to switch the computer off.
Special Features
By default, the login screen only displays the current time and the selected keyboard layout (for mobile systems also the battery status) in addition to the entry fields. For diagnostic purposes, especially in large networks, more information about the computer can be shown if necessary. The login screen can display the computer’s TCP/IP host name, the OS version number, and the computer’s primary IP address. The items will be shown in this order after you click onto the clock in the upper right corner of the login screen. To enable this feature, set a check mark at Show host name/OS version/IP address when clicking the clock.
Hide User
macOS supports a feature to hide selected user accounts in case you had activated the display style List of users for the login screen. This can make sense to keep the list clean, offering “real” users in the list only, not some special accounts which might have been created for administrators, technicians, or other service tasks. Such role accounts can still log in via the Other button in the list.
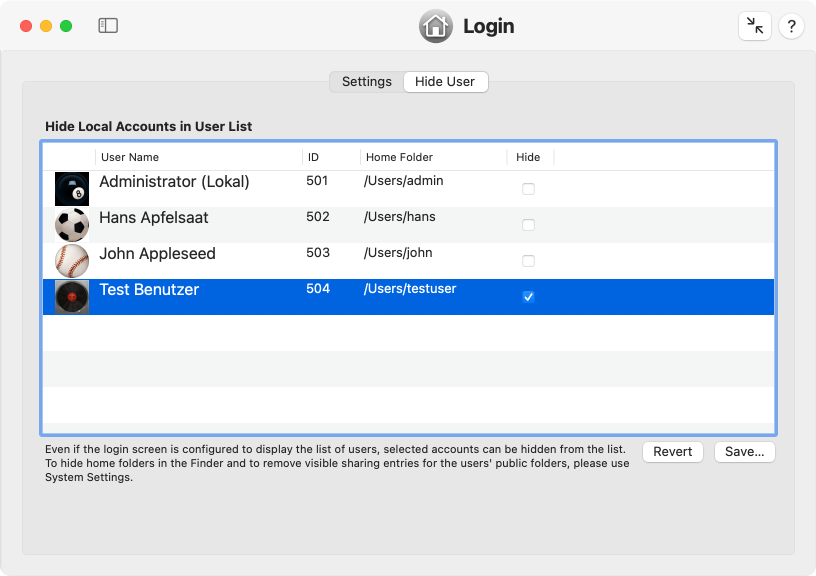
TinkerTool System shows all local user accounts which belong to standard users that have permission to log in, on the tab item Hide User. The accounts are sorted by their numerical identification codes which usually match the order in which they have been created. To hide a user, set a check mark in the column Hide and click the button Save… to store your settings.
After clicking the save button, TinkerTool System will ask for name and password to authenticate with the Open Directory account database on the local computer. Although you can use the same names and passwords of administrative users as in standard login situations, this type of login is technically different.
In this particular case, it is actually TinkerTool System, not macOS, asking for the password. The credentials are then verified by the Open Directory subsystem which will grant or deny permission, depending on the results.
To undo changes which have not been saved yet, click the button Revert. TinkerTool System only offers local user accounts in the list, not network users which might be stored on other directory services.
The hidden user accounts may still be visible indirectly, e.g. by their private home folders at /Users and by their individual entries for file sharing. To hide these items as well, experienced administrators can additionally do the following:
- Move the affected home folder of the hidden user to an invisible Unix folder, for example inside /var. Then open System Settings > Users & Groups, right-click the affected account, and select Advanced options in the context menu. Set Home directory to the new location of the user’s private folder.
- Open System Settings > General > Sharing > File Sharing > i and remove all entries in the list Shared Folders which should no longer be active.