The Pane Diagnostics
Evaluate RAM Size
Introduction to virtual memory
The amount of main memory (RAM, Random Access Memory) installed in a computer can be very important for the system’s achieved computing performance. If not enough memory is available, the speed of the computer will significantly decrease. If too much memory is installed, however, capacity that is not really needed will be unused. Unnecessary costs will be the result.
The optimal amount of RAM will depend on how you use your computer, and, in particular,
- which applications you are using,
- which data is processed by the applications, and
- the degree to which programs are being used simultaneously, causing them to be held in memory at the same time.
macOS keeps detailed internal statistics about the amount of memory used by each running program. TinkerTool System can evaluate these statistics to assess whether the total amount of RAM installed in your computer is appropriate for your typical work. This evaluation will allow you to assess whether additional memory will actually enhance performance.
Background Knowledge
As is the case with all modern operating systems, macOS does not allow any running program to access main memory directly. This access is granted only to the inner core (kernel) of the operating system. For each running program (or process), the hardware simulates a separate memory space. Each process runs in its own, completely separate space, which appears to be exclusively owned by it. For any given process, the only memory it can “see” is its own; other processes’ spaces are completely invisible. That process is incapable of spying on the data space of other processes, and it cannot intentionally or unintentionally write data in their spaces. This is one of the most important methods of ensuring that an operating system is stable and safe. Programs are strictly shielded against each other. Even “rogue” applications cannot crash other processes or the operating system.
This method is called virtual memory. Virtual memory is essentially managed by a hardware component inside the processor, called Memory Management Unit or MMU. For each access to (virtual) memory, the MMU decides which memory should be actually accessed internally: Virtual memory is either being mapped to real main memory, or to special files on the system disk, known as swap space. Mapping virtual memory to real memory is done in blocks, organizational units that are called pages. With macOS, each page always has a size of 4 KiB.
The system tries to map virtual memory to real main memory as long as real main memory is available. However, if too many processes are running simultaneously, or too much data is being processed, the amount of main memory available will no longer suffice to host all pages of needed virtual memory. In this case, a page from main memory will be transferred to disk to make room. To do this, the system constantly evaluates how discrete processes are using their memory and selects a memory page in RAM which is deemed least likely to be required by its process in the immediate future. Transferring that page’s contents to disk frees up the page for use by another process. This transfer is called a “page out” or “swap out.” Later on, if that page, now on disk and not in RAM, is accessed by its associated process, it has to be swapped back into main memory. The system will now select another page to be swapped out, and the two pages trade places.
Because accessing main memory is much faster than accessing hard drives, access to swapped out memory can be 10,000 to 100,000 times slower than accessing memory in RAM. For this reason, the perceived speed of a computer can decrease drastically if too many swap events take place, i.e. there is not enough main memory to hold as many of the used memory pages in the quickly accessible area as necessary. (With up-to-date computers that use flash-based storage instead of magnetic disks, the speed difference has decreased, but it is still very significant.) Theoretically, the best usage of memory has been attained when main memory is being used completely (almost no memory is free), and no swap space is in use. In this case, all data will be in the fast RAM and no part of that RAM is left unused.
In addition to swapping out memory pages to the system’s disk drive, the latest versions of macOS are capable of using another location to hold pages which no longer fit into available RAM. Because a hard drive is so significantly slower than RAM, the operating system can decide to sacrifice a small part of the RAM, which would otherwise be available for applications, and use this part to store swapped-out pages after compressing their contents. This is called compressed memory. Instead of swapping a memory page to disk, the system compresses the page and writes it to a specific RAM area reserved for fast retrieval. This process, of the system’s reducing the amount of memory available to applications for its own memory compression area is a critical step of course. The system has to consider very carefully whether the gain of compressing/decompressing data in RAM instead of reading/writing to swap space outweighs the effect of losing that RAM for applications’ use.
Evaluating the available memory size
As mentioned above, assessing the optimal use of memory is only possible when relating it to the typical usage of memory during the daily work with your computer. Whether you have enough memory will depend on what applications you are using and how you are using them. For this reason, a meaningful evaluation of memory size will be possible only if the operating system had the chance to monitor typical usage of memory within a certain time interval. Perform the following steps to let TinkerTool System evaluate the memory usage statistics:
- Open the sub-item RAM Size in the pane Diagnostics.
- Click the button Refresh Values.
The current statistical readings will now appear in the upper box, the evaluation in the lower box Results. An evaluation is possible only after the system has been switched on for at least 2 hours.
The time period in which macOS has collected statistical data is shown in the last line of the upper box. You have to decide whether the computer has been used under a “typical” workload during this period. If the usage has been more untypical, e.g. because you have had more applications open simultaneously than normal, or because you have worked on an unusually large document (or data set) which has consumed an extraordinary amount of memory, the results will not be meaningful.
If you decide that the usage of the computer has not been typical enough to allow for a meaningful assessment, perform the following steps:
- Restart macOS.
- Use your computer for at least two hours with the typical workload this computer has been purchased for.
- Launch TinkerTool System again, and once more navigate to the feature Evaluate RAM size.
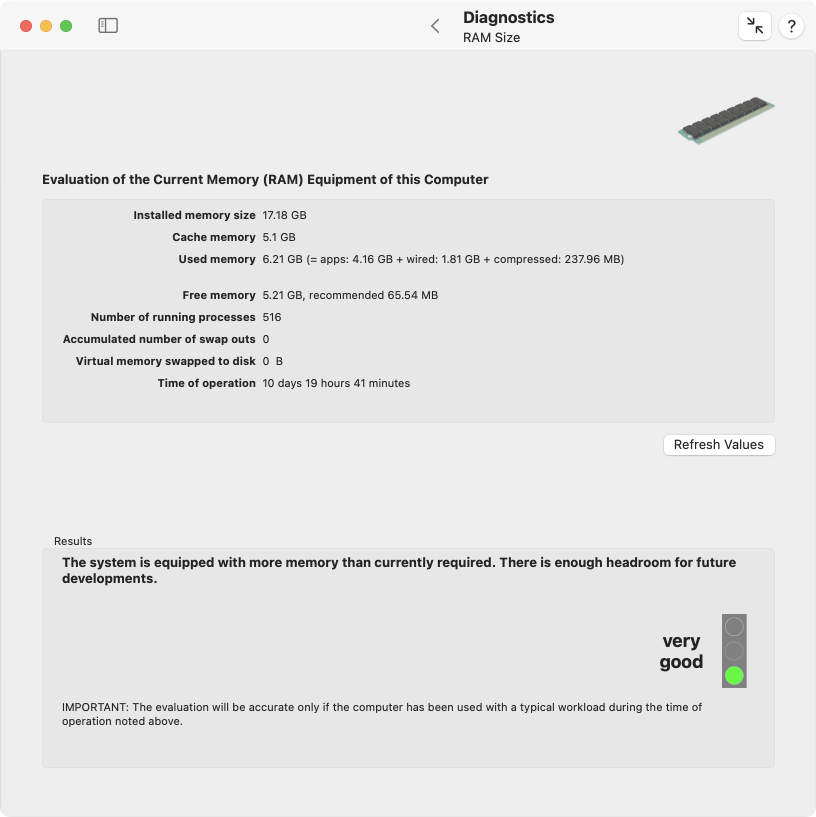
The upper box lists selected data from the memory statistics maintained by macOS:
- Installed memory size: The amount of actually available main memory which can be used by macOS and running processes. This value is usually identical to the total size of RAM modules installed in your computer. In some cases, however, the reading shown here could be lower due to limitations of the hardware. The computer’s chip set, or the “shared memory” feature of graphics chips, can reduce the usable amount of memory on specific computer models.
- Cache memory: Memory used by macOS to speed up the computer’s operation when accessing files or when restarting recently used applications.
- Used memory: The size of main memory which is currently used by running processes and the system kernel. It is further subdivided into three different parts, also listed in the following order: pages used by running processes (application memory), pages which are not permitted to be swapped (wired-down memory, sometimes also called reserved memory), and pages for memory compression (compressed swap space in RAM).
- Free memory: The size of main memory which is currently not mapped to virtual memory. This RAM is left unexploited and is not in use. TinkerTool System also shows the recommended free memory size. The system runs best if nearly all RAM is in use, and a very small free part for current handling is left. This recommendation is computed by macOS. The shown reading is the value on which the system bases its memory usage policies.
- Number of running processes: The number of processes currently running. Each process is using virtual memory.
- Accumulated number of swap outs: The total number of swap-out operations that have occurred during the time of operation of macOS.
- Virtual memory swapped to disk: The size of the swap space currently used by running processes.
- Time of operation: The time since the last start of macOS. The listed data has been collected during that period.
The box Results shows the current evaluation based on the statistics shown in the upper box. The assessment contains a textual explanation and a short overall result like “good” which is additionally represented by the image of a traffic light. The program differentiates between the following results:
- very good: The system is equipped with enough main memory and currently has even more memory than is actually needed. With this configuration, the system will have enough reserve performance for future developments.
- good: The amount of main memory matches the amount actually needed rather well. A good balance between price and performance has been reached. From an economical point-of-view, this is the best solution.
- fair: The system could run slightly better with a bit more memory. The available amount of memory is not in such a short supply, however, that the situation is critical. Expanding memory will increase performance for some degree, but the effect will not be great.
- bad: The system does not have enough memory for its typical usage and is significantly slowed down for this reason. If technically possible, you should increase its RAM size. Expanding memory will result in a perceivable performance gain. If the maximum amount of memory has been reached already, you should migrate to a larger computer or reduce your workload.
Test Finder Copy
The macOS Finder is known to be affected by specific bugs, depending on which version you are using. The issues affecting Finder file copy operations between disk volumes are especially problematic. You cannot assume that a copied file will always be identical to the original. Under certain circumstances, data loss can occur. This is especially true when you consider that the Finder also plays a role in the operation of Time Machine, the backup solution of macOS.
TinkerTool System can verify if the Finder is capable of performing the following operations correctly:
- Copying files with emulated Extended Attributes (so-called AppleDouble files)
- Copying symbolic links that have native Extended Attributes
These operations are known to be unreliable when specific versions of the Finder and specific file system types are used as the source and destination of the copy operation.
File system type means the format of a disk or disk partition, or the transfer protocol used when accessing a file server in the network, respectively. The Finder behaves differently when copying between two HFS hard drives, for example, or between an HFS disk and a memory stick formatted using the Windows FAT standard.
You can let TinkerTool System check two given disks against your version of the Finder. TinkerTool System can control the Finder remotely to test whether the operation runs as expected or not. To perform the check, you only have to specify two folders between which test files should be copied.
- Both folders must lie on different disks to ensure that a real physical copy operation takes place and not only a simple move operation on the data.
- You must have read and write permission for both folders to make sure the Finder running for your account has the right to perform the copy operation.
To run the tests, TinkerTool System needs less than 200 kB on both disks. All files written during the check will be erased automatically after the tests have been completed.
When working with file system types, only the file system families, not specific sub-types, affect the behavior of the Finder. Messages shown by TinkerTool System during this check refer to the family only. For example, the file systems “HFS” and “HFS+ journaled, case-sensitive, encrypted” are both represented by the family “HFS.”
TinkerTool System needs approval for Finder automation before you can use this feature. For more information, please see the last section in chapter Basic Operations.
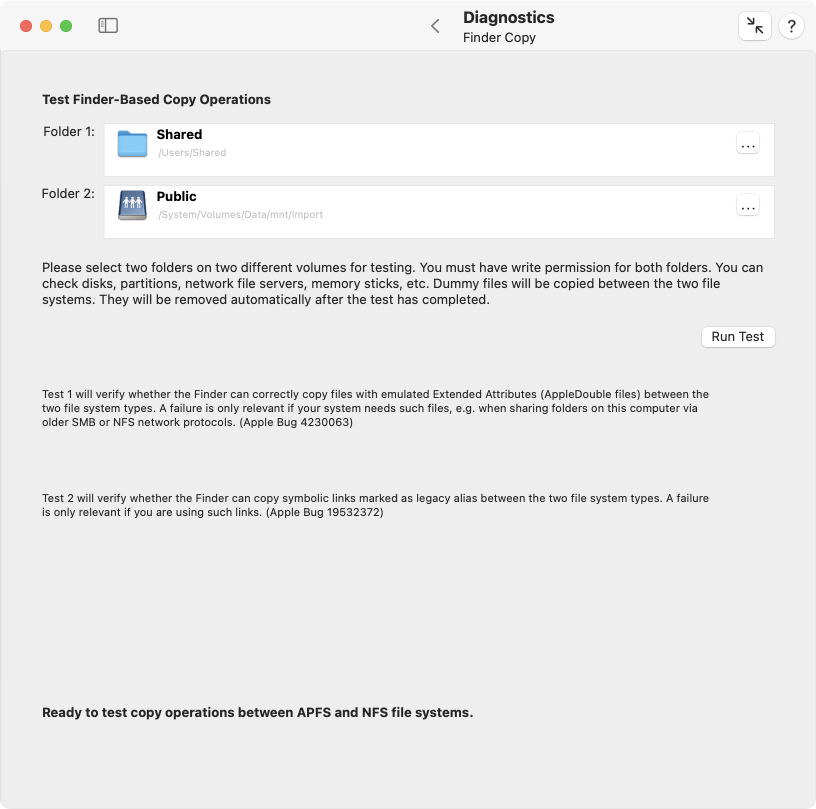
Perform the following steps to test the Finder:
- Open the sub-item Finder Copy on the pane Diagnostics.
- Drag a folder on the first disk to be checked from the Finder into the field Folder 1. You can also click the button […] to navigate to the folder, or click on the white area to enter the UNIX path of the folder.
- In the same fashion, specify a different folder lying on the second disk to be tested in the field Folder 2.
- Now click the button Run Test. After a few seconds, the outcome of the test will appear in the lower section of the pane.
The button can only be clicked if the previously specified conditions are met for the two folders. The pane will show you in advance whether the test can be performed, or if a problem exists with the selection of folders.
TinkerTool System automatically tests the copy operations in both directions, i.e. copying from folder 1 to 2, and from 2 to 1. The order of the two folders does not matter. Because TinkerTool System is controlling the Finder remotely, you might hear the sound effects the Finder uses for copy operations during the test.
A successful test will be marked by a check mark with green background. A test that has failed is marked by a cross marked red.
A failure of test 1 indicates that the Finder is not capable of copying Extended Attributes for files and folders if they are not stored natively, i.e. not on a disk using the formats “Mac OS Extended” (HFS), “Apple File System” (APFS), or on an AppleShare file server (AFPFS). This failure may not be relevant to you. Emulated Extended Attributes are mainly used when you operate the system as a file server, sharing files with older SMB or NFS network protocols. If you don’t use your computer that way, it’s likely that your installation of macOS has never created files with such attributes.
A failure of test 2 indicates that the Finder cannot copy symbolic links which have Extended Attributes attached. This failure may also not be relevant to you, but such situations are more likely than the ones of test 1. For example, you may see such objects as part of applications which have older software library frameworks embedded. These frameworks could store symbolic links which are additionally marked as legacy alias via an Extended Finder Attribute. In practice, you will notice such a problem in situations where the Finder unexpectedly cancels a running copy operation with the message that an object could not be found (error –36) although the object is there.
Please note that TinkerTool System is only testing whether the Finder is working as expected. The application cannot repair any defects it might have detected in the Finder.
Inspecting Optical Disks
If your computer contains one or more optical disk drives with write capabilities, you can use TinkerTool System to retrieve detailed information about inserted disk media, such as CDs, DVDs, or Blu-Ray Discs. This feature can help determine the actual manufacturer of a storage medium, or retrieve information about the recording format of a disk. Depending on the type of medium and its storage format, the amount of data you can retrieve will be very different. With appropriate media, TinkerTool System may include the following detail information in the results:
- identification name of the drive
- firmware revision of the drive
- type of the inserted medium
- media behavior, i.e. compliance with a recording standard
- number of recorded disk sessions
- manufacturer of the disk
- number of recording layers
- diameter of the disk
- supported rotational speeds for this combination of media and drive
- storage capacity of the medium
Whether specific items can be retrieved or not depends not only on the type of storage media, but whether data has already been recorded on the disk.

To inspect optical disk media, perform the following steps:
- Open the sub-item Optical Disks on the pane Diagnostics.
- If multiple optical drives are connected with your computer, select the desired drive with the pop-up button Disk Drive.
- Ensure that the media to be inspected has been inserted into the selected optical disk drive. You can use the button with the eject symbol to eject a disk, or, in case of a drive with a disk tray, use it to open and close the tray. Wait until drive and macOS have recognized the inserted disk.
- Click the button Inspect Disk.
The analysis will be shown in the Results box after a few seconds.
Note the difference between the items Media Type and Media Behavior: If you have recorded digital video on a disk of type DVD+R and have correctly finalized this recording session, the physical type of medium will be DVD+R, but the disk will ultimately behave like a DVD-ROM.
If you are not using the typical Apple “Superdrives”, the application will only support optical drives that can both read and write disks.
SSDs
Before discussing solid state drives (SSD), also called “flash storage” by Apple for previous generations of Macintosh systems, we should first review how conventional magnetic hard disk drives handle file deletion. On hard disks, file deletion is a simple, quick operation. The operating system erases the file’s entry from its folder and informs the file system that the disk blocks used by the file are now free and available for reuse. The old data remains in the blocks until the disk drive overwrites them with data from a new file.
For technical reasons, the deletion procedure is not so straightforward for SSD storage. Although, from the point-of-view of the operating system, an SSD data block is exactly the same as a hard drive block, they cannot be simply overwritten with new data. It is first necessary to explicitly clear them completely, a time consuming operation, before writing new data. The controller of the SSD has to erase each bit of a data block at the physical level, internally resetting all flash memory cells that make up each block. A write operation on a flash storage device will thus be significantly slower if the drive does not have a reserve of empty storage blocks that can be used for the incoming data. The operating system may have to wait for the SSD to prepare an empty block that can be used for a pending write operation. “Empty” in this case means either that this is a brand new, never used storage block, or is a previously used block which has already been cleared.
If large amounts of data have been written to an SSD in the past, the likelihood that either unused or cleared blocks are still available will be lower. The speed of write operations decreases as more data is written. To resolve this problem, the drive must try to clear unused blocks as early as possible. This way, the chance to have empty blocks in reserve, available immediately for incoming write operations, is much higher. But how should the drive “learn” which blocks are no longer in use? On magnetic disks, the drive did not need to “know” that.
To indicate to a storage device that a particular block is considered free by the operating system, so that this block can be prepared for later reuse, the Trim command was introduced. Trim commands are part of the ATA8-ACS2 industry standard which specifies how computers should communicate with modern disk drives. So in addition to just updating its own file system information that show which blocks are free, the operating system can now inform the disk drive, too, which blocks are no longer in use. When an SSD receives a Trim command for a specific storage block, it will place that block on its to-do list for cleaning. When the drive has time for cleanup operations, it will then clear the corresponding flash cells in the affected blocks. The likelihood that incoming write commands will find immediately usable free blocks increases, so write operations should be executed as fast as possible.
In a default configuration, macOS won’t send Trim commands to all SSDs, but only to flash storage drives provided by Apple, because in this case the operating system is safe to assume that the Trim commands are implemented correctly by the drive, so the commands won’t lead to data loss or data corruption.
Very old SSDs (from a time before Trim was standardized) can have internal design flaws, and as a result may not handle Trim commands correctly. This is dangerous, because it can actually lead to situations where the drive clears the wrong block. This could result in 512 bytes of zeros overwriting the actual data within a file. To avoid this danger of data loss or corruption, macOS, by default, only sends Trim commands to Apple flash drives, because it knows that the commands will be implemented correctly.
However, Apple lets you decide whether to use Trim commands with all third-party solid state drives (SSD) attached to your system via a SATA bus and a bus interface based on the AHCI standard (Intel Advanced Host Controller Interface). Changing the mode of operation can be done with Apple’s program trimforce which must be executed on the UNIX command line. System Integrity Protection ensures that only Apple software can be used to either enable or disable this setting. We won’t describe the usage of trimforce here. For more information, please see Apple’s documentation.
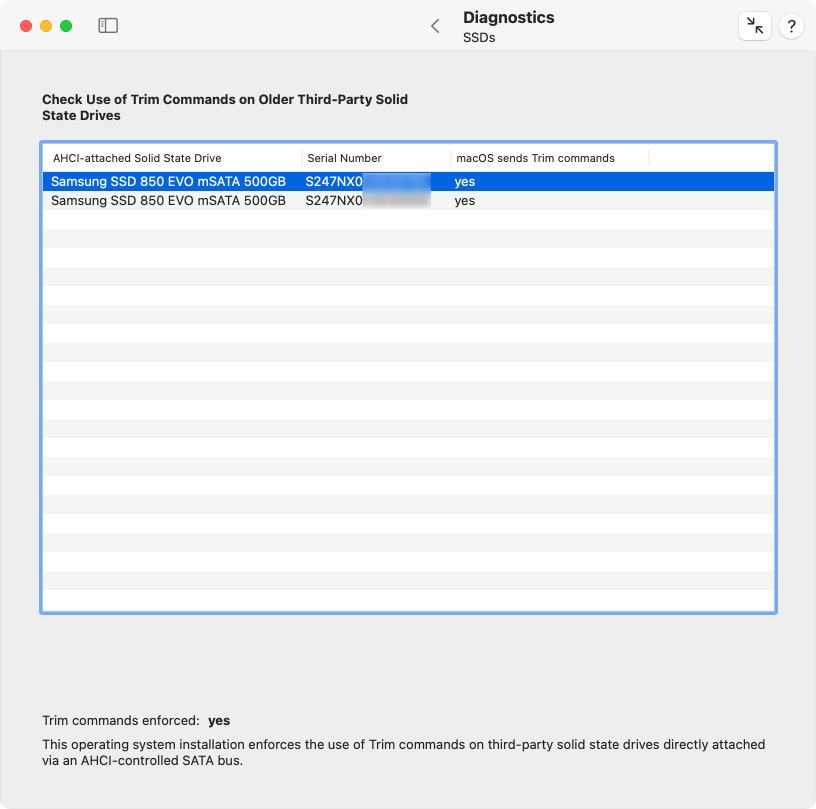
TinkerTool System can check the actual mode of operation currently chosen by macOS to communicate with solid state drives. Open the sub-item SSDs on the pane Diagnostics to do that.
SSDs with SATA interfaces and AHCI protocol are outdated technology. Modern Macs use SSDs with the NVMe protocol or “raw” flash memory chips that are directly connected to the processor. Here, the former Trim lock for old SSDs does not matter any longer. TinkerTool System won’t show such modern flash devices in the table.
The table on this sub-item shows you all relevant SSDs currently attached to your Mac, and also lists whether Trim commands are sent by macOS. You may like to verify the status of all SSDs before and after reconfiguring the operating system with trimforce (after the computer is restarted). The status line below the table indicates whether the trimforce setting is currently enabled in the operating system or not.
Flash Health
SSDs, or more exactly, the flash memory chips that comprise such storage media, are subject to wear and tear, just as magnetic hard drives. Although there are no mechanical parts that could wear out, each flash memory cell can only withstand a limited number of erase or write operations due to its design. When a certain amount of reprogramming operations is exceeded, the memory cell can no longer switch between its 0 and 1 states reliably. The affected bit “gets stuck” and the entire storage block in which this bit is located must be blocked, because it is no longer working correctly. The controller of the flash storage is prepared for such cases and ensures internally that all blocks wear out as evenly as possible. In addition, the storage space is overprovisioned, i.e. there is more hidden space available than is reported to the outside world. The “superfluous” space is used on one hand to compensate for the slow speed of erase operations (see previous section), by always having enough pre-erased blocks available on reserve for pending write operations. On the other hand, it is used to replace worn-out storage blocks.
You can check the health of flash memory in your Mac by letting TinkerTool System read out internal SSD statistics. Among other items, you can retrieve the number of read/write operations that have been executed, how long the SSD was in operation, whether there is still enough spare storage available, and how much of the expected lifespan has already been consumed. It does not matter whether this is a real SSD drive, or whether the Mac uses pure flash memory chips (as is common with all modern Macs), where an Apple processor simulates the presence of an SSD drive. However, it is important that the device is an original component of Apple for the respective Macintosh model. The health of third-party SSDs is not automatically monitored by macOS, so it cannot be retrieved by the pane Flash Health in that case.
Accurate values are only guaranteed if communication with the flash unit is based on NVMe technology (Non-Volatile Memory Express). This is the case for all modern Macintosh systems, but for some older Macs which used AHCI communication, macOS will support a very small number of health readings only. TinkerTool System will display this accordingly.
It is not necessary that the flash storage is in use or contains a mounted volume to let it appear in the overview. SSD units which are part of an Apple Fusion Drive are also automatically included in the list.
To let TinkerTool System read out the data that has been collected about Apple flash storage, perform the following steps:
- Open the sub-item Flash Health on the pane Diagnostics.
- Click the Refresh button in the lower right hand corner.
All recognized flash drives provided by Apple will now be listed in the upper table. If there has been a problem while retrieving the data, or no original parts of Apple could be found, the table will stay empty and the message –no entries– will be shown. After clicking a line of the table, the readings for the selected drive are shown in the lower half of the window.
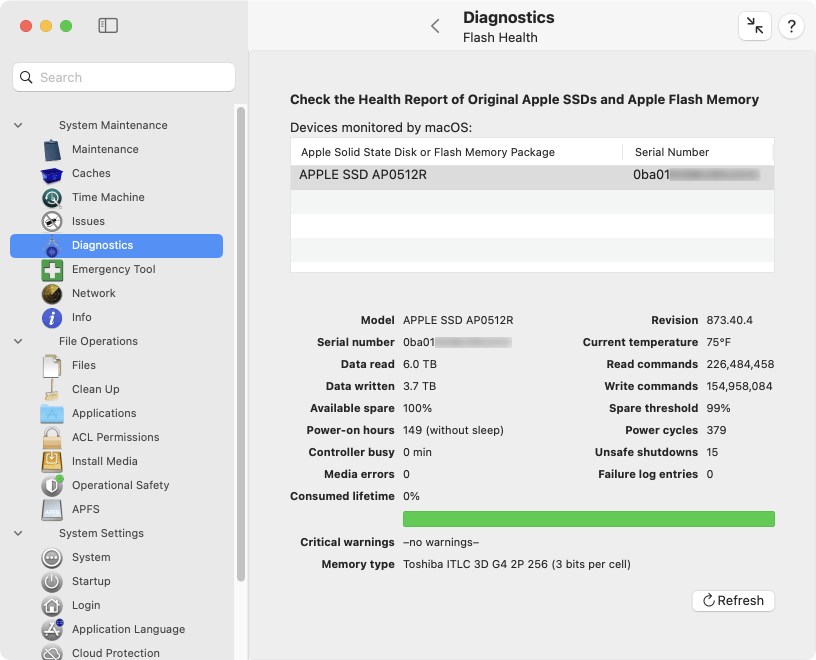
The meaning of the different items is as follows:
- Model: The official model designation Apple uses for this SSD (or simulated SSD, respectively).
- Revision: The model revision of the SSD, related to both hardware and firmware.
- Serial number: The serial number of the SSD. The numbers of real SSDs can usually be recognized by the use of capital letters. Simulated SSDs often have a fix random code containing the digits 0 to 9 and the small letters a to f only.
- Current temperature: The currently measured operation temperature of the flash memory. The unit is determined by your personal locale settings.
- Data read: The absolute amount of data which has been read from flash memory during the past lifetime of the SSD.
- Read commands: The number of read commands sent from the attached computer to the SSD during its past lifetime.
- Data written: The absolute amount of data which has been written to flash memory during the past lifetime of the SSD.
- Write commands: The number of write commands set from the attached computer to the SSD during its past lifetime.
- Available spare: The still available amount of spare memory that can be used to replace defective flash storage blocks. The absolute amount is usually a trade secret of the manufacturer. For this reason, the amount is presented as percentage value since manufacturing. The initial value is 100% and decreases with age.
- Spare threshold: The value set by the manufacturer at which the remaining spare is considered critical. When the percentage value for the spare falls below this value, the lifespan of the flash memory unit is about to end shortly. The SSD or the logicboard should then be replaced.
- Power-on hours: The duration in hours in which the SSD was switched on completely. Sleep mode of SSD or computer does not count as uptime.
- Power cycles: The number of on/off cycles during the past lifetime of the SSD.
- Controller busy: The number of minutes where the controller of the SSD was so under load that it could not execute pending commands immediately. This value can be used to assess how strong activity and workload on the SSD have been in the past.
- Unsafe shutdowns: The number of events where the SSD has lost power without having been previously informed by the attached computer to prepare for a shutdown. This happens, for example, in the event of an unexpected power failure. The controller of the SSD protects itself against such incidents by using its own miniature emergency power supply.
- Media errors: The number of errors in flash memory that could be detected via checksum operations, but could not be corrected. Incorrect data was stored or delivered.
- Failure log entries: The number of error situations the controller has observed and recorded internally during the lifetime of the SSD.
- Consumed lifetime: The percentage of estimated lifetime which has already been consumed by operating the flash storage. For a brand new device, the value is 0%. When the SSD has reached its expected endurance, considered normal by the manufacturer, the value will be 100%. If the unit lasts longer than expected, values between 100% and 255% can be shown. The adjacent bar symbolizes the estimated remaining lifespan. For brand new storage, the bar is completely green. With aging, the green bar becomes smaller and is replaced by gray. The estimation is made by the SSD controller, not by macOS or by TinkerTool System.
- Critical warnings: A list of warnings related to the health of flash memory which has been recorded by the controller in its permanent error log. Common warnings are:
- the amount of spare storage has fallen below the critical threshold
- the specified operating temperature has been exceeded
- a high number of media errors has been observed
- storage media has been set to read-only mode via a hardware setting
- the controller’s internal emergency power supply has failed at least once
- Memory type: This information is only available for specific models of the latest Mac model series. It refers to flash memory directly attached to an Apple Silicon processor. If possible, the manufacturer and marketing name of the flash memory will be shown. The basic flash technology used may also be indicated, specifically the number of bits which can be stored per cell. Flash memory of type TLC (Triple Level Cell) can hold 3 bits per cell, for example. A higher number of bits usually means more storage space at a lower price, but also less operational reliability.
Performing a Quick Test on Cooling Fans
Many Macs need to be cooled constantly, which is done by one or more blowers which pull fresh air into the computer and push out hot air. Most of these fans are continuously monitored and are controlled by an independent auxiliary computer built into your Mac. In older Macs, this is the System Management Controller (SMC), in later Macs an Apple T2 processor running Apple’s BridgeOS operating system, and in modern Macs with Apple Silicon, the M processor itself. Fans are mechanical components which are constantly in use when the computer is active, and as such they are subject to wear and tear. If you hear unusual noise from your Mac and you suspect that one of its fans is no longer working correctly, it is helpful to quickly test the fans without having to open the Mac.
TinkerTool System can do so by temporarily forcing a fan to accelerate to its specified maximum and showing you the current rotational speed values. By listening to the fan’s response, you can easily identify its location and determine whether it appears to be behaving normally.
As of December 2017, Apple has begun to protect the fan control hardware of some Macintosh model series from access by applications. In this case, TinkerTool System cannot determine the names and locations of the fans.
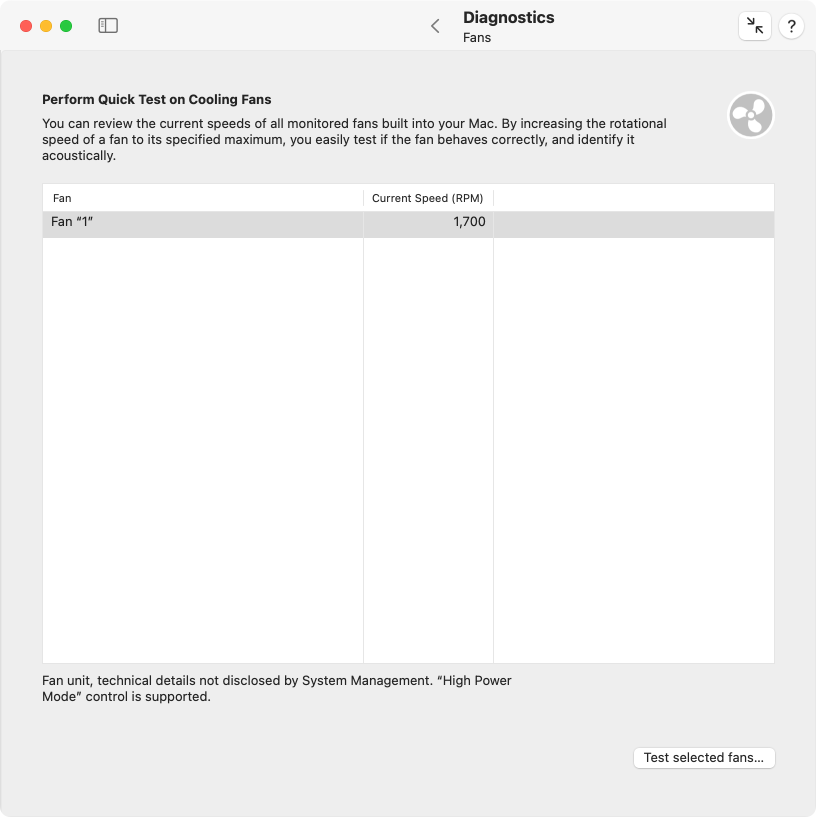
To run a test on one or more fans, perform the following steps:
- Open the sub-item Fans on the pane Diagnostics.
- Select one or more fans in the table that should be tested.
- Click the button Test selected fans….
- When you like to end the fan check, click the button Finish test.
The current speed values are shown in the table and are updated continuously. If you select a single line in the table, technical details about the fan and its approximate location within the Mac’s case are shown below the table.
If you are using a third-party application to manipulate the built-in standard fan control of the Mac, TinkerTool System will not interfere with that application and an error message is shown in the pane. To run fan tests you will need to deactivate the other application first, then restart TinkerTool System.
Additional considerations for modern Macs
For some computer models released as of November 2023 or later (M3 processors or higher), the fans and the fan control unit can be powered down completely if the system is not warm enough to require any cooling. Different from earlier hardware generations, applications like TinkerTool System cannot override this any longer. The fans remain switched off as if they didn’t exist. The application tries to detect this, signaling this special situation with an error message shown below the fan table. To test the fans in this particular setup, perform the following steps:
- Put computational load on the system so that the processor cores are enabled and generate heat.
- Wait until the Current Speed (RPM) indicators in the table switch from 0 to a higher value. This will indicate that the fan hardware was switched on.
- Quit TinkerTool System.
- Restart TinkerTool System. The fan control error message should no longer appear and you can test the fans as described previously.
If you don’t have an application that forces the Mac to execute a continuous workload, you can download our free utility SystemLoad:
Login Time Accounting
macOS is a Unix system, so it has its roots in classic time-sharing computing that was used as of the 1950s and onwards. Users connected to a large central computer via a terminal line, logged in with their accounts, ran some programs, and disconnected again. Use of the computer had to be paid per minute. The connection time statistics necessary for this type of accounting are still kept today. TinkerTool System allows you to get access to the data. You can retrieve either the total connect time per user or the total time the Mac was used per day.
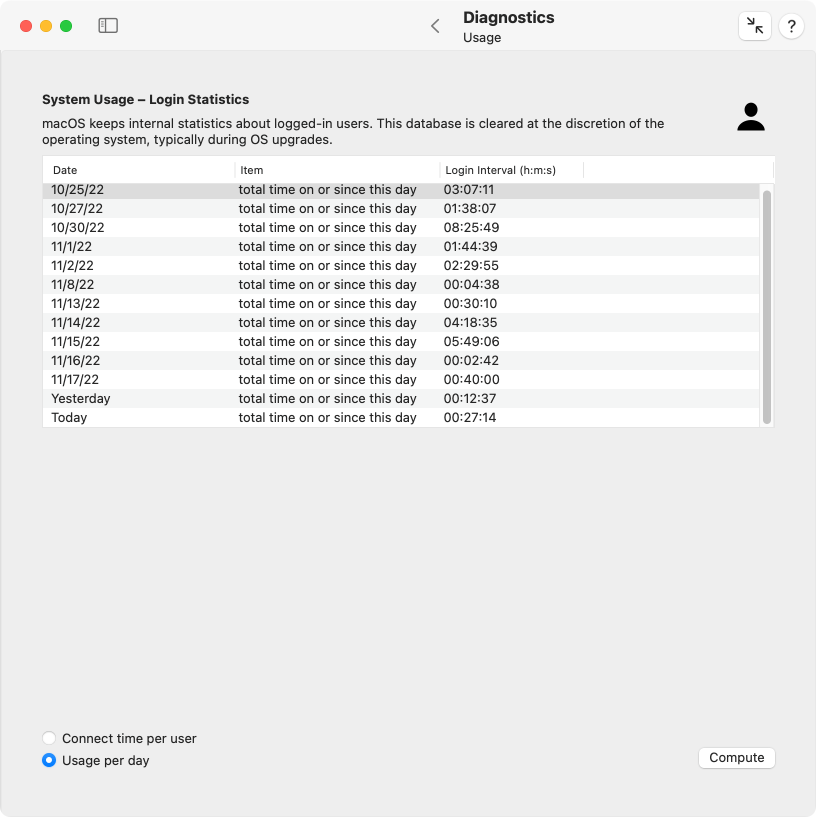
- Open the sub-item Usage on the pane Diagnostics.
- Select one of the report types listed in the lower left corner.
- Click the button Compute.
The results are shown in the table. Please consider the following:
- Login intervals are listed in the format hour/minute/seconds, separated by colons (:). If a time interval is longer than one day, the number of days will be shown additionally with the unit d.
- The connect time records are collected automatically by macOS. TinkerTool System has no effect on the accuracy of the data. The operating system may delete the internal statistics at its own discretion. This usually happens during operating system upgrades.
- Login time is the time interval between the event where a user logged in (either automatically via macOS or FileVault, or manually by entering her password) and this user logged out (either automatically during a shutdown of the computer, or manually).
- All logins are considered. This includes working at the Mac’s screen (which is called a console login in time-sharing terms), Fast User Switching, logins via a Terminal session, or remote logins via network. The use of file sharing, however, is usually not counted as login. This can depend on the file server.
- Time intervals are measured based on real wall-clock times. If a user is logged in while the computer is sleeping or in standby mode, the sleep time will still be counted as login time.
- Statistics per user are managed by the short user names which were valid at the times where these users had access to the computer. So old renamed accounts or deleted accounts may still be found in the list. The short user names are called account names in the Users & Groups pane of System Settings and are identical to the names of each user’s home folders.
- The statistics can contain records for users called root and _mbsetupuser which are accounts used internally by macOS during system updates.
- Although no privileged operation is necessary in order to use this feature, read permission for the login records is required, because this affects personal data of others. You must be logged in as administrative user to retrieve the data.
Testing Displays
Depending on their quality, display screens can have certain defects already from factory: Individual picture elements (pixels) may not work at all or not always reliably. Aging of the device can also lead to such image errors. Based on the display technology used, the individual colors of the pixels are generated either by making them radiate themselves or by shining white light onto a pixel from behind, letting the picture element filter out specific colors while letting others through. The final color impression of each pixel arises from the fact that a certain amount of red, green and blue light, either generated or filtered, is mixed with one another.
The technical components responsible for the red, green and blue light of a pixel are separated from each other. If there is a defect in a specific pixel, the mechanism responsible for creating or filtering out one of these three colors will have usually failed. A primary color of that pixel can either no longer be switched on (“dead pixel”), or no longer be switched off (“hanging pixel”).
You can use TinkerTool System to test an attached display screen, by switching all primary colors and their individual mixtures on and off for all pixels on the screen. By selecting red, green, or blue color areas, dead pixels will become visible as black dots. By selecting a mixed color, or by switching from white to a primary color, hanging pixels can be recognized as white or flickering dots. If all pixels are in order, the colors will be displayed correctly over the entire image area.
Some particular Macintosh models with a built-in display are notorious for having screens where the glass and foil lamination elements that make up the display are not perfectly sealed against the outside. This allows dust and moisture to penetrate, leading to streaks, especially at the corners of the picture. Such defects can easily be identified with a completely white test image. A fully black picture, on the other hand, can be useful to clean the glass of the screen without turning off the computer first. Dirt on the surface can be seen easily with this setup.
The following test images are provided by TinkerTool System:
- black picture
- pure white color
- pure red color
- pure green color
- pure blue color
- pure cyan color (“white without red”)
- pure magenta color (“white without green”)
- pure yellow color (“white without blue”)
- vertical bars with all the mentioned colors, similar to the test card of the European Broadcasting Union

When the solid screens are shown, it is additionally possible to overlay a pulsing black grid that moves back and forth. Pressing the key 1 creates a grid with a distance of 1 physical pixel, pressing 2 a grid with a distance of 2. This means you will see a very fine checkerboard pattern, whose fields constantly move back and forth. This way, faulty pixels are even easier to see. You can switch this additional function off again using the 0 key.
Epilepsy notice for photosensitive people: The application makes sure that the alternating effect does not exceed a frequency of 2 Hz. The flashing pattern caused by this is considered harmless.
The grid is not active when displaying color bars. Naturally, it is not visible on a black screen.
You can access the test cards as follows:
- Open the sub-item Display on the pane Diagnostics.
- Click the button Start Display Test.
- If more than one monitor is connected, you will be asked which one to test. Select the display screen you like to check and click OK.
- You can choose the individual test cards with the keyboard (see below). The test can be quit by pressing esc.
| Key | Function |
|---|---|
| esc or q | quit test |
| ↓ or → or ␣ | next test |
| ↑ or ← | previous test |
| k | black |
| w | white |
| r | red |
| g | green |
| b | blue |
| c | cyan |
| m | magenta |
| y | yellow |
| t | test card with color bars |
| 1 | add moving black grid of size 1 |
| 2 | add moving black grid of size 2 |
| 0 | disable the grid feature |