The Pane Time Machine
This chapter applies to the Time Machine pane. When using Time Machine in macOS 10 mode, which automatically activates the pane Time Machine X, please read the previous chapter instead.
TinkerTool System won’t switch the Time Machine mode of operation while it is running. When you swap the destination disk from APFS to HFS+ while TinkerTool System is open, the application will notice this the next time you will be preparing a maintenance operation and shows an error message in this case. You can simply quit and reopen the program to resolve this situation.
Maintenance After Replacing a Data Source of Time Machine
The incremental backup strategy mentioned in the introduction only works if Time Machine can be absolutely sure which files have changed between two consecutive backups and which haven’t. If Time Machine cannot confirm that a given file is identical to the one it saw during a previous run, that file will be freshly copied in the next run.
When the identity of your computer changes, for example if you purchased a new one, or if it had components replaced during a repair, Time Machine has to assume that all the files of your computer have changed. This is true even if you have “cloned” or manually copied the files from the old to the new computer. This means that during the next backup, Time Machine will copy all the files again. Only if you use Time Machine itself to perform a full restore operation of the previous data, will Time Machine “know” that it can safely reuse the previous incremental backup.
The same problem arises if you replace a volume of your Mac, but use something other than Time Machine to copy the data back. Replacing a volume can mean
- you replaced a disk drive physically,
- you erased or reformatted a partition,
- you cloned a volume by a third-party application, but the original and copied volumes were attached to the computer at the same time, so that the system had to change the identity of one volume to keep track of which is which.
Only if you copy a disk drive or partition physically (i.e., by a copying the raw data blocks, not file by file) and make sure that the operating system where Time Machine is active doesn’t mount both volumes simultaneously, will Time Machine seamlessly continue its incremental operation. In all other cases, Time Machine has to assume that all files on the entire affected volume have changed and therefore must be fully copied again.
TinkerTool System can help here, letting you manually confirm to Time Machine that a computer or a volume should still be considered the same, although its identity changed. This way, the new item will take over the role of the replaced item, and its history in Time Machine can be continued without requiring a full new backup.
Please note that it is a necessary requirement in all cases that the operating system with all its user accounts has stayed the same. For example, you cannot use these maintenance features if you have a new Mac (with a different installation of macOS) and like to take over data from the Time Machine backup of an old Mac. Even if system versions and names of all users are identical, transferring the Time Machine backup won’t be possible in this case, because the backup contains access rights for user accounts of a different system installation. This problem can be resolved by copying accounts and Time Machine data at the same time via Apple’s Migration Assistant.
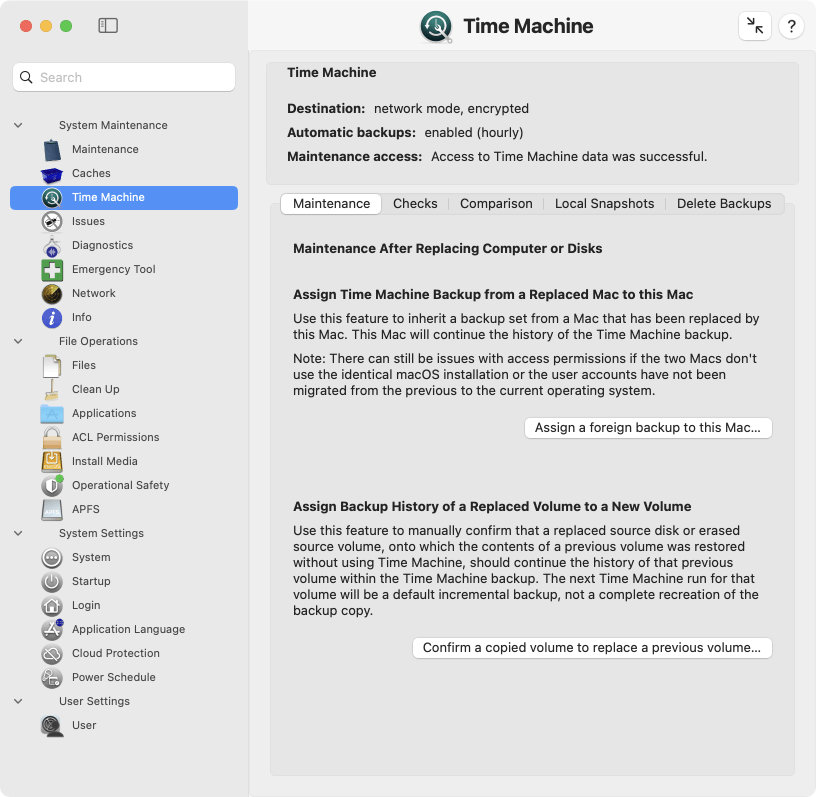
Inheriting a Time Machine Backup Set from a Replaced Computer
If you need to confirm that Time Machine can safely take over a backup set that was created by a different physical computer or by a different operating system installation on the same computer, you can reassign the backup set to your current system. You should only do this in the aforementioned scenario, where all files have indeed be copied to the new system installation by some other means (not under control of Time Machine). Perform the following steps to do this:
- Open the tab item Maintenance on the pane Time Machine.
- Click the button Assign a foreign backup to this Mac….
TinkerTool System will guide you through all steps of the procedure. You will need to locate the foreign backup set to complete the operation. In case of a local Time Machine disk, this will be the top folder of the backup set. It has the name of the previous computer and is located in the folder Backups.backupdb on the destination disk. When using APFS, the folder is the Time Machine volume itself.
Depending on how Time Machine was configured before inheriting the foreign backup set, you might need to re-enable Time Machine in the General > Time Machine section of System Settings and change the backup destination.
In case the local volumes of the current computer are different from the ones of the previous computer, inheriting the backup set alone won’t be sufficient. You will additionally need to reassign each volume, which is described in the next section.
Associating a Replaced Volume with a Volume in the Backup Set
As outlined in the introduction, there can also be cases where you need to confirm to Time Machine that it can safely take over the history of a volume in the backup, although the identity of the original source volume has changed. You can reassign a volume in the backup (for all snapshots recorded by Time Machine) to match a volume of your current setup. You should only do this in the previously mentioned scenario, i.e. where all files have indeed been copied from the previous volume to the new volume (not under control of Time Machine, so that Time Machine did not “notice” it). Perform the following steps to do this:
- Open the tab item Maintenance on the pane Time Machine.
- Click the button Confirm a copied volume to replace a previous volume….
Three items need to be specified:
- a snapshot in the current backup set that includes one of the backups of that volume,
- the name of that volume as it was recorded at the time of the selected snapshot,
- the name of the new volume in your current installation that should match the volume in the backup set.
TinkerTool System reassigns that volume for the entire time line recorded in that backup set, i.e. for all snapshots. It does not matter if the previous volume changed its name during the recorded time period. Time Machine identifies the volume correctly tracking its internal history data.
Do not abuse the two maintenance features to manipulate the backup in any other cases that have not been mentioned here. The backup set could become unusable.
Backup Verification
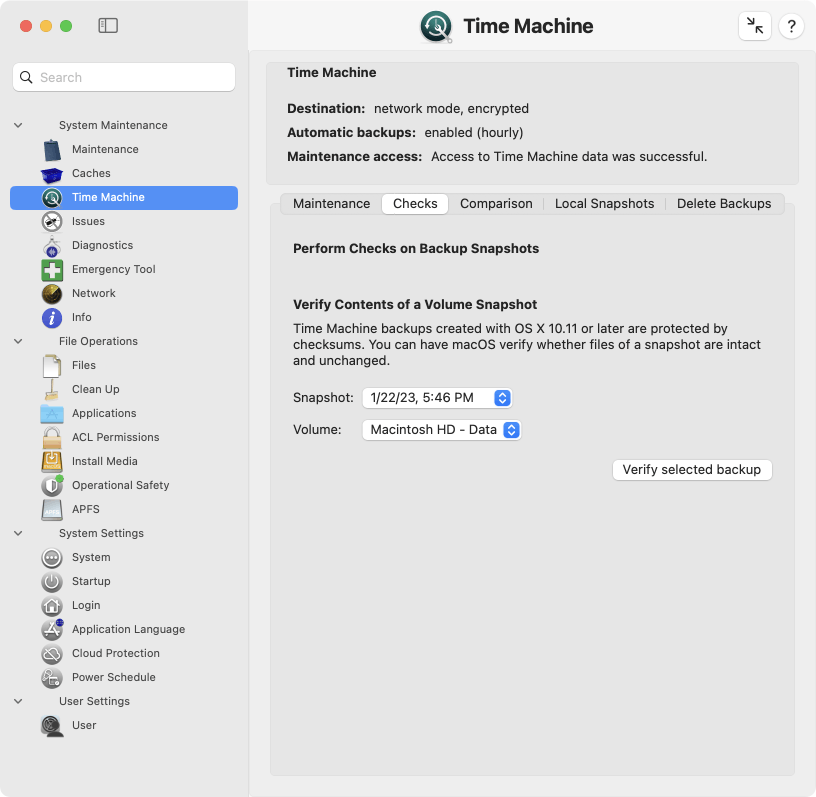
Verifying the Contents of a Volume Snapshot
To be absolutely sure that the backup copy of a volume for a specific point in time can be read without problems and is fully intact, you can force Time Machine to validate its internal checksums. As of version 10.11 of the operating system, Time Machine protects each file in the backup by computing and recording a checksum for the content of that file. To verify a backup run for a volume, perform the following steps:
- Open the tab item Checks on the pane Time Machine.
- Use the pop-up button Snapshot to select the time of the backup that should be checked.
- Use the pop-up button Volume to select the volume in the snapshot that should be verified.
- Click the button Verify selected backup.
The check will need a considerable amount of time. If problems are identified, TinkerTool System will show a table with all issues after the verification has been completed. The table will list the full paths of the files in the backup where a problem was detected. There can be two types of problems, indicated as follows:
- File modified: the file in the backup did not match its checksum. Either the file could not be read correctly or its contents changed unexpectedly.
- No check possible: the file could not be tested successfully because its checksum was not available. This indicator does not mean that you shouldn’t trust the copied file. It means that it is currently unknown whether the file is OK or not.
Possible reasons for cases where no check is possible could be:
- The snapshot was created with an operating system prior to version 10.11.
- The checksum is currently in use because another Time Machine operation (e.g. a new backup session) is currently running in the background. In this case you should repeat the test, perhaps after temporarily disabling automatic backups.
The list of possible reasons depends on the operating system version and may not be complete.
Comparing Time Machine backup snapshots
Time Machine does not usually need any maintenance as long as you don’t replace the source or destination disks. You just define which disk volumes should be included in the backup, what destination drive should be used, and switch Time Machine on. However, there can be certain instances where Time Machine may not run as expected – for example if there is a file system problem on one of the source volumes, or if there was a power failure during a Time Machine run. TinkerTool System can help you to detect possible problems with backups by controlling one of the diagnostic features of Time Machine with a few simple clicks.
You can select two different backup sets and compare all their files. This will show the “true,” incremental contents of a Time Machine backup, rather than the simulated view in the Finder or the Time Machine user interface, which always shows the entire effective backup set at a selected point in time. If some part of Time Machine is failing, this will mean that although specific files have been modified, they have not been included in the next incremental backup copy corresponding to the Time Machine snapshot taken immediately after the modification time. For typical Time Machine problems, the updates for an entire folder would be missing, which can be detected easily when comparing the two backups preceding and following the modification of files in that folder.
You can also use this feature to determine which files have changed on your computer at a particular point in time, or to assess how many files with what storage size are typically part of your backups every hour.
Alternatively, it is also possible to compare the current data on your computer (that is, all files which are selected to be handled by Time Machine) with a specific backup session. This feature is helpful to detect implementation errors in Time Machine. You can immediately see whether the data that should be copied has actually been copied. Note that this type of compare operation takes a significant amount of time, because all files on your computer have to be checked.
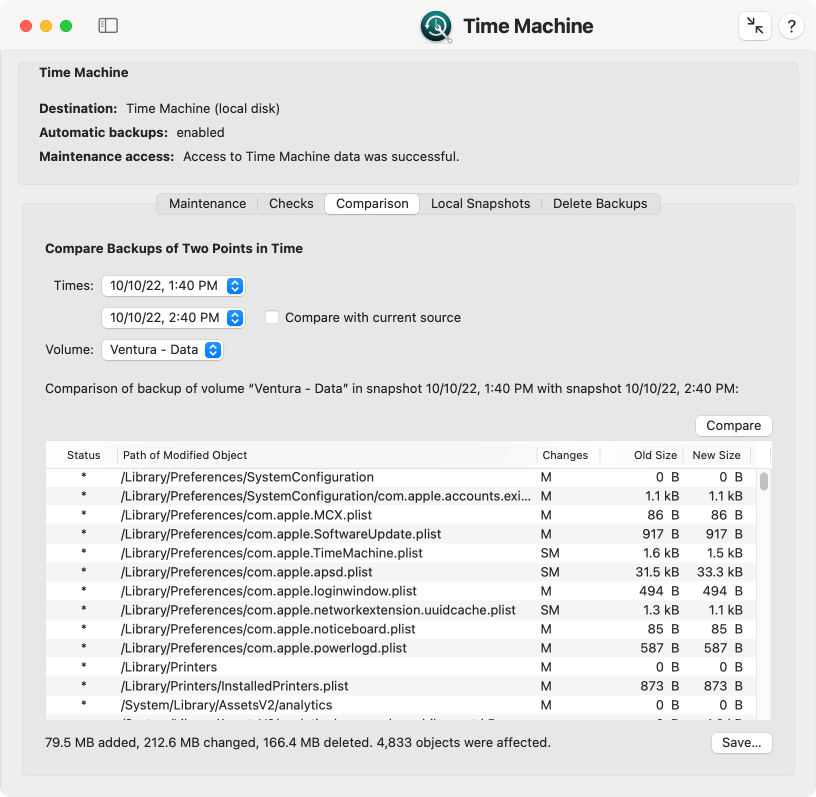
To start the comparison of two Time Machine backups, perform the following steps:
- Open the tab item Comparison on the pane Time Machine.
- At Times, select the two points in time for which the backup sets should be compared. The order of the times does not matter. To choose the “live” data on your computer for comparison, set a check mark at Compare with current source.
- If Time Machine is configured to create backup copies of multiple disk volumes, select the desired disk to compare, using the pop-up menu Volume. (This is not necessary or possible when comparing the current source data).
- Click the button Compare.
Depending on the size of your backup and the amount of data differing between the two selected backup sets, the compare operation may need a few seconds or several minutes to complete. The results will be shown in the table.
- The column Status uses a single marker to indicate the overall status of each difference that has been found. The markers have the following meaning:
- +: This object has been added.
- -: This object has been removed.
- *: This object has been modified.
- Path of Modified Object shows the UNIX path of the file or folder where a difference was detected. The path must be interpreted relative to the volume you had selected for comparison.
- Changes indicates the exact type of modification:
- A: The Access Control List has changed.
- C: The creation time has changed.
- D: The data stored in the object has changed.
- G: The group owner has changed.
- M: The modification time has changed.
- O: The owner has changed.
- P: The POSIX permissions have changed.
- S: The size has changed.
- T: The object type has changed.
- X: The Extended Attributes have changed.
- If the object is a file and the file has been modified, the column Old Size shows the storage size required by the file for the older of the two selected points in time.
- Similarly, the column New Size displays the storage size at the later of the two selected times.
If you move the mouse cursor over an entry in the column Changes, TinkerTool System will display a short textual explanation, so you don’t need to learn the abbreviations.
For reasons of efficiency, the entries in the table cannot be rearranged in different sort orders. TinkerTool System shows them in the same order as they are processed by Time Machine during backups. You can use the button Save… to create a processed report in text form which can then be saved to a file.
Working with Local Snapshots
If at least one of the volumes selected to be part of the backup uses the modern Apple File System (APFS), Time Machine will automatically enable additional features:
- Every time a backup session is started, Time Machine will create an APFS snapshot of each APFS volume that is about to be copied. An APFS snapshot is basically a frozen image of the source volume, created at the time the backup began. Even if files are changing while the backup session is running, the snapshot will ensure that Time Machine only “sees” a static picture of the volume. If the backup copy must be restored later, the result will reflect a consistent state of the volume, without any files that have been in an “in-between” condition only.
- Each APFS snapshot will be kept by the operating system on each volume as long as this volume has enough storage space. The snapshot is basically invisible during normal operation and only needs a small amount of additional storage space. It is based on the strategy to never reuse any block of the volume that had been occupied by a file for any new files, even when that file has been deleted or this part of the file has been changed.
- APFS snapshots are not only created when normal Time Machine backups are made, the operating system also creates them when major changes in the system are to be expected, e.g. when an operating system update is about to be installed.
- These snapshots can be used as “restore points” that allow you to very rapidly reset an entire APFS volume to a consistent state of the past. This is done via Time Machine (usually after starting the recovery system), selecting the APFS volume itself, not the actual Time Machine volume, as source for a restore operation. For more information, please see Apple’s official documentation on macOS.
This basically means that an APFS snapshot can be used as a local snapshot of Time Machine. Working with these snapshots doesn’t require access to the actual Time Machine backup volume.
Other parts of macOS can use the APFS snapshot feature as well. The list shown on the tab Local Snapshots considers APFS snapshots created by Time Machine only. If you like to work with the complete list of APFS snapshots, please see the chapter The Pane APFS.
It is under sole discretion of the operating system when to automatically create or to remove APFS snapshots. TinkerTool System gives you additional manual control about these local snapshots, however.

- You can create a local snapshot immediately, just by clicking a button. This is helpful to create a well-defined restore point, e.g. when you like to test a possibly “dangerous” action on an APFS volume that might need to be undone in the near future.
- You can review which local snapshots are currently available on each APFS volume.
- You can force macOS to clean up its local snapshots immediately, to bring forward the point in time when this would happen automatically. This is done by specifying a planned amount of storage space that should be reclaimed during the cleanup. macOS will keep as much snapshots as it can to meet this target.
- You can delete local snapshots of your choice.
To create a new local snapshot on all APFS volumes that are part of your Time Machine backup, perform the following steps:
- Open the tab item Local Snapshots on the pane Time Machine.
- Click the button Create local snapshot now.
Creating the local snapshot should typically require less than one minute.
You can review all snapshots using the table Available local snapshots on the same pane. The available points in time are listed as separate lines. By default, you will see a list for the entire computer. If more than one APFS volume is in use, it can also be interesting to see the list of snapshots on each volume. Note that the sets of available snapshots can be different on each volume because some volumes may have less free storage space, so they will automatically remove snapshots earlier than others. To select between different volumes, use the pop-up button above the table.
To reclaim storage space on a particular volume, select the volume with the pop-up button above the table, then click the button Reclaim storage space…. TinkerTool System will ask you in a dialog sheet how much bytes you like at least to be reclaimed. You can specify a low value (like 1) to make sure that only the smallest possible number of snapshots will be deleted. The operating system will use its standard policies to automatically select the snapshots that should be removed. At the end of the operation, TinkerTool System will show a summary how many local snapshots have been lost and how much storage space has been freed on the volume.
In some cases, Time Machine may decide to postpone the cleaning operation for some time. In this particular situation, TinkerTool System may not indicate that storage space has been freed yet immediately after requesting a reclaim procedure.
In order to free up as much space from a volume immediately, select the volume at Available local snapshots and click the button Delete all from this volume. Time Machine will understand this as urgent request to reclaim the maximum amount of storage space currently in use for local snapshots.
To delete a local snapshot manually, select it in the table and click the button Delete selected snapshot….
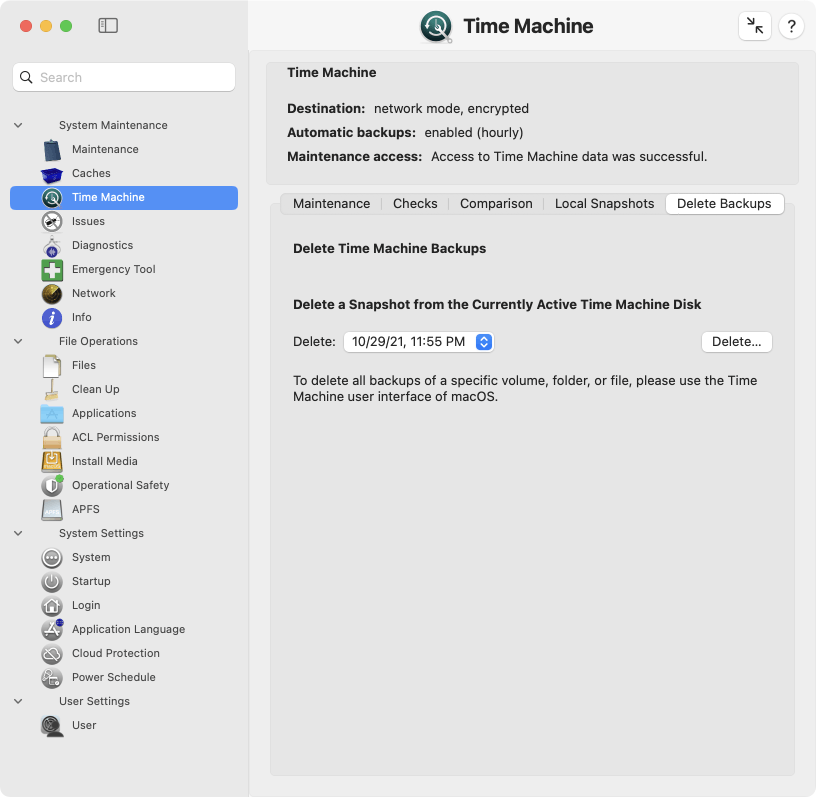
Deleting Time Machine snapshots
As part of its daily routine, Time Machine cleans up backups regularly, if necessary every hour. After a backup session has run, outdated backup snapshots are removed from the backup disk. Sometimes, you may like to remove a specific snapshot manually, e.g. to free some storage space. You must never do this via the macOS Finder. This could damage the Time Machine backup set, and in addition also the Trash feature of the Finder. TinkerTool System offers you a safe way to remove a Time Machine backup for a certain point in time:
- Open the tab item Delete Backups on the pane Time Machine.
- Select the snapshot that should be removed with the pop-up button at Delete.
- Click the button Delete… next to it.