Recovery Mode: Working with User Accounts
Selecting the User Account to be Processed
The first step of all features listed under the title Work with User Accounts in the main menu must be to choose the account on which the operation should be conducted. After selecting the menu item, a dialog sheet appears that contains the pop-up button Users. Choose a user by his or her short account name.
The pop-up button User contains only those users who have their home folders at the usual place, i.e. the folder Users (/Users) of the operating system. Other users or their files, respectively, are not available in macOS Recovery Mode in the general case.
The dialog sheet can be closed by clicking the button Close.
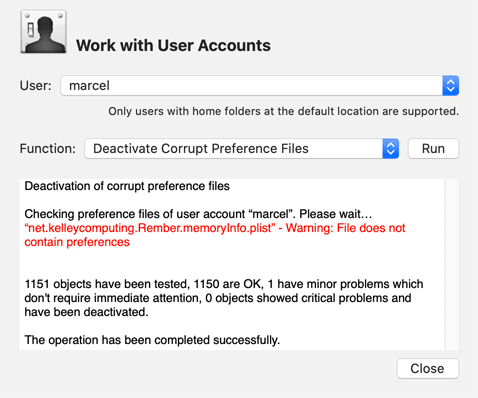
Deactivating Corrupt Preference Files
You can instruct TinkerTool System for Recovery Mode to verify all preference files of a user, and deactivate all files which are detected from the outside as being corrupt. Nothing will be deleted during this step. The damaged files will be deactivated by renaming them, so that they can no longer have any effect on macOS and applications which use the affected preferences. This is equivalent to a strongly simplified version of the feature User > Preferences > Check Files of TinkerTool System.
- In the main menu, click on Work with User Accounts.
- Choose a user account via the pop-up button User.
- Select the item Deactivate Corrupt Preference Files in the pop-up button Function.
- Click on Run.
- Wait until the final results of the verification or repair steps are shown on screen.
Deactivating All Caches of a User
As described in the chapter Caches, damaged cache contents can lead to errors during the execution of programs in individual cases. The standalone program can completely deactivate the personal standard caches of a user account if desired. Nothing is deleted, so the valuable cache contents can be restored in case of doubt to maintain a high operation speed of the system. Perform the following steps to deactivate the personal standard caches of a user temporarily or permanently:
- In the main menu, click on Work with User Accounts.
- Choose a user account via the pop-up button User.
- Select the item Deactivate All Caches of a User in the pop-up button Function.
- Click on Run.
- Wait until the final results of deactivation are shown on screen.
Reactivating All Caches of a User
After removing the contents of caches, macOS and many applications will run slower because the caches must be rebuilt internally. If deactivation of caches (from the previous section) did not have the expected success, the affected data can be restored completely by a simple key press, avoiding loss of performance.
- In the main menu, click on Work with User Accounts.
- Choose a user account via the pop-up button User.
- Select the item Reactivate All Caches of a User in the pop-up button Function.
- Click on Run.
- Wait until the final results of reactivation are shown on screen.
Deactivating All Preferences of a User
Preference settings of users can be damaged in such a way that their outer appearance is still correct, however the internal meaning of the stored information might be inconsistent. In rare cases, this can cause applications to behave erratically or not to launch at all. If such a problem cannot be isolated to a specific application, a last resort to troubleshoot the error might be to temporarily deactivate all preference settings of a user. All applications started by this user will run with “fresh” manufacturer defaults afterwards. When deactivating preferences, the settings will not really be deleted, so that they can be restored in case of doubt later.
- In the main menu, click on Work with User Accounts.
- Choose a user account via the pop-up button User.
- Select the item Deactivate All Preferences of a User in the pop-up button Function.
- Click on Run.
- Wait until the final results of deactivation are shown on screen.
Reactivating All Preferences of a User
In case you find out that deactivating all preferences (from the previous section) did not have the expected effect, all preferences can be restored completely (to the status of the time the deactivation procedure occurred). Perform the following steps:
- In the main menu, click on Work with User Accounts.
- Choose a user account via the pop-up button User.
- Select the item Reactivate All Preferences of a User in the pop-up button Function.
- Click on Run.
- Wait until the final results of reactivation are shown on screen.