Basic Operations
The control window of TinkerTool System
After starting TinkerTool System, the main control window will appear. Depending on computer model and system configuration, it may take a few seconds until the window becomes visible. TinkerTool System is performing a great number of validation and security checks during startup which will need some time until completed. The checks are necessary to ensure that TinkerTool System can indeed run successfully even if you are using it as a kind of first aid utility on a computer with a partially damaged operating system.
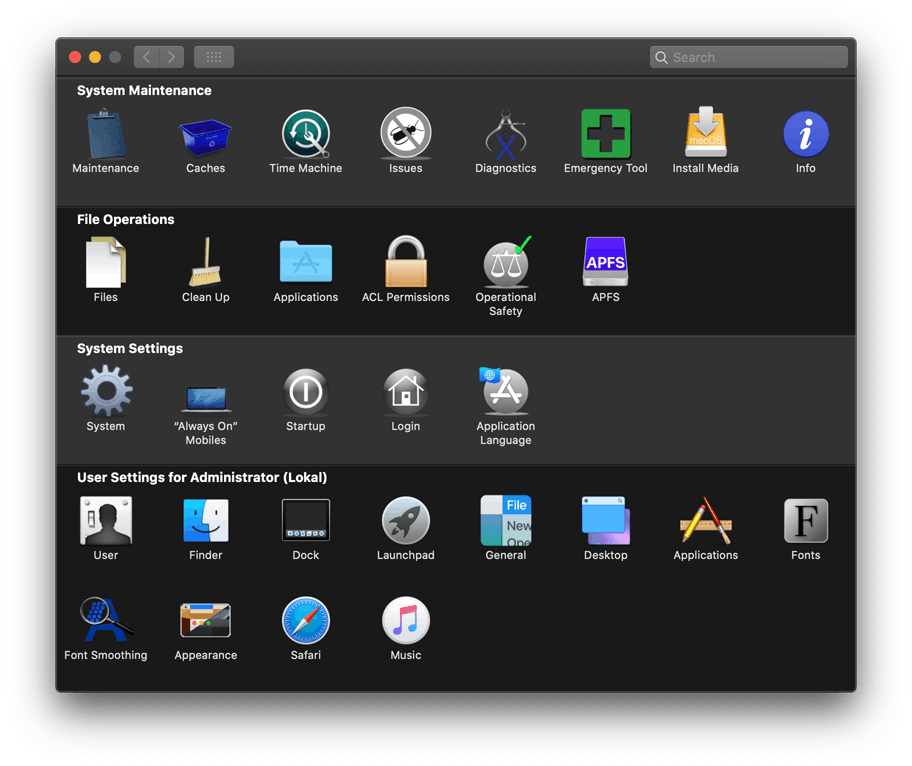
The control window is divided into horizontal bars, representing the different functional areas of the application. Each bar contains a number of icons which can be clicked to open the control pane connected with the respective feature set. For example, clicking on the icon Info in the row System Maintenance will open the pane named Info, used to access detail information about the computer and operating system. The panes behave very similar to the items found in the System Preferences application of macOS.
As an alternative, you can select one of the items in the menu View. Jumping from one pane to the next or previous one is possible by clicking one of the two arrow buttons in the toolbar of the control window. Stepping through the panes is also possible by menu, selecting the items View > Back or View > Forward, respectively, or by pressing ⌘ + ← or ⌘ + →. To go back to the overview of all pane icons, click the button with the little dots in the toolbar of the window, or select the menu item View > Show All Panes (⌘ + L).
You can also use keyboard navigation to open the different panes. If you like to do that, you’ll have to ensure that full keyboard access is enabled for your user account:
- Open the System Preferences application.
- Open the pane Keyboard and its tab item Shortcuts.
- Verify that the button All controls is selected at Full Keyboard Access.
If full keyboard access is active, press the tab key ⇥ in the control window of TinkerTool System to display the keyboard focus ring in the pane overview. You can then move the focus using the arrow keys or tab keys. Press the space-bar to open a pane.
Panes can also be subdivided into different functional areas. Tab items are used to select between these features. TinkerTool System automatically remembers which tab was open the last time you used a pane. It will automatically go back to the previously selected item the next time you use the pane again.
Searching for features by keywords
TinkerTool System offers a high number of different features. You may not use all of them regularly and may forget on which pane and tab they are located. To help you in this case, you can search for functions and options by keywords: Ensure that the icons for all panes are visible, then type a word for the feature you are looking for into the search field in the upper right corner of the window. After having typed the first letters, TinkerTool System will additionally make suggestions based on your input. You can select one of the suggestions by clicking, or by using arrow keys and then pressing the ↵ key. This will automatically open the related pane and tab. While searching, TinkerTool System dims the overview of panes and highlights the items that relate to your keyword.
The entered keyword can be deleted by clicking on the button with the cross in the search field.
Using the Touch Bar
If you have a Mac with a Touch Bar, you can also use the bar as an alternative for navigating between panes or searching for features. The controls to switch to the previous or next pane, to the icon overview, or to enter a search keyword can also be found in the Touch Bar.

Context Help
Each pane of TinkerTool System offers a context help panel which can be opened by clicking the round button with the question mark in the upper right corner. A second window will be attached at one of the sides of the main window, displaying short help information for the pane and the tab item currently open. The help text is structured by the following sections:
- What it does: a short description what the feature offered in the opened item will do when you activate it.
- When to use: one or more descriptions of typical situations where the feature can be helpful.
- When not to use: a list of contraindications when it is not recommended to use this feature or situations where it even can be harmful.
- Notes: an optional list of additional notes.
- Internet information from Apple: if available, one or more direct links to Apple’s web pages which give first-hand, up-to-date information about the topic in question.
The Dock Menu
Some frequently used functions of TinkerTool System can also be activated via the Dock menu: Search for the icon of the application in the Dock, then perform a right-click on the icon to open the context menu. The menu items follow the usual Macintosh standards. If the text of the item does not end with an ellipsis character (…), the function will be executed immediately when you select it in the menu. In the other case, TinkerTool System will only open the respective pane and tab item, so you will have the chance to review settings and to adjust them before anything will happen.
Fields for file system objects
Many features of TinkerTool System work on files and folders. In contrast to other applications, it is often important to know at which exact locations the objects are stored. macOS is using UNIX paths to describe such locations. For this reason, TinkerTool System is using special fields to display file system objects together with their UNIX paths. These fields are a special feature of TinkerTool System and look like this:

- At the left side of the field, you see the icon for the selected file system object. This is the same icon the Finder and other applications use to represent this object.
- The top of the field shows the name of the object. It might be translated into your preferred language and file extensions could be hidden.
- The true UNIX path of the object is displayed in a smaller typeface at the bottom of the field. Because paths can become quite long, multiple lines might be used to display a path.
- At the right side, a selection button can be seen. This button will only be available if you are allowed to change the contents of the field. After clicking the button, a standard open panel of macOS will be displayed which allows you to navigate into other folders and to select a different object.
In all cases where TinkerTool System likes you to specify a file system object, you can use any of the following methods to enter the requested data:
- You can click on the selection button if available, as mentioned above. A navigation panel will appear. Alternatively, you can double-click or option-click the field. The latter is especially helpful if you are visually impaired.
- You can click onto the field and enter a UNIX path manually. Note that paths always begin with a leading slash (/). Finish your data entry by pressing the key ↵.
- You can drag a single object from the Finder into the field.
Understanding when Changes Take Effect
When you are using TinkerTool System to modify a system setting of macOS, it tries to let the changes take effect immediately. Note that macOS may ask you to enter name and password of an administrative user first before the actual change takes place. You see that the change has been applied successfully if the user interface keeps its new state, e.g. a check mark you have set “sticks,” or a radio button you have clicked keeps the marker in its new position.
For features which do not affect a simple setting but actually execute some operation, for example to delete a selected file, TinkerTool System will show a dialog sheet after the operation has been completed. The sheet will confirm whether the operation was successful or whether it has failed for some reason. More complex operations which might run for several minutes are accompanied by a textual report, displayed either during the operation, or after it has completed, depending on technical situation. The reports can be saved into text files, or be printed for future reference.
General Preferences
TinkerTool System supports a few general preference settings which control some basic policies. You can modify them by selecting the menu item TinkerTool System > Preferences… or by pressing ⌘ + ,.
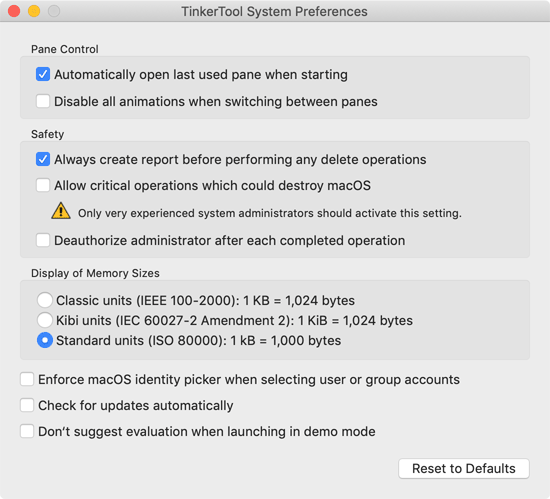
Pane Control
Setting a check mark for the option Automatically open last used pane when starting has the effect that the application will remember the pane which was active the last time when you have used and then quit the program. TinkerTool System will automatically switch to this pane and the correct control tab the next time it is started.
In case you don’t like the short animation sequences that are shown when switching from icon overview to a pane, or when switching between different panes, you can disable all animations setting a check mark at Disable all animations when switching between panes
Safety
The option Always create report before performing delete operations controls if TinkerTool System should display a confirmation dialog before removing objects from the file system. It applies mainly to the pane Clean Up and to a few other features where TinkerTool System might delete files from folders unknown in advance. In the confirmation dialog you can preview what TinkerTool System will do and which files will be lost after the delete operation has been executed. You can either cancel the entire operation, or deselect particular files or folders from the deletion set. It is recommended to keep this preference setting switched on. Switching it off causes TinkerTool System no longer to wait for confirmation but to remove files immediately. The pane Clean Up has additional switches to override this policy for single operations, however.
The option does not apply to all delete operations. When removing cache files or when removing language support packages from applications, tens of thousands of files might be affected, so a confirmation for each file would not be useful.
TinkerTool System contains a safety mechanism which tries to detect if you are about to make modifications which could make the whole operating system unusable. Examples are the change of permission settings for files which are part of the operating system, or removing files which belong to macOS. In these cases, changes could cause TinkerTool System or the whole computer no longer to work correctly, so it would also become impossible to revert such a change without reinstalling the whole system.
Very experienced administrators can disable this safeguard, setting a check mark at Allow critical operations which could destroy macOS. After this, TinkerTool System will no longer block dangerous file operations. The administrator alone will be responsible for any actions performed.
It is not recommended to enable this feature. Total data loss can occur. You should know exactly what you are doing when the safeguard is inactive.
You must not understand this safety feature as a guarantee that TinkerTool System cannot be misused to damage important user or system files even if it is left at its recommended setting.
The option Deauthorize administrator after each completed operation controls if TinkerTool System should cache and reuse name and password of an administrative user after these credentials have been entered correctly and no more than 5 minutes have passed since the last successful authorization. For further details, please see the chapter The security policy of TinkerTool System.
Display of Memory Sizes
The buttons in the box Display of Memory Sizes allow you to select how the program should round the number of bytes whenever it needs to represent the size of storage space or main memory:
- Classic units use the old common practice of information technology to report memory sizes in multiples of powers of two. 1 kilo byte equals 1,024 bytes. Kilo is abbreviated by a capital K in this case, denoting that it refers to a binary interpretation and does not represent the usual decimal prefix with the meaning 1,000 here. Higher multiples (1 MB = 1,048,576 bytes, not 1,000,000 bytes) don’t make this differentiation, however.
- Kibi units resolve this ambiguity by additionally marking the prefix with “bi,” indicating a binary prefix. 1 kibi byte (1 kiB) equals 1,024 bytes. 1 mebi byte (“megabinary,” 1 MiB) are 1,048,576 bytes.
- Standard units enforce compliance with “correct” international conventions for quantities and units. 1 kilo byte equals 1,000 bytes, now abbreviated 1 kB. 1 mega byte (1 MB) represents 1 million bytes.
The option Standard units is the recommended default for macOS, because many of Apple’s applications (unfortunately not all) use the same policy for the display of memory sizes.
Other preference settings
TinkerTool System contains several features where you need to choose a user or a group from the list of accounts available on your Mac, e.g. to change the ownership of a file. In professional network environments, the list of user and group accounts may not be hosted on your Mac alone, but also on one or more directory servers in the network. This way, your Mac can work with several thousand user accounts that are known in your network. However, some versions of macOS are affected by performance problems when working with such external account lists. Because TinkerTool System likes to present the complete list of users or groups in situations where you need to select an account, retrieving these lists can take a considerate amount of time. Some versions of macOS may even block the entire user interface for several minutes due to internal design flaws in the way the operating system collects the necessary data.
To avoid such problems, you can force TinkerTool System to use a very simple user interface when it is necessary to choose an account from a list of available users and groups. Set a check mark at Enforce macOS identity picker when selecting user or group accounts to use the built-in features of macOS only.
If the simple account window also has performance problems, this will indicate that this macOS version currently cannot handle this more efficiently.
Apple’s account window has the following disadvantages, however:
- It is not possible to preselect an entry to guide you in a specific situation.
- You have to decide from context whether to select a user account or a group account.
- You cannot see the internal identifications of the accounts, only their presentation names.
- You cannot access any system-internal accounts.
The setting Check for updates automatically controls whether the application should automatically inform you when new, free updates of the software become available. The automatic check will be performed in regular intervals while you launch the program.
The preference Don’t suggest evaluation when launching in demo mode only applies if you don’t own a valid registration for TinkerTool System. Under normal conditions, TinkerTool System will offer to let you test the application during a limited period for free, which is called evaluation mode. When setting a check mark for this option, TinkerTool will no longer make this offer upon each launch (if still available), but directly switch to the locked demo mode. For more information about demo mode, unlocking TinkerTool System, and evaluation mode, please see the respective chapter.
The button Reset to Defaults will reset all of the preferences discussed in this section to their recommended default settings. Only the option for update notification will keep its value.
Reverting All Permanent Changes to System Settings
Among the many features of TinkerTool System is the capability to modify system settings built into macOS. When experiencing system problems, you might like to reset all settings to Apple’s factory defaults. This is possible by selecting the menu item Reset > Reset all permanent changes… or pressing the key combination ⇧ + ⌘ + R and following instructions.
This step is also helpful after you have tested TinkerTool System without license in evaluation mode but the evaluation period is over. In this case, TinkerTool System will fall back to demo mode and you can no longer use it to revert system settings you might have changed. The reset feature however will always remain functional, no matter if you are going to purchase a license or not. This makes sure you cannot be locked out from certain settings after the evaluation has ended.
Note that it is not possible to differentiate which system settings have been changed by TinkerTool System and which have been changed by other third-party applications or by using the macOS command-line. For this reason, TinkerTool System must reset all system settings it could have changed theoretically to factory defaults, even if you didn’t use it, but something else to make the initial changes. Disabling support for IPv6 is excluded from this rule, because you have full control over this setting in System Preferences after TinkerTool System has switched the respective option to off.
Searching for Software Updates
TinkerTool System is under continuous development and new versions will be published in irregular time intervals. These updates are usually free unless a completely redesigned product will be released. The latest version is always available for download via the official web site. TinkerTool System can check if a new free update is available for the version you are currently using. To do this, select the menu item TinkerTool System > Check for Updates. The program will connect to the Internet and inform you about the results. In case a newer version is indeed available, you can choose to open your web browser to be automatically guided to the download page. Instead of performing a manual check by clicking the menu item, you can alternatively enable a preference setting (see above) to let the application perform automatic checks in regular intervals.
The program does not support any auto-download mechanisms because such features usually do not work and should not work in professional environments where all applications are stored on protected file servers. Automatic replacement of software products might neither comply with security regulations of large organizations, nor with the laws of certain jurisdictions.
System Integrity Protection
Technical Background
The operating system is protected by a security feature called System Integrity Protection. At the technical level, this is also known as Customer System Restriction (CSR). For marketing purposes, Apple also uses the term rootless.
System Integrity Protection means that only specific programs of the operating system itself, for example the Apple Installer, have permission to modify certain files of the operating system or to use certain features. Not even the highest system authority, the root user account can circumvent this restriction. This policy makes sure the system cannot be damaged, or intentionally manipulated by an attacker. Access to the following resources is restricted by System Integrity Protection:
- The modification or deletion of operating system files which are marked with the special attribute restricted.
- The modification or deletion of specific NVRAM entries.
- The use of kernel extensions which are not trusted.
- Running the kernel debugger.
- Tracing the execution of specific system processes with the dtrace utility.
Some features of TinkerTool System can be affected by System Integrity Protection. For example, when you disable the preference setting Allow critical operations which could destroy macOS and you try to use the function Files > Delete > Force Delete to remove a file which has the attribute restricted set, the delete operation will be prevented by macOS. In such cases, TinkerTool System will show an error message as follows:
“Your computer is configured not to permit this operation. The current task cannot be completed because System Integrity Protection is active on this computer. It might be possible to deactivate this feature by changing a hardware setting via the recovery operating system. Please see the reference manual for more information.”
System Integrity Protection can be switched off if the owner of a computer prefers to do so. To be effective, System Integrity Protection has to protect itself, however. This means switching this feature off is not possible within the running operating system. In addition, the setting is not stored in any file, but in the system hardware. In case you have installed multiple copies of macOS on your computer, the setting will take effect for all of them.
Disabling Protection
If you need to disable System Integrity Protection for some reason, you can do so as mentioned in the previous section. Perform the following steps:
- Restart your computer and hold down ⌘ + R to select the Recovery System.
- Wait until the screen macOS Utilities appears, then select the menu item Utilities > Terminal to launch the Terminal application.
- Enter the following command in Terminal to disable System Integrity Protection for the entire computer. Press the return key afterwards:
csrutil disable
We don’t recommended to disable this feature.
The change will take effect after you have restarted the computer. You can restart the system via the corresponding menu item in the Apple menu.
To re-enable System Integrity Protection later, you can use the same steps with the command
csrutil clear
Switching System Integrity Protection on or off can also be controlled by mouse click, using TinkerTool System for Recovery Mode. Further information is available in the sections The Pane Emergency Tool and RecoveryMode: Basic Features.
Privacy Policy Settings of your Mac
Background Information
As of version 10.14 of the operating system, Apple has added another level of system protection: Nearly all applications are now running in a sandboxed environment, which means that each and every request an application sends to the operating system is monitored and checked before it will be executed. Not only Apps from the Mac App Store, but all other software as well, including some of Apple’s own applications, are no longer free in executing any command that would otherwise be authorized by user permissions. Access to data that could affect system security or a user’s privacy needs explicit approval by an administrator of the Mac first. This approval is granted per program. For example, the administrator could say “program A has permission to access a user’s Photos database”. Such a privacy definition will then become valid for the entire computer and any user account, for all copies of program A. If program A is running while its privacy settings are changed, the program must be restarted before the new policy takes effect.
The settings for privacy policy are a powerful tool to prevent applications from accessing critical data behind the user’s back, no matter whether intentionally or unintentionally. This is especially true for unwanted applications such as adware, computer viruses, Trojan Horses, or other types of malware. However, this additional protection comes with additional work for administrators. After new software has been installed, it should be checked whether the application needs access to protected parts of the Mac in order to fulfill its duties. If the necessary approval is not granted, the affected application cannot execute specific operations. Such operations may either silently fail, or they are stopped with an error message. The necessary approval must be given by an administrator and the application must be restarted.
Privacy Settings affecting TinkerTool System
As the name indicates, TinkerTool System is a an application designed to perform system-related tasks. Some of the areas that can be accessed by TinkerTool System are critical to the users’ privacy, e.g. the application is capable of determining the size of the Spotlight index database. The Spotlight index contains information about all files of all users, and parts of this data may be related to persons, or could be confidential, so it is protected by macOS. Without prior approval, TinkerTool System cannot “see” the Spotlight index or its size at all.
TinkerTool System uses special precautions to check whether a certain operation could be blocked by macOS due to privacy settings before that operation is about to be executed. This way, “silent failures” should be avoided. TinkerTool System won’t erroneously pretend that an operation was apparently successful although that operation might have been completely blocked by macOS and actually nothing happened at all. In such cases, TinkerTool System shows specific error messages with detailed information which approval needs to be granted before the affected feature can be used.
A special warning marker Privacy will appear in the toolbar of the control window when TinkerTool System detects that basic features of the application won’t work as expected due to the current privacy settings. If you click on this marker, TinkerTool System will show in detail which areas are affected:
- Full disk access for your user account: The application cannot access critical files during standard operations which don’t require special privileges.
- Full disk access during privileged operations: The application cannot access critical files while executing privileged operations that require you to authenticate as system administrator.
- Access to other volumes: The application cannot access data located on secondary volumes, e.g. external disk drives or network file servers. All volumes which are not the system volume (hosting the operating system and your local home folder) can be affected.
If you see the Privacy button in the toolbar or any of the detail items have a red warning indicator, you should change the privacy settings of macOS using the instructions given in the next sections. You can still operate TinkerTool System without doing this, but then some features could fail with an error message.
Changing the privacy settings (macOS Mojave only)
If you are using macOS 10.15 Catalina or later, please see the next section.
In order to use all features of TinkerTool System, the following privacy approvals must be granted:
- Full Disk Access for the privileged component of TinkerTool System
- Full Disk Access for TinkerTool System itself
- Automation between TinkerTool System and the Finder if you like to use the feature Test Finder Copy on the Diagnostics pane.
At the moment, macOS is not capable of accepting an automation approval before it has observed that a failed attempt for automation between two specific applications occurred. This means if you like to use the Test Finder Copy feature, you’ll have to try using this feature, let this fail, grant approval to use this feature, restart TinkerTool System, and call the feature once again. Apple may or may not modify this unfriendly behavior in future versions of macOS. Applications (except Apple’s own) cannot circumvent this.
If you like to approve full disk access for TinkerTool System, perform the following steps:
- Launch System Preferences.
- Open the pane Security & Privacy.
- Go the tab item Privacy.
- Click the lock and identify yourself as user with administrative permissions.
- Select the item Full Disk Access.
- Click the button + below the list of apps.
- Navigate to the folder Library > PrivilegedHelperTools on your system volume.
- Select the file TinkerToolSystem-PrivilegedTool and click the Open button.
- If you like to work with Time Machine features in TinkerTool System, also add TinkerTool System itself to the table.
- Relaunch TinkerTool System.
This complex procedure has been under a lot of criticism by third-party software companies, but Apple was not willing to change or simplify it.
Changing the privacy settings (macOS Catalina or later only)
If you are using macOS 10.14 Mojave, please see the previous section.
In order to use all features of TinkerTool System, the following privacy approvals must be granted:
- Full Disk Access
- Automation between TinkerTool System and the Finder if you like to use the feature Test Finder Copy on the Diagnostics pane.
macOS will automatically ask for your approval for automation when you are attempting to use the feature Test Finder Copy for the first time. If you like to approve full disk access for TinkerTool System, perform the following steps:
- Launch System Preferences.
- Open the pane Security & Privacy.
- Go the tab item Privacy.
- Click the lock and identify yourself as user with administrative permissions.
- Select the item Full Disk Access.
- Check if an entry for TinkerTool System is in the table. If yes, set a check mark next to it. If no, click the button + below the list of apps and add TinkerTool System to the table.
- Relaunch TinkerTool System.