Editing Preference Settings or Property Lists
The main task of PrefEdit is to give users the possibility to view the full set of preference settings for a given application and to make changes to the settings when necessary. To open the settings of a preference domain, double-click the related line in the table of the preference domains window, or use the feature Find Preference Setting to double-click a line of the search results. A window displaying all current settings of the selected domain will open. If multiple scopes are available for a domain, e.g. settings for all users and settings for your user account only, the affected files will be opened in multiple windows.
The table in the lower part of the window lists all preference settings currently stored for that domain and corresponding scope in the preference database. The column Property Key displays the name of each setting, Value its current value, and Type the data type for that value. A check mark in the column Managed indicates that the respective setting is currently under control of the Managed Client feature of macOS, so it may be automatically overwritten even if you temporarily change its value. You can hide this column if you don’t need it.
The scope of the preference settings with regard to the aspects application, user, and computer are shown in a small text line above the table.
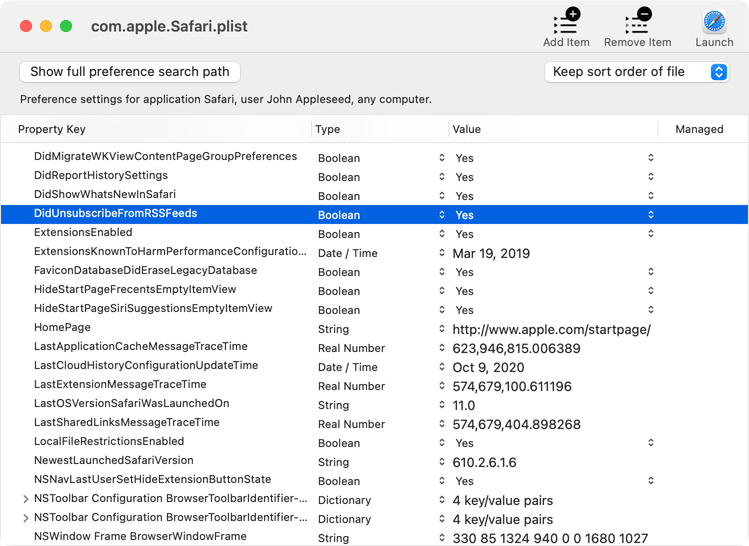
If you have permission to do so, you can change any aspect of a preference setting. Just click on key, type or value to edit the contents of those fields. Nested entries like dictionaries or arrays can be opened by clicking on the disclosure triangles displayed in front of the respective lines.
- When entering numbers or dates as values for the types Integer Number, Real Number or Date/Time, respectively, PrefEdit will automatically respect your personal preferences to format those entries in accordance with the rules of your current locale. For example, decimal places are separated by a decimal point in most English-speaking countries, while other locales may use a decimal comma. Even if you are modifying a date entry in a foreign application which writes dates with the year specification at first position, for example, you can (and should) enter the date following the guidelines of your own preferred language. This rule does not apply when using numbers or dates within values of the type String, however. In that case, the application owning the preference domain defines how it will interpret the entered texts. Further notes on specifying dates are given in a separate chapter.
- In specific cases, Strings, whether property keys or values, may contain multiple lines or invisible control characters. This can happen, for example, if a property list contains a modern string table, such as the ones used to internationalize macOS programs for use in multiple languages. If such a key or value is recognized, it naturally cannot be displayed directly in the table. Instead, the message —Control characters! Double-click to show— will appear. For more information, see the respective section below.
- Values of type Binary Data must be specified as sequence of bytes, written as 2-digit hexadecimal numbers, separated by single spaces and enclosed in angle brackets. Example: The three bytes with the decimal values 2, 129 and 254 must be entered as <02 A1 FE>.
- Remember that property keys of dictionaries must be unique. PrefEdit will automatically warn you if you are trying to use two identical keys in the same dictionary.
- The property key of a preference setting is the name this setting is being identified with within its domain. So if you change (rename) a key, you will in fact be deleting that setting, inserting a new one with the same value under a different name.
You can add and remove settings without limitation. Removing a setting is equivalent to resetting it to factory defaults. The next time the application owning this preference domain is started, it will notice that the setting is missing and will use its own predefined default value for it.
- To remove a preference setting or an item of a nested structure, select the item in the table, then click the button Remove Item in the toolbar of the window. You can also the menu item Edit > Delete.
- To add a preference setting or an item of a nested structure, ensure the correct nesting level is selected in the table and click the Add button in the toolbar of the window. You can alternatively select the menu item Edit > Add entry. PrefEdit automatically tries to “guess” if you like to add an item at the same nesting level or at a deeper level in the hierarchy. This will be reflected in the toolbar which switches between Add Item and Add Child, respectively.
- You can use the editing features Cut (⌘ + X), Copy (⌘ + C) and Paste (⌘ + V) on any entry. This allows you to easily transfer one entry or a whole nested structure from one position to another. When pasting an entry, PrefEdit will use the same strategy to decide whether to add the item at the same level or as child, as discussed in the previous item. Of course, copying is also possible between different windows, and in some cases even with other applications, such as the property list editor of Apple’s Xcode.
- You can reorder items by drag and drop or move them within the same or different windows.
Items of the types dictionary or array can be strongly nested. It can be tedious work to click all disclosure triangles to navigate to elements deeper in the hierarchy. To simplify that task, you can select an item at an upper level in the hierarchy and open all nested child entries by a single operation. Select the menu item Edit > Fully Expand Entry to do so. The corresponding feature to collapse all entries of a hierarchy is also available. Instead of using the main menu, you can alternatively use the context menu via the right mouse button.
All changes you make to a preference domain usually take effect immediately (although this doesn’t mean that the application belonging to this domain is immediately taking notice of your changes). This is compliant with the behavior which Apple stipulates for up-to-date versions of macOS. You don’t need to care about saving data. However, it is still possible to store changes “explicitly and immediately” as you may be used to from classic applications. Select the menu item File > Save or press the key combination ⌘ + S.
When saving preference files manually, PrefEdit may sometimes show a warning message indicating that some other application has modified the settings while you were editing them, so there could be a conflict between the version you are saving and the version currently on disk. You can choose which version to keep in this case. Such a situation can occur when the application associated with the preference settings is currently running or was running in a short time frame before opening the file. As noted in the introduction, you should thus avoid making changes to preferences when the corresponding application is active at the same time. You’ll find additional notes below in the section Change of data in the background.
Working with property list files
You can not only edit preference settings, but any file which is using the property list format (plist) of macOS. Just double-click the file in the Finder, or select the menu item File > Open (⌘ + O) in PrefEdit. The window to review the contents of the file will open.
In case you are opening a general property list file which is not being used as store for preference settings, the text line describing the scope above the table will be missing. Instead, you will find a remark whether the file could theoretically be used as a preference file or not.
The column Managed is always empty when working on a general property list file. You can hide this column if you don’t need it.
It is technically possible to extend the official property list definition, permitting values of additional data types, for example. This means a file could contain more than the eight permitted data types outlined in the introductory chapter. For a property list in text format, this can be done by introducing new XML tags. For a property list in binary format, this can be implemented by encoding data in new record types. In both cases, the resulting files are no longer compliant with the official property list definition, so only the applications that created them can fully “understand” their contents. In practice, such files may unfortunately even have the path extension .plist although they are no true property list files. When you try to open such a proprietary file with PrefEdit, you will receive a warning that the file is invalid. However, in many cases, PrefEdit will try its best to decode the contents of the file nevertheless. If a file maintains the basic structure of a property list, but uses proprietary data types, PrefEdit will open an interpreted version of this file as untitled document. In this interpreted version, all values with invalid data types are replaced by strings that contain a short, technical text description of the proprietary data. This can help you to get a first impression of the file’s contents. Because the interpreted copy is a true property list, it can also be saved as new document. However, you should keep in mind that this is just a substitute representation where unknown values have been made readable to a certain extent. The readable version cannot replace the original file.
Undoing changes
Any changes you have made to data in a file can be undone completely. There are two different approaches:
Small changes can be reverted in single steps by using the menu item Edit > Undo or pressing ⌘ + Z. Each new call of this function will go back one more step in the past. If you mistakenly have undone one step too much, you can also revert this by selecting Edit > Redo or pressing ⌘ + ⇧ + Z.
The possibility to undo single operations stops at the point where the file was either opened or saved explicitly. If you like to go even further in the past and the respective modifications have been made by PrefEdit, you can use the feature Versions of the operating system to restore an old, saved variant of the file. Select the menu item File > Revert To > Last Opened to restore the file to the state when you originally opened it. You can also use the menu item File > Revert to > Browse All Versions to review earlier variants of the file in a time line and search for the point in time you like to restore. The user interface will resemble the Time Machine function of the operating system.
Depending on the operating system version you are using, small details in the operation of Versions, or the designations of menu items can slightly differ. To get more information about Versions, please search for the term Document Versions in the reference manual of your operating system version. You can open the manual via the item Help > Help Center in the Finder application.
Depending on operating system, you can use additional menu items or the title bar of the window to duplicate, rename, move, or protect the file. To save a file with a different name, select File > Duplicate and enter the desired name for the duplicate.
Strings with multiple lines or control characters
Keys or values can contain control characters. If a character represents a line feed (LF), it means that the entry contains multiple lines. Such entries cannot be displayed directly in the table. Instead, the message —Control characters! Double-click to show— appears.
If you double-click the respective entry, PrefEdit displays a special window that displays the string in two text boxes. In all situations where the text can be modified, you can edit the string immediately at this point. The box on the left is used for this purpose. The right box, on the other hand, cannot be changed, but identifies the invisible characters via a special presentation. You can choose between displaying the special characters
- as ISO symbols with the official Unicode name of the control character, or the name according to the international standard ISO 646, respectively,
- or in C syntax, i.e. in a readable replacement representation with a backslash, just as the characters are typed in all programming languages of the C family. This format is used in many other programming languages as well.
For better readability, PrefEdit displays the line feed character directly as the end of a line. If this is not desired, you can uncheck Evaluate line feeds.
Control characters in property lists may not be permitted by macOS in all situations. Only the characters for line feed (LF), carriage return (CR) and horizontal tab (HT) are guaranteed to be supported in every case and will also be saved again during further processing of a file. All other control characters may be automatically removed or ignored.
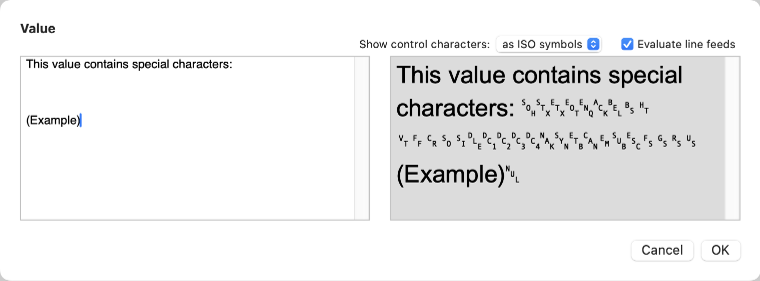
If you have made changes in the text box, they will not be commited until you click the OK button. When you click Cancel, the previous value remains unchanged.
Deleting multiple entries at the same level
The table presenting the property list only permits to select one line at a time only, because many operations that can be performed with the data may not make sense for reasons of logic when being executed with multiple entries simultaneously. This can be impractical if you like to remove multiple entries from a container element at the same time, like an array or dictionary. You can do so via a specific deletion dialog, however, which is used as follows:
- Select an array or dictionary in the table.
- Open the menu item Edit > Delete Multiple Items…, or the equally named item in the context menu, or press the key combination ⌘ + -.
- A dialog window will appear that only shows the content objects of the array or dictionary at the selected level. You can now select several items for deletion.
- Click the button Delete to remove the selected objects.
Exporting binary data
If a property list file contains entries of type Binary Data, this will often be sequences of bytes which actually belong to a different file format. For example, if a photo should be stored in a property list, it will be a common method to convert the photo into the JPEG file format and to insert the bytes of the resulting file into an entry of type binary data. In that case, in can be helpful to export such an entry to file. In many other cases, it can also be useful to have a byte sequence in form of a separate file, for example when you like to analyze unknown data with a different application. Perform the following steps to export binary data as file:
- Select an entry of type Binary Data in the property list.
- Open the menu item Edit > Export Binary Data as File… or use the equally named item of the context menu.
- Confirm folder location and file name in the save sheet and click the button Export.
Decoding Binary Data
Sometimes, entries of the Binary Data type are simply strings that have been slightly obfuscated, or file contents that are actually plain text, such as JSON data structures. PrefEdit provides an additional feature to make such content visible without needing to export it to a file: You can check whether a data entry would be valid for a string using the standard macOS encoding UTF–8, or you can display a complete hex dump of the data as text, i.e. a representation consisting of a sequence of hexadecimal digits paired with its ASCII text decoding.
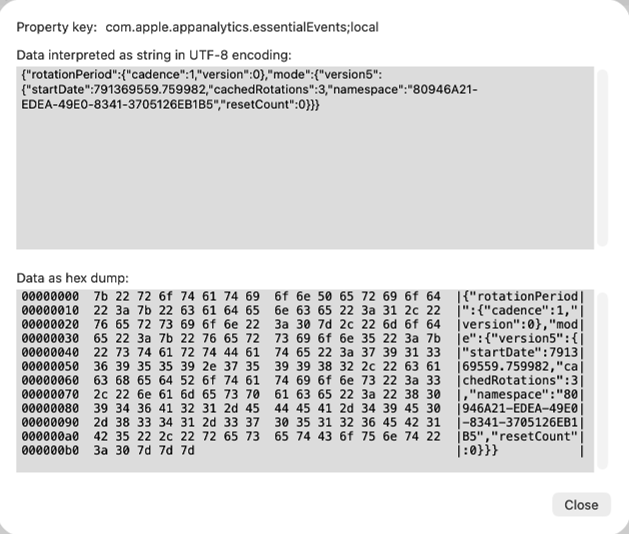
To do this, select a data entry and open the menu item Decode binary data either in the context menu or in the main menu at Edit.
Launching corresponding applications
After you have made changes to a domain, you might like to check whether the modifications have the effect you intended. To make this easy, PrefEdit can launch the application which is corresponding with the domain. Just click the button Launch in the tool bar of the window.
You should always prefer to start a program with changed preference settings via PrefEdit and not via the Finder, Dock, Launchpad, Spotlight, Terminal, etc. PrefEdit uses technical means to force the launching application to respect all recent changes, which is not guaranteed otherwise. The details depend on the operating system version you are using.
The Launch button won’t be available if the preference domain is not linked to an application running at the graphical user interface of macOS. The button will also be missing if you have opened a property list file which is not used as a preference file.
If the button is disabled, this will indicate that the associated application is running already. Note that PrefEdit reflects the true state of the corresponding process, not the simplified user-oriented view of the Dock. For further information, please also the notes on live preference settings in the chapter on property list files.
Retrieving Powerbox settings
If you opened a property list representing the preference settings of a sandbox-protected application, there could be additional preference settings outside the sandbox which are usually invisible.
If the sandbox-protected application has a feature to open or save files, this application should in most cases be capable to see specific files outside its sandbox, namely when the user has explicitly given her approval by selecting files in an open or save dialog. The application cannot show this dialog itself, however, because before the user has granted approval, it has no right to see the outside files.
Apple has resolved this conflict by providing a specific component in macOS, the service for open and save panels, which works outside any sandbox but can optically integrate into any running sandbox-protected program. This way, it looks as if the running application itself could show a navigation window for the selection of files, although in reality a service running outside the sandbox does the job, communicating with the running program via a protected channel. When the user selects a file in the panel, macOS reconfigures the sandbox to the effect that the affected application gets access approval for the file in question. This particular service is called Powerbox by Apple. It is so to speak a counterpart of the sandbox.
To increase the ease of use, the Powerbox must have the capability to store settings on behalf of the sandbox-protected application, for example the preferred size of the file navigation window, or the last visited folder. Such preference settings are stored as property list files outside the sandbox. They are managed by the Powerbox, but use the preference domain name of the associated application.
If PrefEdit recognizes that additional preference settings of the Powerbox are available for an application, an additional button Powerbox will be shown in the toolbar of the window. You can click the button to open the respective preference settings in an additional window. This window behaves like any other document window.
Working with Preference Suites of Application Groups
In addition to the Powerbox, there is another situation where sandbox protection can force applications to store preference settings separately and not keeping them in standard domains. Oftentimes, software vendors offer programs that complement each other so that multiple applications can work on the same data. Sometimes, a vendor may also offer services for a group of programs, for example an account used to login at Internet servers of this vendor.
Sandbox protection usually prevents that an application A can “see” settings the user has already made in application B. This means the user would have to make the same setting twice. However, if the two applications complement and trust each other, it will make sense to grant direct access, sharing specific preference settings between them. For such a case, the respective programs can declare an application group with macOS and its sandbox. Each application group is associated with a chosen name. Membership in an app group is confirmed via the digital signatures of each application, so this is cryptographically secured. If at least one of the members of an app group is distributed via the App Store, Apple dictates that the group name must begin with Apple’s internal identification of the respective software developer (typically a code with ten letters and digits). The code is followed by a readable domain name for the application group, following the known domain name rules. An example for the name of an app group would be
ABCDE2FGH9.com.example.group.office-suite
The preference settings themselves are stored in the usual property list files. For sake of simplicity, their names can just be normal domain names, or the names of the application groups are repeated, for example. The applications are free in this decision. There are no hard rules, because the affected settings are a private matter of the associated application group. As a consequence, preference values stored this way cannot become part of automatic search mechanisms. Such “private” collections of settings that are exclusively handled by the respective applications themselves so they don’t fall under any automatisms of macOS are called preference suites.
Even for preference suites, it would be possible to use priorities and search paths, e.g. by differentiating between settings “for all computers” vs. “for this computer”. In practice, however, this almost never happens. For this reason, PrefEdit is limited to only collect preference suites of application groups in a window which correspond to the scope “this user / all computers”.
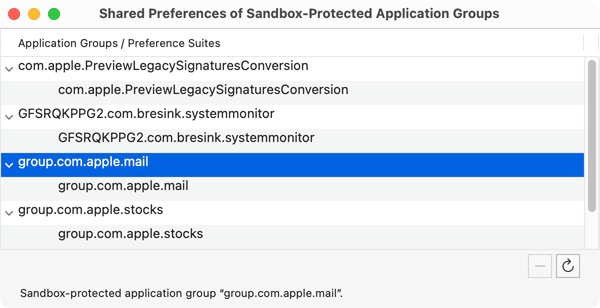
To open a window with an overview that lists all shared preference suites that are part of a registered application group, click the menu item Window > Show Application Group Suites, or press the key combination ⌘ + 2. Application groups and their respective preference suites are shown in a hierarchical table. By double-clicking, one or more suites can be opened. The arrow button can be used to refresh table in case of external modifications, and the minus button allows you to delete suites completely.
Showing the complete preference search path
If you opened a file containing preference settings, the window will only show the entries which match a certain scope regarding users and computers. However, when you like to see all preference settings which currently take effect for a particular application, PrefEdit can evaluate the complete search path, as mentioned in the introduction. To do so, click the button Show full preference search path at the upper left corner of the window. A gliding sheet will appear as in the example picture below.

The listed items represent a snapshot created at the moment you clicked the button. The time of the snapshot is shown at the bottom left. This means data in this sheet won’t be updated live, even if the corresponding files change in the background.
Note that the window contains data from many files which may influence each other in complex fashion. To avoid confusion and inadvertent damage of settings, you cannot change any entries in this window. The first three columns in the window have the same structure and meaning as their counterparts in the property list window. The additional column Source indicates where each effective setting comes from. If a setting in the search path comes from the file you have currently opened in the attached window, this will be indicated by bold print. For settings that come from files other than the file currently open, you can click the corresponding arrow markers to open them in PrefEdit.
In many cases, entries shown in the table come from positions further back in the preference search path. This means by copying such an entry from this window to the attached main window, the property will raise its position in the search order. If you later edit the copied entry, giving it a new value, the new value will override the default value which was set at the scope lower in the search order. You can copy an entry as follows:
- Select an entry in the table of effective preference settings.
- Click the button Copy entry onto this level….
- Confirm the operation.
- You can now edit the value of the transferred entry in the main window as desired.
The table showing the preference search path supports all standard Find features. Use the button OK to close the sheet.
Converting between file formats
As mentioned in the introduction, preference files and property list files can be stored in different file formats. PrefEdit can read all common formats. When saving a file, you can choose whether the XML format or the binary format should be used to store the data. You can convert from one format to the other by performing the following steps:
- Open the file in PrefEdit.
- Select the menu item File > Export as….
- In the export panel, navigate to the desired destination folder, change the file name if necessary, and ensure the new output format is selected with the pop-up button.
- Click the button Export or press the return key.
Note: In older versions of macOS, it was also possible to duplicate the file and then save it with a different format. Up-to-date versions of macOS may no longer permit this.
When saving property list files in XML format, PrefEdit enforces XML syntax rules stricter than Apple to ensure that the resulting XML representation is indeed compliant with the standards.
While macOS may accept the creation of files that contain any sequence of control characters in string values, PrefEdit only accepts
- horizontal tabs,
- new line characters, and
- carriage return characters.
They will be encoded by their valid XML representations, such as , for example. Other control characters will be silently removed.
Sorting data
XML is a format describing data in textual form. This means a property list stored in XML format implicitly defines a specific order in which the elements of the list appear within the text. This is not the case for binary format. Elements of type dictionary don’t have any predefined order, so macOS may sort them at random to optimize processing speed, making access as efficient as possible. These differences are respected by PrefEdit.
If a file is stored in XML format, PrefEdit will ensure that the order the elements appear in the file is matching the shown order in the window (top down). By default, the pop-up button in the upper right corner of the window will display the mode Keep sort order of file.
This won’t be guaranteed if the XML file contains syntactical errors. A file with slight errors that would still be accepted by macOS during processing will also be opened by PrefEdit, the order of entries may then be lost, however.
You can re-sort the columns Property Key and Type if you like. Just click once on the header of the respective table column to get an alphabetic sorting. Another click will cause sorting in reverse order. The pop-up button in the upper right corner will automatically change to Allow sorting by columns in that case. This sorting will only change the shown order of the items, not the physical order in the file. You can go back to the file order any time by selecting Keep sort order of file.
During the time the window is in mode Keep sort order of file, you can also change the actual, physical order of the items, however. Furthermore, after selecting the top line of a dictionary, you can let PrefEdit sort the dictionary in alphabetical order of its keys by selecting the menu item Edit > Sort Dictionary by Keys (or by the matching item in the context menu).
Changing the order of elements is possible for files in binary format, too. The new order may have no lasting effect on dictionaries however, because macOS may change the order during each save operation for efficiency reasons, as already mentioned.
Change of data in the background
If you use PrefEdit to review preference settings of a running application, it can happen that this program modifies the settings in the background. As a consequence, the contents of the window is no longer up-to-date. If you haven’t made any changes to the shown data yourself, PrefEdit will indicate this situation by a red warning Preference settings have changed in the upper right corner of the window, making you aware that the window content no longer reflects the current state. You can click the button Refresh which is also shown in such a case, to have the contents of the window updated.
You won’t receive a live warning if you also modified data in the window. In that case there is an inevitable conflict between your changes and the changes of the running application. PrefEdit will make you aware of this issue when you try to save the file. You can then decide whether to discard your changes, overwrite the changes of the application, or save the file as copy to a different location.
Opening and saving of files without write permission
After opening a property list in a file for which you don’t have write permission, you may not be able to save changes. To avoid bad surprises, PrefEdit notifies you about such a problem with the file immediately after opening it.
You can review the contents of the file without problems. In addition, PrefEdit gives you the chance to make modifications and to store them later in the protected file. At the beginning, you will receive the warning message You cannot make changes to this file. Do you like to reopen it in a mode which allows you to override permission settings as administrative user? In case you answer No, the file will only be read. If you still try to make changes, you will be asked to create a duplicate (to be saved later at a different location where you actually have write permission).
In case your response is Yes, PrefEdit will allow you to make changes to the protected file (without duplicating it first). However, the following limitations will apply:
- You’ll have to take care to save all changes “manually”, as in classic applications. macOS will no longer handle this automatically. The menu item File > Save, or the key combination ⌘ + S, respectively, are available. Of course, PrefEdit will notify you about unsaved changes in case you forget to save the data before closing the window or the application.
- Modifications done by other applications on the saved file while the window is open won’t be reflected live in the document view.
- To revert changes, only the features Edit > Undo or File > Revert to Saved are available. You cannot use the Versions feature of the operating system.
- When saving the protected file, macOS will ask for an administrator password to temporarily override the permission settings.
If you like, however, you can completely disable the feature mentioned in this section. This is useful if you often like to just review system-related property list files, but prefer not to change them. The question to re-open the file with privileged administrator access will be suppressed. Perform the following steps:
- Select the menu item PrefEdit > Settings… or press ⌘ + ,.
- In the panel Settings, set a check mark at Don’t ask for privileged operation when opening protected file.
Search for contents in the opened file
PrefEdit will display a standard macOS Find dialog in the upper part of the window, when you select the menu item Edit > Find > Find… or press the key combination ⌘ + F. You can search for all contents of the preference domain or property list, i.e. both for keys and values, but not for type names. In addition, values of type Boolean, Date/Time and Binary Data won’t be considered during search, because no obvious representation of them can be formulated as input text. Click the button Done to close the search dialog.

PrefEdit is fully compliant with the macOS design guidelines for search operations:
- The key combination ⌘ + G will find the next occurrence of the already entered search text, continuing the search in forward direction.
- The key combination ⌘ + ⇧ + G will do the same in reverse direction, finding the previous occurrence.
- The key combination ⌘ + E will cause your current text selection to become the text to search for.
- The key combination ⌘ + J forces the window content to jump to the current selection, making sure the selected item becomes visible.
By clicking on the disclosure triangle next to the magnifying glass, you can specify additional search modes, e.g. case-sensitivity, search in the whole document, search for words, or search by regular expressions.
To search for settings in all preference domains, use the feature Find in Preferences instead.