System Settings
The Pane System
Drives
Hard Disk Sleep Timer
Nearly all hard drives contain a built-in sleep timer which is designed to power down the spindle motor, saving energy when the drive has not been in use for some specified time. macOS supports a simple yes/no setting to manage this sleep feature of hard drives. It can be controlled by the option Put hard disks to sleep when possible on the pane Energy Saver (or Battery, respectively) of the System Settings application. Enabling this option corresponds to setting the sleep timer of disk drives to a value of 10 minutes of inactivity.
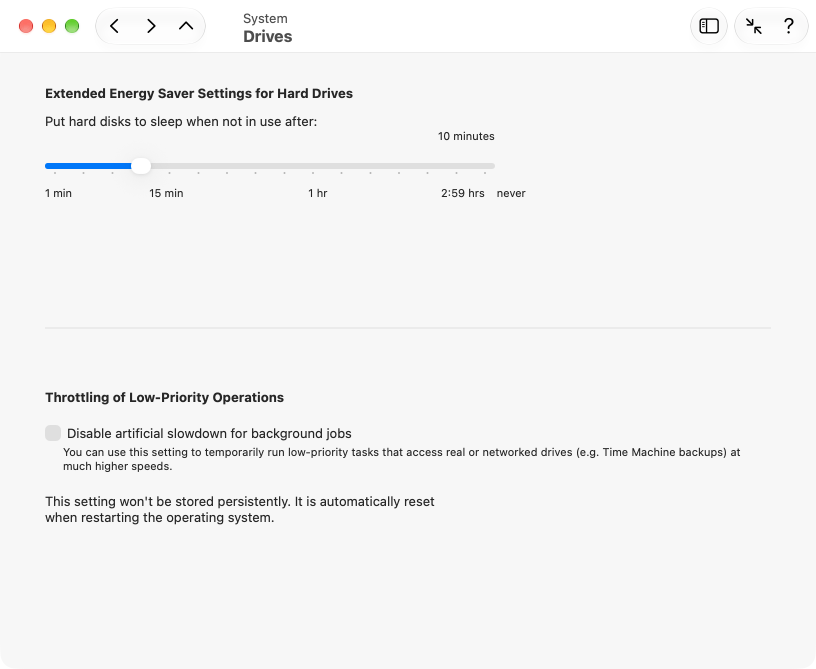
With TinkerTool System, you can control the sleep timers of hard disks more precisely, by specifying the exact value for the timer. Time intervals between 1 minute and 2 hours 59 minutes can be selected. To change the sleep timer of all disk drives, perform the following steps:
- Open the sub-item Drives on the pane System.
- Drag the slider Put hard disks to sleep when not in use after… to the desired value.
Throttling of Low-Priority Operations
The kernel of the operating system uses priorities to organize its Input/Output Jobs, mainly disk and network operations that must be executed as service for the applications currently running. Work carried out for invisible background applications (like Time Machine, for example) has lower priority than operations performed for interactive applications (like a text-processing program). Operations with low priority are throttled which means they are artificially slowed down, by letting them pause for certain small time intervals.
In some situations, this performance penalty can become tedious, e.g. when you are waiting for an extensive Time Machine backup run to complete. Time Machine jobs are mainly made up of input/output operations on disks or network, so they are significantly affected by this slow-down.
You can temporarily disable throttling of input/output operations for background applications, giving them the same priority as other tasks. The change becomes effective immediately, but is not permanently stored as a preference. The setting will only be retained until you either shut down the operating system or change the setting again.
To disable low-priority throttling for I/O operations in the kernel perform the following steps:
- Open the sub-item Drives on the pane System.
- Set a check mark at Disable artificial slowdown for background jobs.
Under very rare circumstances, running jobs could block each other while throttling is disabled, causing the system to freeze. Because all I/O operations run with the same priority in this case, the system can no longer reschedule important jobs to run before low-priority ones. High-priority operations may need to wait for a large number of low-priority ones, increasing the likelihood that jobs that depend on each other start waiting in circular fashion, causing a mutual blockage.
Spotlight
Spotlight Operation
Spotlight is the built-in search technology of macOS which is designed to find files very rapidly after the user has specified key words or other search criteria. The technical implementation is based on several system services which operate silently in the background. However, Spotlight can sometimes be affected by technical problems, so administrators may need to fine-tune Spotlight operations in certain situations.
Spotlight is designed to operate as one of the basic core components of macOS. For this reason, other system services and many applications developed for macOS depend on the correct operation of Spotlight and will fail when Spotlight has been shut down. This includes the Time Machine backup service and the App Store application. For this reason, TinkerTool System does not support any operation to disable Spotlight completely. However, you can shut down Spotlight indexing on selected disk volumes.

Spotlight Index Databases
When Spotlight is active, it automatically creates a hidden index database and some preference files on each volume currently connected with your computer. The database and the preference settings are needed to quickly find the contents you are searching for. These hidden components are called Metadata Stores.
For each of the volumes, TinkerTool System allows you to display whether Spotlight is activated on that volume (column Spotlight Status with indicator in green or red), whether Spotlight is generally disabled (column Blocked) and how much storage space is currently needed by the Metadata Stores. This information is displayed in the table Spotlight Metadata Storage. Only volumes which are technically capable of supporting Spotlight are listed in the table. A refresh button right below the table will update the contents of the table. This step is necessary to let macOS allow TinkerTool System (after authentication) to compute the size of the index databases. Access to the databases is protected because they contain potentially confidential information, namely all words of all documents all users have stored on the current computer.
After selecting a line in the table, you can activate several operations that should be performed:
- You can delete the metadata store on the selected volume. This will reset the privacy settings for this volume and enforces complete reindexing of all documents stored on the volume. This feature is helpful when the metadata appears to have been damaged. You would typically use this function when you detect that Spotlight finds less documents than it actually should.
- You can toggle Spotlight indexing, which means all indexing operations on the selected volumes will either be stopped, or be re-enabled for the currently running session of macOS. If you re-enable indexing, macOS will resume the background index operations at its own discretion at a later time.
- You can remove the metadata stores on the selected volume and disable indexing at the same time. The search database will be removed and Spotlight will no longer touch the affected volumes in the currently running macOS session.
To activate one of these functions, click the button Perform selected operation.
Note that the deactivation of index operations is only in effect until you restart macOS. Unless Spotlight isn’t blocked on affected volumes by using the setting Siri & Spotlight > Spotlight Privacy… in System Settings, macOS will recommence its indexing services upon next startup.
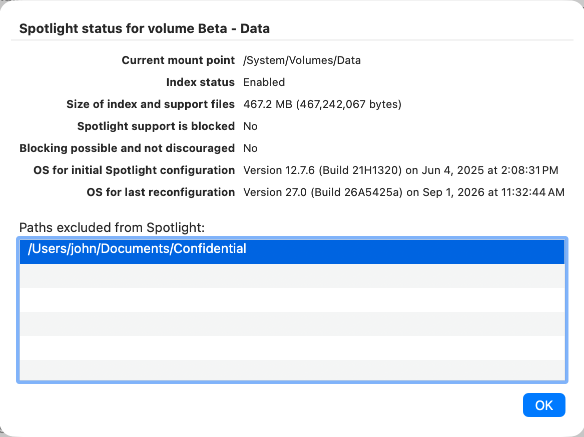
When you click the info symbol at the end of a table line, you can get further details about Spotlight for the corresponding volume. The application will open an additional panel with the following data:
- the current position in the UNIX file system where the volume is actually located
- a detailed presentation of status, memory usage, and possible blocking
- the information whether blocking is generally possible at the technical level and also not discouraged by TinkerTool System
- the operating system version used to configure Spotlight originally on this volume, together with the time specification
- the operating system version used the last time to modify the configuration of Spotlight, together with the time specification
- a list of UNIX file paths locked out expressly by one or more users for search operations
Under specific circumstances, it might be helpful to disable Spotlight operations on a disk volume “forever,” e.g. on a slow pen drive which you only use to transport data to other computers. This can be done by a special marker which works independently of the Spotlight privacy settings. Setting such a marker is particularly helpful on external drives which are used with different macOS computers, because all systems will automatically respect this setting after it has been established. To set or remove this marker, perform the following steps:
- Open the sub-item Spotlight on the pane System.
- Click the refresh arrow at the right hand side below the table to ensure the program had the chance to analyze all volumes completely.
- Select the desired volume in the table.
- Click the button Block/unblock Spotlight in the lower left corner.
Actions that could cause severe damage to the normal operation of macOS, e.g. removing the Spotlight index of Time Machine, are disabled automatically.
If you have triggered a command to have a search index be recreated, you can check as follows whether the indexing operating has actually been completed in the background:
- Open a Spotlight search inquiry via the Spotlight icon (magnifying glass) at the right hand side of the menu bar and enter a file name that you know exists on the affected volume.
- Leave the dialog open for a few seconds.
If the Spotlight index is not ready yet, macOS will show a progress bar after a few seconds, to indicate how much time it needs until the index will be complete. When the Spotlight index is ready, the search results will be shown without an additional progress indicator.
Network
Options for Connecting to File Servers
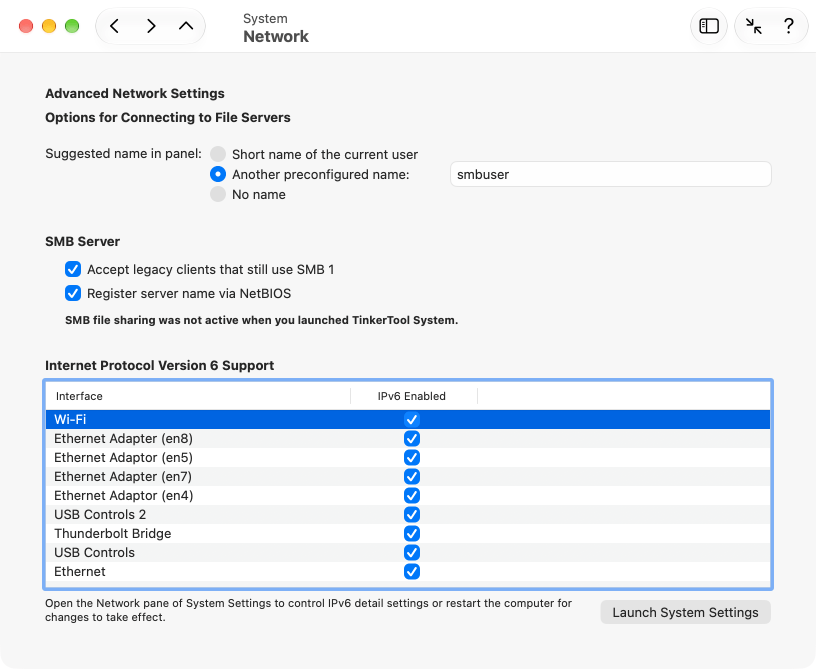
When you attempt to connect to a file server manually, a password entry panel will appear. TinkerTool System can modify the system setting that controls which name macOS should suggest in this panel. You can select between the short name of the current user, another preconfigured name, or the option not to suggest any name (No name). Perform the following steps:
- Open the sub-item Network on the pane System.
- Choose the desired option at Suggested name in panel.
Settings for the SMB Server
With the feature Sharing > File Sharing in System Settings, the built-in SMB server of macOS can be set up quickly. TinkerTool System allows access to two specific advanced settings of the SMB server:
- Accept legacy clients that still use SMB 1: The SMB industry standard has evolved over a period of 40 years. The oldest versions, which can be summarized under the name “Version 1” of the SMB protocol, are considered very insecure by today’s standards and are no longer commonly used. This also applies to the server in macOS, which typically does not offer Version 1 of the SMB protocol, but only services according to the standards “Version 2” and “Version 3”. However, if you use very old devices or operating systems in your network that still rely on SMB 1, and you want them to access this Mac using the old standard, you can enable SMB 1 if necessary.
- Register server name via NetBIOS: A comparably outdated function, which is only used by older devices or operating systems, is the registration of the SMB server’s name via the NetBIOS over TCP/IP protocol. This function is no longer needed normally, as modern computers use the DNS standard to manage names on the network. If desired, however, you can also activate the older NetBIOS procedure as a legacy feature for your Mac server.
The changed settings will take effect upon next start of the SMB service. TinkerTool System indicates in a note below the settings whether the SMB service was active on your Mac when you started the application.
Internet Protocol Version 6 Support
By default, the pane Network of the application System Settings does not show a menu item to disable the support of IPv6 on specific network interfaces. The feature to switch IPv6 to Off is present in the operating system, however. You can use TinkerTool System to control this option.
- Open the sub-item Network on the pane System of TinkerTool System.
- Locate the network service you like to modify in the table Internet Protocol Version 6 Support.
- Remove the check mark in the column IPv6 Enabled to disable IPv6 for the network interface in that line.
When you have disabled IPv6 support for an active network service, System Settings will correctly reflect this, adding an Off menu item to the Configure IPv6 option. You can either use System Settings or TinkerTool System to re-enable this feature later. If you use TinkerTool System to do this, your configuration setting automatically switches back to the mode previously defined in System Settings.
If you change your network location or the IPv6 mode in System Settings while TinkerTool System is running, it is recommended to restart TinkerTool System to ensure that the application shows the updated status.
Permission Filter for New File System Objects
In the permission system of macOS, which is explained in detail in the chapter The Pane ACL Permissions, each application decides for itself what rights it will grant for a new a file or folder when that file system object is being created. This also includes the Finder which is the typical application to create new folders.
Security problems could arise if you are using badly written or very old applications which don’t care about permission settings. Such applications could grant write permission to the category “other users” which means that nearly everyone — no matter if the user is even “known” by the current computer — could access, overwrite, and delete each and every document created by that program. In environments where users cannot be considered to behave cooperatively, like schools or large companies, such a lax policy of granting permissions can make a system unusable. For this reason, macOS and every other UNIX system is using a permission filter: Whenever an application creates a new file or folder and has to set the initial permission settings, the permissions will be sent through a filter first which decides if applications are allowed to grant a specific right or not. The filter corresponds directly with the three POSIX rights read, write, execute, and the access parties owner, group owner, and others. See the chapter The Pane ACL Permissions for details.
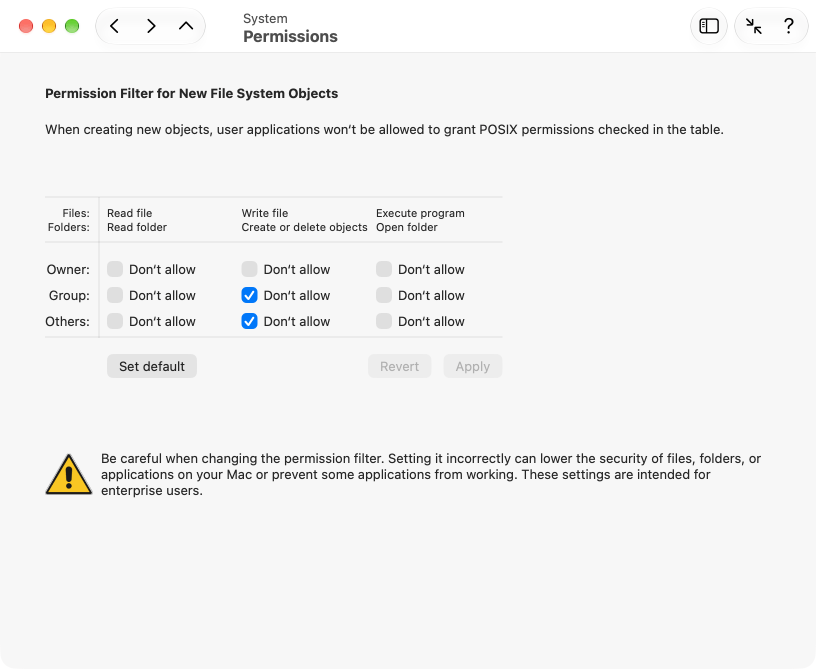
By default, macOS uses a permission filter which is preconfigured with the following policy:
- don’t allow applications to grant initial write permission for the group owner of a new object
- don’t allow applications to grant initial write permission for other users, who are neither owner nor group owner of the new object.
Administrators can change this policy, modifying the permission filter so that the initial permissions are either relaxed or become even stricter. To modify the permission filter of macOS, perform the following steps:
- Open the sub-item Permissions on the pane System.
- Set or remove check marks in the table Permission Filter for New File Systems Objects. The lines of the table represent the three access parties Owner, Group, and Others, the columns represent the rights which should be blocked when creating new objects, namely read, write and execute. Remember that write permission for a folder means the right to create, rename and delete objects in the folder, and that execute permission for a folder means to browse the contents of a folder.
- Click the button Apply below the table.
The change will take effect the next time you start the computer. The button Set Default can be clicked to return to the recommended standard filter. Clicking the button Revert will cause TinkerTool System to discard your changes and to display the settings currently established in the system.
The setting only affects programs started in user sessions. Background programs of the operating system won’t be affected (unless they are started as part of a user session).
There are specific circumstances where TinkerTool System detects that it won’t be possible to modify the permission filter. In this case, the table is disabled and an error message appears below. The following situations can cause such a problem:
- A pending operation to change the filter is currently in progress. New values have been set to be established but the computer has not been restarted yet.
- Some third-party application is manipulating the permission filter. This could be intended by the other application but it could also indicate a defect. It won’t be possible to change the filter settings until this problem has been resolved.
Miscellaneous
Screen Sharing
If a remote administrator uses the screen sharing feature of macOS to receive the current contents of the computer screen on her own computer across a network connection, macOS automatically tries to protect the privacy of the user currently working on the local screen: If the remote administrator connects with a user account which is different from the one of the local user, the screen session won’t begin immediately. Instead, the accessing user is asked whether he likes to work on his own, separate screen, or if the local user should be asked to grant permission that the remote user can see and take over the current screen. The local user could have private or confidential information on screen, so this behavior will protect the displayed data.
In some cases, this policy may not be useful. You can disable this privacy feature as follows:
- Open the sub-item Miscellaneous on the pane System.
- Click on the item Permit clients to take over frontmost screen session.
You should check if this policy is compliant with local laws and the guidelines of your organization, if applicable.

FileVault Options
If you enabled FileVault on your computer, the entire system volume will be encrypted by a secure key and a password will be necessary to unlock and decrypt the disk. When the computer is switched on, the operating system cannot start immediately, because the Mac cannot read the encrypted disk. Instead, the computer’s firmware and some parts of the unencrypted preboot volume present a special login screen (which resembles the login screen of macOS). Users have to log in here first, and for entitled users, the secret decryption key will be unlocked, which is then used to decrypt the operating system volume and to launch macOS.
At this stage, it is known that the user who unlocked the disk must also be a valid user of macOS, so the firmware passes the name and password of this user to the operating system, performing an automatic login, hereby avoiding to ask for credentials a second time. For this reason, the activation of FileVault automatically enables the automatic login feature of macOS, too.
In some cases, this behavior might not be intended. macOS supports a special feature to uncouple the decryption of the FileVault disk from the initial login upon start of the operating system:
- Open the sub-item Miscellaneous on the pane System.
- Click on the item Use separate logins for disk decryption and first user session.
You can also enable an advanced security feature of FileVault for cases where this is needed. To guarantee continued access to storage media, your Mac must always keep the key for disk encryption in memory in order to successfully process any block on the disk the operating system needs to read or write. That includes time periods where your Mac enters sleep and standby modes. This is necessary to ensure that the Mac can still perform regular maintenance tasks when not being fully switched on and to execute Power Nap functions.
This policy maintains a certain comfort level, but can become an issue should your Mac be stolen, when an attacker tries to get direct memory access by connecting special hardware devices to the sleeping Mac. In theory, the disk encryption key could be disclosed this way.
By removing the check mark Keep encryption key in memory during standby you can avoid this possible method of attack. If this option is not checked, macOS will destroy the FileVault key in RAM when the system enters standby mode. In this configuration, your Mac will no longer have disk access during standby, so Power Nap and similar maintenance features will no longer be active regardless how you have configured them.
Typing Assistant at Caret Position
As of macOS 14, Apple introduced new pop-ups when typing text, which are displayed right next to the cursor, at the insert position of the text. Many users find these pop-ups annoying. You can turn them off with TinkerTool System, which is done system-wide (for all users of the computer). Two system settings are available:
- the pop-up for the Caps Lock key (capital letters) and for text dictation
- the pop-up of a palette with suggestions for emojis when you have entered appropriate text and open the menu item Edit > Emoji & Symbols or press the corresponding keyboard shortcut.
Perform the following steps to change these system settings:
- Open the sub-item Miscellaneous on the pane System.
- Set or remove check marks at Typing Assistant at Caret Position.
- Restart your Mac if you like the change to take effect immediately.