The Pane Issues
Resolving Issues with the macOS Software Update Feature
Under specific circumstances, which depend on your local network, your Internet service provider, and the country you are in, the software update feature of macOS might not always work as error-free as expected. TinkerTool System can help you to resolve typical problems with single mouse-clicks.
What is macOS Software Update?
macOS uses two completely separate technical features to keep software products up-to-date: The operating system itself and additional components which can be seen as parts or add-ons of the operating system are updated via a function called macOS Software Update. It is based on a newsfeed-like architecture which informs macOS about available downloads. If you participate in one of the beta software programs offered by Apple, the standard feed can be redirected to a different one which contains additional beta products, not available to the general public.
For Apps that have been dowloaded from the Mac App Store, no matter if the Apps have been developed by Apple or by third-party vendors, macOS uses a different mechanism which is linked to the App Store itself. This feature is called App Updates.
App updates are presented in the App Store application, item Updates. On the other hand, macOS software updates are listed in System Settings, pane General > Software Update.
Apple distributes new Macintosh operating systems in form of an App which is in fact the installer for that system. So an upgrade of macOS (switching from your current OS to a new generation OS with a different major version number) comes as App from the App Store, while each update of the OS (product care which only changes the minor version number) comes via the Software Update function.
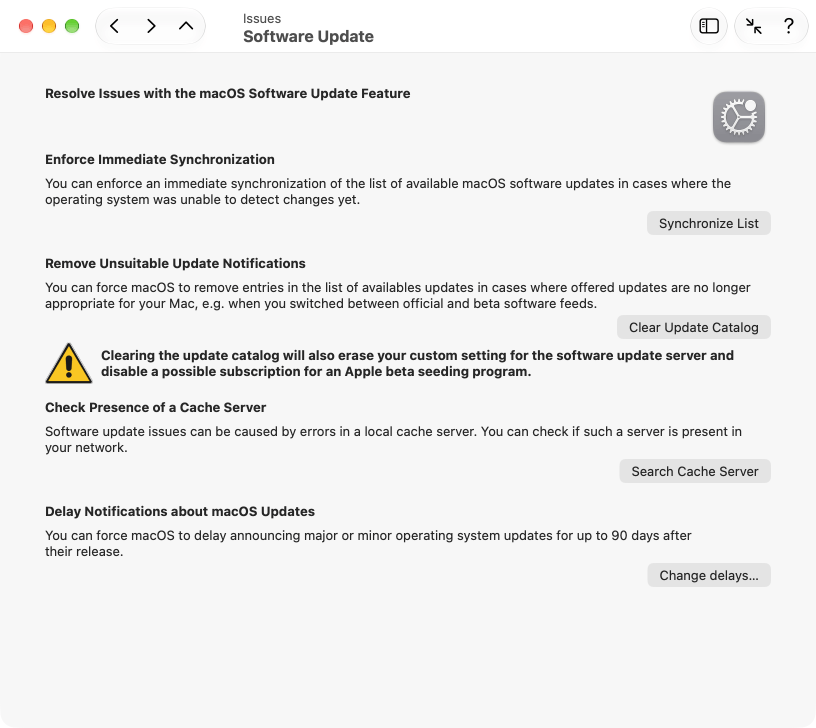
Enforcing an Immediate Synchronization with the List of Available Updates
It can happen that macOS doesn’t notice the availability of an update immediately. There can be a delay of up to two weeks before an entry finally appears on your local system. In case you have learned from somewhere else, like a press article or news web site, that an update must be available which was not automatically listed by your computer yet, you can force your Mac to contact Apple, retrieving the latest list of update downloads available now. To do this, perform the following steps:
- Open the sub-item Software Update on the pane Issues.
- Click the button Synchronize List.
After that, macOS will contact Apple via your Internet connection. TinkerTool System shows a small status panel, indicating live what the operating system is doing. Retrieving and evaluating the up-to-date software list may take several minutes. If new updates are available, System Settings will automatically list them as soon as the synchronization process is completed.
Removing Unsuitable Update Notifications
In some special cases, the opposite of the previously mentioned issue can occur: macOS may list available software updates you are no longer interested in, so you basically have “too many” entries in the list of updates. This can happen shortly after you have changed your personal software feed, for example when you have decided to no longer participate in one of the beta programs. In that particular case, System Settings may still list beta updates although you don’t like to see them any longer.
To clear the list of available updates in such a case, perform the following steps:
- Open the sub-item Software Update on the pane Issues.
- Click the button Clear Update Catalog.
Check the Presence of a Cache Server
If you have many Apple devices on your local network, setting up a content caching server on your network can greatly speed up access to updates. All you have to do is turn on the corresponding function on a Mac in your network that is running as continuously as possible. This server monitors the data traffic for updates and caches all downloaded data. The other computers on the network detect the presence of the content caching server and can now download updates from it over a fast local line. The update data no longer has to be downloaded again for each computer via the slower Internet connection. If desired, the content caching server can also accelerate read and write access to iCloud services by also caching data locally for this purpose. Multiple content caching servers can be deployed simultaneously for very large networks.
All aspects of a content caching server are fully automated. After turning on the service on the computer that was selected for this purpose and selecting the options, which and how much data should be cached, no further actions are required. Clients do not have to be set up, but use the service automatically as soon as it is available.
For certain combinations of operating system versions of the clients and the operating system version of the server, however, there are known errors in macOS in which the search for updates does not work correctly, or certain update packages are not offered at all or are offered very late. Therefore, when troubleshooting software update issues, it is necessary to know if there are one or more content caching servers on the network. This is not always clear. For example, a mobile Mac user might have accidentally (or even maliciously) turned on the content caching server feature, causing problems when this Mac is present in the local network.
The program can check whether there are content caching servers on the local network and which of them is currently the preferred one used by your Mac to retrieve updates. The IP addresses of a server and the list of detail services offered by the cache can also be determined.
- Open the sub-item Software Update on the pane Issues.
- Click the button Search Cache Server.
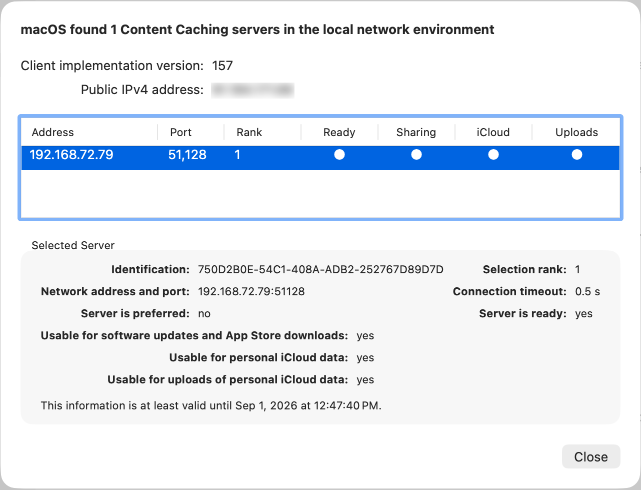
If one or more servers are available, they will be listed in a separate sheet. The window contains the following data:
- Client implementation version: the version number of the software that the currently running version of macOS uses when working with content caching
- Public IPv4 Address: the network address currently used by the client when accessing the Internet
A table lists all local content caching servers with a brief description. After selecting a line, the details for each server appear in the lower part of the window:
- Identification: a UUID that uniquely identifies each server worldwide
- Network address and port: the IPv4 address of the server in the local network and the port number for accessing the cache service
- Server is preferred: a flag indicating whether this server should be preferred over other existing servers
- Selection rank: the priority used to select this server if there are multiple servers in the network
- Connection timeout: the time after which an access attempt will be aborted
- Server is ready: a status indication of whether this server is currently operational
- Usable for software updates and App Store downloads: a status indication of whether this server caches software updates and app updates
- Usable for personal iCloud data: a status indication whether this server can be used to read iCloud data from users in the local network
- Usable for uploads of personal iCloud data: a status indication whether this server can be used for writing iCloud data by users in the local network
In addition, information is given as to when this Mac considers the specified data to be valid. At this point in time at the latest, the information will be refreshed again.
Delaying macOS Updates
If you know that a specific macOS update will cause issues with your software environment, or you generally do not want to use a particular generation of macOS and want to suppress all notifications about it, it is possible to delay the announcement of system updates for a certain period of time. TinkerTool System can set a ban where your computer ignores the presence of an update for up to 90 days after its release. The shortest delay is one day. Separate delays can be set for
- “major” upgrades, where the major version numbers change, e.g., switching from macOS 26 Tahoe to macOS 27 Golden Gate,
- “minor” updates, where only the minor version numbers change, e.g., an update from macOS 27.3.1 to 27.4.
This is an official feature of Apple for macOS. Your computer is not manipulated in any way. Perform the following steps to establish a delay:
- Open the sub-item Software Update on the pane Issues.
- Click the button Change delays….
- Use the sliders to set how many days of delay should apply to major and minor updates, and then click OK.
If you set the sliders all the way to the left, the normal setting is restored, where macOS updates are announced without delay. The change takes effect the next time macOS searches for a software update. You can trigger this immediately if you wish by clicking the Synchronize List button mentioned above, or by using the corresponding function in System Settings.
If a delay is effective, macOS automatically removes all corresponding notifications from the system after the next successful search, for example in the Dock, in System Settings, and in the Apple menu.
To check if macOS updates could be currently suppressed by a delay, you can open System Settings > General > Software Update. After the check for updates, macOS will not indicate that your Mac is up-to-date in this case, but that it is running the latest update allowed by your organization.
App Store Update
The App Store application introduces an annoying problem as of macOS Big Sur where users receive update notifications for Apps they have updated already, sometimes several months ago. This can happen if you are using your Mac with multiple users and only one of them usually downloads updates for Apps, or if you have multiple Macs and use the App Store on only on one of them, then copying the Apps manually to the others.
A reset of the App Store information for the affected user should usually fix this problem. TinkerTool System offers you to reset either the current user account or all active user accounts of the Mac. In this context, an “active” account refers to a user who has a home folder at the default location on the local Mac (usually in the folder /Users).
The reset operation will also clear the overview page of the App Store that lists the recent updates this user has downloaded. The list of purchases or any other data for the user who might currently be logged into the App Store won’t be affected, however.
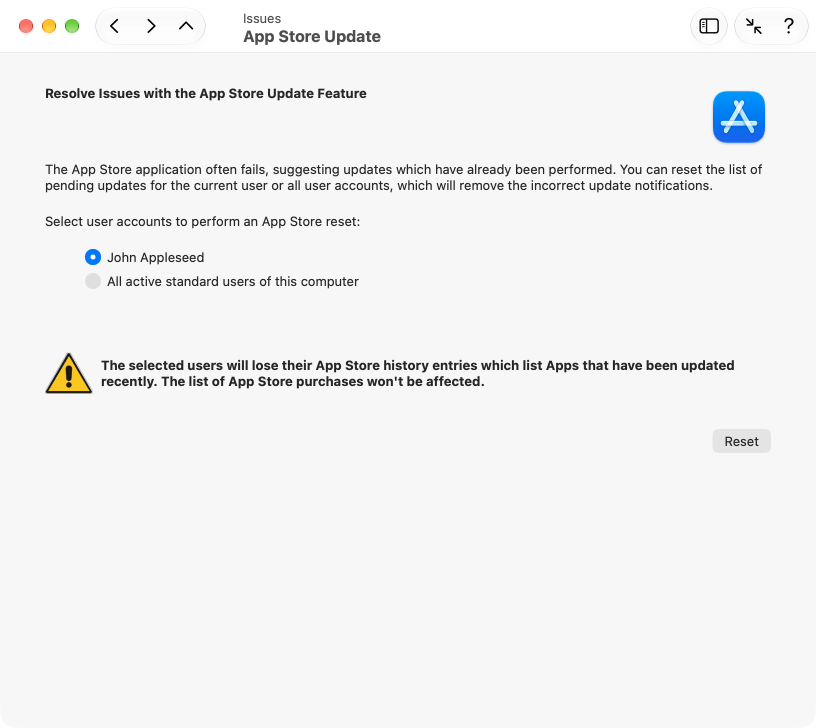
To reset the App Store application, perform the following steps:
- Open the sub-item App Store Update on the pane Issues.
- Use the buttons at Select user accounts to perform an App Store reset to choose whether you like to run the reset for the current user or for all users of this Mac.
- Click the button Reset.
You should quit the App Store application before you run the reset operation, and you should also make sure that no downloads or updates from the App Store are currently running in the background.
App Background Activity
With macOS 13 Ventura, Apple had integrated a strongly revised version of system service management into the operating system. The most important change is that helper programs that provide services for “big” applications no longer have to be placed in central folders of the operating system (such as /Library/PrivilegedHelperTools/ for privileged utilities). Instead they can remain in their associated main programs. This has the advantage that nothing needs to be installed or uninstalled for new applications. Once the main application has been copied to the Mac, its embedded utility is automatically present with no special setup required. If the program is later deleted, the embedded helper program is automatically removed as well. To do this, macOS must monitor in the background whether the existing applications contain helper programs that can provide services. The type of each service can be determined based on description files that are hidden in the main program. The same mechanism applies to other “invisible” parts of an application, such as components which should work in the background, or may need to be activated each time a user logs in. Apple calls all these components App Background Activities.
The following behaviors of invisible auxiliary programs are considered app background activities:
- Startup service for all users: the helper is allowed to be started if necessary once macOS has booted
- Login service for all users: the helper is allowed to be started if necessary once any user has logged into macOS
- Login service for you: the helper is allowed to be started if necessary once your own user account has logged into macOS
- Embedded startup service: the utility resides in the main application and is allowed to be started if necessary once macOS has booted
- Embedded login service: the utility resides in the main application and is allowed to be started if necessary once any user has logged into macOS
- Embedded hidden login item: the utility resides in the main application and will be launched in any case once your own user account has logged into macOS. It is similar to a login item, but it is set up by the associated main application and not via visible user settings.
- Invisible continuation of an application: the visible part of an application is quit by the user, but invisible helper services may still continue running.
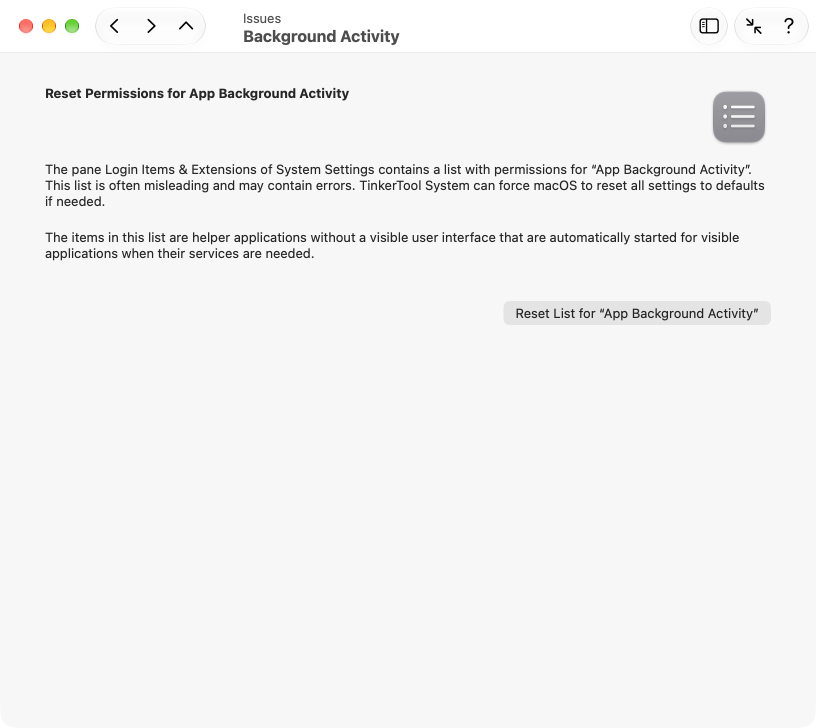
If problems arise with the settings for app background activity, e.g. if an activity is mistakenly listed which is actually never performed, you can use TinkerTool System to force macOS to reset all settings and rebuild the list. This requires a restart of the operating system.
- Open the sub-item Background Activity on the pane Issues.
- Click the button Reset List for “App Background Activity”.
- Follow the on-screen instructions.
During this process, macOS may prompt for an administrator’s login credentials in English, even if you have set your user account to a language different than English.
Fix Problems with Automatic Time Synchronization
There is a known design flaw in newer versions of macOS: If the Mac is switched off without shutting the operating system down correctly, which can, for example, happen in the event of a power failure or, in the case of portable Macs, if the battery is empty, date and time settings may be wrong the next time the computer is switched on again, but they can also no longer be set correctly. In this special case, macOS repeatedly changes the date and time to incorrect values. This can lead to significant additional problems when communicating with other computers on the network or logging in to user accounts.
You should check first whether the system settings for automatic time synchronization are correct.
- Open the sub-item Time on the pane Issues.
- Click Show Date & Time Settings.
The corresponding pane in System Settings will open. The normal settings are:
- Set time and date automatically: switched on
- Source: Apple (time.apple.com.)
- Time zone: the timezone valid for your current location

If all settings are correct, but time and date are still wrong, you can try to have TinkerTool System fix this problem by resetting the macOS time synchronization service and deleting incorrect data. Note that this process requires restarting the computer. To attempt repair, follow these steps:
- Open the sub-item Time on the pane Issues.
- Click Reset Time Synchronization….
- Follow the instructions given by the application.
Erasing the Partitioning Info of Disks to Resolve Issues with Disk Utility
The application Disk Utility, as shipped with modern versions of macOS, is affected by several technical defects. One of the issues can prevent the reorganization of used disks: Depending on the partitioning scheme and previous contents, Disk Utility may reject or fail to erase a disk, so you cannot use the drive for new purposes. All attempts to remove the previous file systems are unsuccessful. TinkerTool System can help in this case, clearing the partitioning info that causes problems in Disk Utility.
Warning: Clearing the partitioning info means that all file systems on the drive in question become inaccessible. All data in all volumes on that disk will be lost. The disk drive will behave similar to a brand new device.
To prepare the disk for successful reuse in Disk Utility, perform the following steps:
- Open the sub-item Disk Drives on the pane Issues.
- Select the disk that should be cleared with the pop-up button Disk to erase.
- Review the current partitioning layout of the selected disk in the overview at Affected volumes. TinkerTool System shows the layout in hierarchical order as it was detected by macOS. The application tries to indicate the names and sizes of all volumes found which helps you to identify the correct disk. Note that the overview might include invisible system partitions which might not be shown by Disk Utility.
- Click the button Erase Disk….
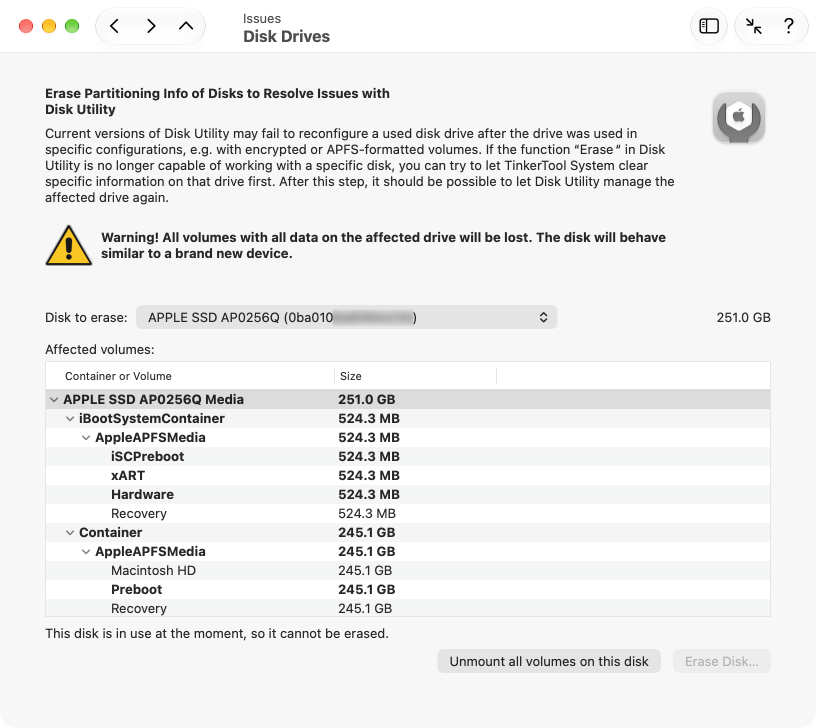
The disk itself is shown by its device name, often supplemented by a serial number or bus identification, which can help you to differentiate between similar disks if you have multiple drives of the same model. Volumes which are currently not mounted are inaccessible which means that TinkerTool System may not be able to indicate the volume names to which you are accustomed. Instead, the internal names of the associated partitions may be shown. If you are not completely sure about the identity of a specific disk, try to mount it in Disk Utility to see the volume names in TinkerTool System, then unmount the volumes again.
You can only select a drive for erasure when all of its volumes are inactive. If a disk is still in use, unmount the respective volumes by clicking the button Unmount all volumes on this disk below the table.
After TinkerTool System has successfully performed the clearing procedure, you can try to reuse the drive with Disk Utility, using its own Erase feature which should work correctly now.