The Pane Diagnostics
Evaluate RAM Size
Introduction to virtual memory
The amount of main memory (RAM, Random Access Memory) installed in a computer can be very important for the system’s achieved computing performance. If not enough memory is available, the speed of the computer will significantly decrease. If too much memory is installed, however, capacity that is not really needed will be unused. Unnecessary costs will be the result.
The optimal amount of RAM will depend on how you use your computer, and, in particular,
- which applications you are using,
- which data is processed by the applications, and
- the degree to which programs are being used simultaneously, causing them to be held in memory at the same time.
macOS keeps detailed internal statistics about the amount of memory used by each running program. TinkerTool System can evaluate these statistics to assess whether the total amount of RAM installed in your computer is appropriate for your typical work. This evaluation will allow you to assess whether additional memory will actually enhance performance.
Background Knowledge
As is the case with all modern operating systems, macOS does not allow any running program to access main memory directly. This access is granted only to the inner core (kernel) of the operating system. For each running program (or process), the hardware simulates a separate memory space. Each process runs in its own, completely separate space, which appears to be exclusively owned by it. For any given process, the only memory it can “see” is its own; other processes’ spaces are completely invisible. That process is incapable of spying on the data space of other processes, and it cannot intentionally or unintentionally write data in their spaces. This is one of the most important methods of ensuring that an operating system is stable and safe. Programs are strictly shielded against each other. Even “rogue” applications cannot crash other processes or the operating system.
This method is called virtual memory. Virtual memory is essentially managed by a hardware component inside the processor, called Memory Management Unit or MMU. For each access to (virtual) memory, the MMU decides which memory should be actually accessed internally: Virtual memory is either being mapped to real main memory, or to special files on the system disk, known as swap space. Mapping virtual memory to real memory is done in blocks, organizational units that are called pages. With macOS, each page always has a size of 4 KiB.
The system tries to map virtual memory to real main memory as long as real main memory is available. However, if too many processes are running simultaneously, or too much data is being processed, the amount of main memory available will no longer suffice to host all pages of needed virtual memory. In this case, a page from main memory will be transferred to disk to make room. To do this, the system constantly evaluates how discrete processes are using their memory and selects a memory page in RAM which is deemed least likely to be required by its process in the immediate future. Transferring that page’s contents to disk frees up the page for use by another process. This transfer is called a “page out” or “swap out.” Later on, if that page, now on disk and not in RAM, is accessed by its associated process, it has to be swapped back into main memory. The system will now select another page to be swapped out, and the two pages trade places.
Because accessing main memory is much faster than accessing hard drives, access to swapped out memory can be 10,000 to 100,000 times slower than accessing memory in RAM. For this reason, the perceived speed of a computer can decrease drastically if too many swap events take place, i.e. there is not enough main memory to hold as many of the used memory pages in the quickly accessible area as necessary. (With up-to-date computers that use flash-based storage instead of magnetic disks, the speed difference has decreased, but it is still very significant.) Theoretically, the best usage of memory has been attained when main memory is being used completely (almost no memory is free), and no swap space is in use. In this case, all data will be in the fast RAM and no part of that RAM is left unused.
In addition to swapping out memory pages to the system’s disk drive, the latest versions of macOS are capable of using another location to hold pages which no longer fit into available RAM. Because a hard drive is so significantly slower than RAM, the operating system can decide to sacrifice a small part of the RAM, which would otherwise be available for applications, and use this part to store swapped-out pages after compressing their contents. This is called compressed memory. Instead of swapping a memory page to disk, the system compresses the page and writes it to a specific RAM area reserved for fast retrieval. This process, of the system’s reducing the amount of memory available to applications for its own memory compression area is a critical step of course. The system has to consider very carefully whether the gain of compressing/decompressing data in RAM instead of reading/writing to swap space outweighs the effect of losing that RAM for applications’ use.
Evaluating the available memory size
As mentioned above, assessing the optimal use of memory is only possible when relating it to the typical usage of memory during the daily work with your computer. Whether you have enough memory will depend on what applications you are using and how you are using them. For this reason, a meaningful evaluation of memory size will be possible only if the operating system had the chance to monitor typical usage of memory within a certain time interval. Perform the following steps to let TinkerTool System evaluate the memory usage statistics:
- Open the tab item RAM Size in the pane Diagnostics.
- Click the button Refresh Values.
The current statistical readings will now appear in the upper box, the evaluation in the lower box Results. An evaluation is possible only after the system has been switched on for at least 2 hours.
The time period in which macOS has collected statistical data is shown in the last line of the upper box. You have to decide whether the computer has been used under a “typical” workload during this period. If the usage has been more untypical, e.g. because you have had more applications open simultaneously than normal, or because you have worked on an unusually large document (or data set) which has consumed an extraordinary amount of memory, the results will not be meaningful.
If you decide that the usage of the computer has not been typical enough to allow for a meaningful assessment, perform the following steps:
- Restart macOS.
- Use your computer for at least two hours with the typical workload this computer has been purchased for.
- Launch TinkerTool System again, and once more navigate to the feature Evaluate RAM size.
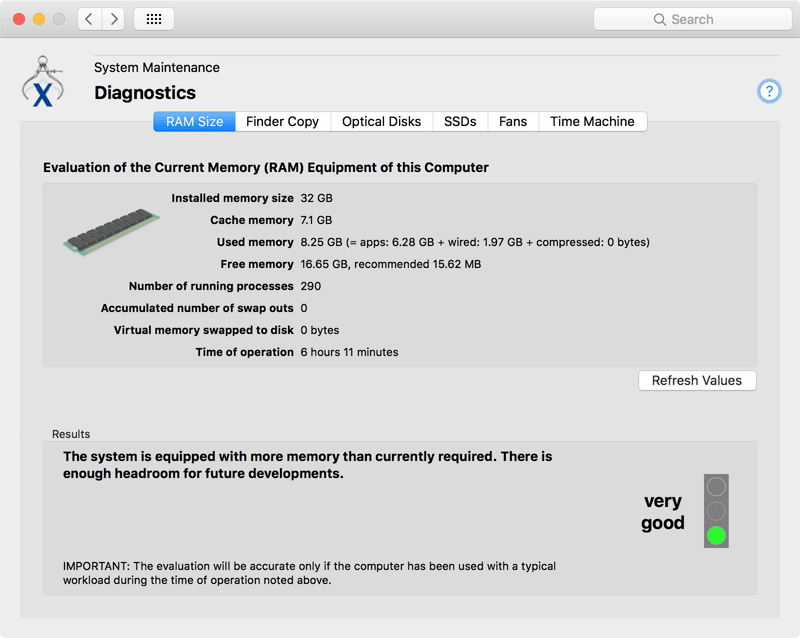
The upper box lists selected data from the memory statistics maintained by macOS:
- Installed memory size: The amount of actually available main memory which can be used by macOS and running processes. This value is usually identical to the total size of RAM modules installed in your computer. In some cases, however, the reading shown here could be lower due to limitations of the hardware. The computer’s chip set, or the “shared memory” feature of graphics chips, can reduce the usable amount of memory on specific computer models.
- Cache memory: Memory used by macOS to speed up the computer’s operation when accessing files or when restarting recently used applications.
- Used memory: The size of main memory which is currently used by running processes and the system kernel. It is further subdivided into three different parts, also listed in the following order: pages used by running processes (application memory), pages which are not permitted to be swapped (wired-down memory, sometimes also called reserved memory), and pages for memory compression (compressed swap space in RAM).
- Free memory: The size of main memory which is currently not mapped to virtual memory. This RAM is left unexploited and is not in use. TinkerTool System also shows the recommended free memory size. The system runs best if nearly all RAM is in use, and a very small free part for current handling is left. This recommendation is computed by macOS. The shown reading is the value on which the system bases its memory usage policies.
- Number of running processes: The number of processes currently running. Each process is using virtual memory.
- Accumulated number of swap outs: The total number of swap-out operations that have occurred during the time of operation of macOS.
- Virtual memory swapped to disk: The size of the swap space currently used by running processes.
- Time of operation: The time since the last start of macOS. The listed data has been collected during that period.
The box Results shows the current evaluation based on the statistics shown in the upper box. The assessment contains a textual explanation and a short overall result like “good” which is additionally represented by the image of a traffic light. The program differentiates between the following results:
- very good: The system is equipped with enough main memory and currently has even more memory than is actually needed. With this configuration, the system will have enough reserve performance for future developments.
- good: The amount of main memory matches the amount actually needed rather well. A good balance between price and performance has been reached. From an economical point-of-view, this is the best solution.
- fair: The system could run slightly better with a bit more memory. The available amount of memory is not in such a short supply, however, that the situation is critical. Expanding memory will increase performance for some degree, but the effect will not be great.
- bad: The system does not have enough memory for its typical usage and is significantly slowed down for this reason. If technically possible, you should increase its RAM size. Expanding memory will result in a perceivable performance gain. If the maximum amount of memory has been reached already, you should migrate to a larger computer or reduce your workload.
Test Finder Copy
The macOS Finder is known to be affected by specific bugs, depending on which version you are using. The issues affecting Finder file copy operations between disk volumes are especially problematic. You cannot assume that a copied file will always be identical to the original. Under certain circumstances, data loss can occur. This is especially true when you consider that the Finder also plays a role in the operation of Time Machine, the backup solution of macOS.
TinkerTool System can verify if the Finder is capable of performing the following operations correctly:
- Copying files with emulated Extended Attributes (so-called AppleDouble files)
- Copying symbolic links that have native Extended Attributes
These operations are known to be unreliable when specific versions of the Finder and specific file system types are used as the source and destination of the copy operation.
File system type means the format of a disk or disk partition, or the transfer protocol used when accessing a file server in the network, respectively. The Finder behaves differently when copying between two HFS hard drives, for example, or between an HFS disk and a memory stick formatted using the Windows FAT standard.
You can let TinkerTool System check two given disks against your version of the Finder. TinkerTool System can control the Finder remotely to test whether the operation runs as expected or not. To perform the check, you only have to specify two folders between which test files should be copied.
- Both folders must lie on different disks to ensure that a real physical copy operation takes place and not only a simple move operation on the data.
- You must have read and write permission for both folders to make sure the Finder running for your account has the right to perform the copy operation.
To run the tests, TinkerTool System needs less than 200 kB on both disks. All files written during the check will be erased automatically after the tests have been completed.
When working with file system types, only the file system families, not specific sub-types, affect the behavior of the Finder. Messages shown by TinkerTool System during this check refer to the family only. For example, the file systems “HFS” and “HFS+ journaled, case-sensitive, encrypted” are both represented by the family “HFS.”
TinkerTool System needs approval for Finder automation before you can use this feature. For more information, please see the last section in chapter Basic Operations.
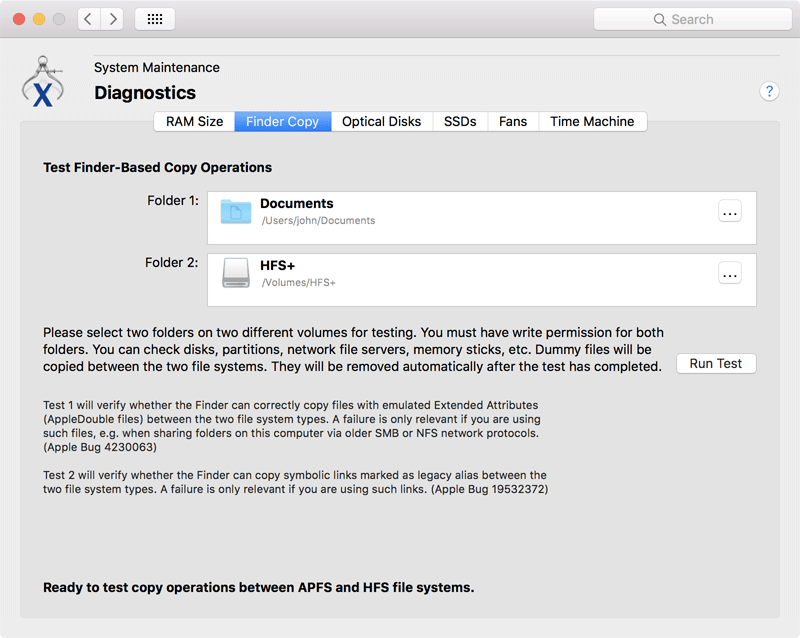
Perform the following steps to test the Finder:
- Open the tab item Finder Copy on the pane Diagnostics.
- Drag a folder on the first disk to be checked from the Finder into the field Folder 1. You can also click the button […] to navigate to the folder, or click on the white area to enter the UNIX path of the folder.
- In the same fashion, specify a different folder lying on the second disk to be tested in the field Folder 2.
- Now click the button Run Test. After a few seconds, the outcome of the test will appear in the lower section of the pane.
The button can only be clicked if the previously specified conditions are met for the two folders. The pane will show you in advance whether the test can be performed, or if a problem exists with the selection of folders.
TinkerTool System automatically tests the copy operations in both directions, i.e. copying from folder 1 to 2, and from 2 to 1. The order of the two folders does not matter. Because TinkerTool System is controlling the Finder remotely, you might hear the sound effects the Finder uses for copy operations during the test.
A successful test will be marked by a check mark with green background. A test that has failed is marked by a cross marked red.
A failure of test 1 indicates that the Finder is not capable of copying Extended Attributes for files and folders if they are not stored natively, i.e. not on a disk using the formats “HFS+,” or “APFS”, or on an AppleShare file server. This failure may not be relevant to you. Emulated Extended Attributes are mainly used when you operate the system as a file server, sharing files with older SMB or NFS network protocols. If you don’t use your computer that way, it’s likely that your installation of macOS has never created files with such attributes.
A failure of test 2 indicates that the Finder cannot copy symbolic links which have Extended Attributes attached. This failure may also not be relevant to you, but such situations are more likely than the ones of test 1. For example, you may see such objects as part of applications which have older software library frameworks embedded. These frameworks could store symbolic links which are additionally marked as legacy alias via an Extended Finder Attribute. In practice, you will notice such a problem in situations where the Finder unexpectedly cancels a running copy operation with the message that an object could not be found (error –36) although the object is there.
Please note that TinkerTool System is only testing whether the Finder is working as expected. The application cannot repair any defects it might have detected in the Finder.
Unfortunately, if one of the tests fails when you select two HFS+ disks for the copy operation, you have to expect that will also not work correctly. Because the Finder is an indirect part of some copy operations performed by Time Machine, backing up or restoring data can also lead to corruption of copied files.
Inspecting Optical Disks
If your computer contains one or more optical disk drives with write capabilities, you can use TinkerTool System to retrieve detailed information about inserted disk media, such as CDs, DVDs, or Blu-Ray Discs. This feature can help determine the actual manufacturer of a storage medium, or retrieve information about the recording format of a disk. Depending on the type of medium and its storage format, the amount of data you can retrieve will be very different. With appropriate media, TinkerTool System may include the following detail information in the results:
- identification name of the drive
- firmware revision of the drive
- type of the inserted medium
- media behavior, i.e. compliance with a recording standard
- number of recorded disk sessions
- manufacturer of the disk
- number of recording layers
- diameter of the disk
- supported rotational speeds for this combination of media and drive
- storage capacity of the medium
Whether specific items can be retrieved or not depends not only on the type of storage media, but whether data has already been recorded on the disk.
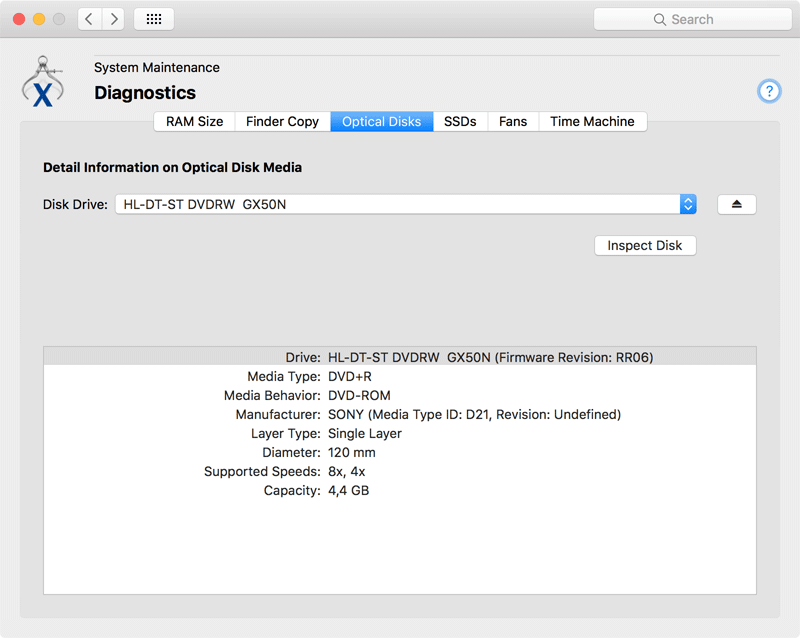
To inspect optical disk media, perform the following steps:
- Open the tab item Optical Disks on the pane Diagnostics.
- If multiple optical drives are connected with your computer, select the desired drive with the pop-up button Disk Drive.
- Ensure that the media to be inspected has been inserted into the selected optical disk drive. You can use the button with the eject symbol to eject a disk, or, in case of a drive with a disk tray, use it to open and close the tray. Wait until drive and macOS have recognized the inserted disk.
- Click the button Inspect Disk.
The analysis will be shown in the Results box after a few seconds.
Note the difference between the items Media Type and Media Behavior: If you have recorded digital video on a disk of type DVD+R and have correctly finalized this recording session, the physical type of medium will be DVD+R, but the disk will ultimately behave like a DVD-ROM.
If you are not using the typical Apple “Superdrives”, the application will only support optical drives that can both read and write disks.
SSDs
Before discussing solid state drives (SSD), also called “flash storage” by Apple for previous generations of Macintosh systems, we should first review how conventional magnetic hard disk drives handle file deletion. On hard disks, file deletion is a simple, quick operation. The operating system erases the file’s entry from its folder and informs the file system that the disk blocks used by the file are now free and available for reuse. The old data remains in the blocks until the disk drive overwrites them with data from a new file.
For technical reasons, the deletion procedure is not so straightforward for SSD storage. Although, from the point-of-view of the operating system, an SSD data block is exactly the same as a hard drive block, they cannot be simply overwritten with new data. It is first necessary to explicitly clear them completely, a time consuming operation, before writing new data. The controller of the SSD has to erase each bit of a data block at the physical level, internally resetting all flash memory cells that make up each block. A write operation on a flash storage device will thus be significantly slower if the drive does not have a reserve of empty storage blocks that can be used for the incoming data. The operating system may have to wait for the SSD to prepare an empty block that can be used for a pending write operation. “Empty” in this case means either that this is a brand new, never used storage block, or is a previously used block which has already been cleared.
If large amounts of data have been written to an SSD in the past, the likelihood that either unused or cleared blocks are still available will be lower. The speed of write operations decreases as more data is written. To resolve this problem, the drive must try to clear unused blocks as early as possible. This way, the chance to have empty blocks in reserve, available immediately for incoming write operations, is much higher. But how should the drive “learn” which blocks are no longer in use? On magnetic disks, the drive did not need to “know” that.
To indicate to a storage device that a particular block is considered free by the operating system, so that this block can be prepared for later reuse, the Trim command was introduced. Trim commands are part of the ATA8-ACS2 industry standard which specifies how computers should communicate with modern disk drives. So in addition to just updating its own file system information that show which blocks are free, the operating system can now inform the disk drive, too, which blocks are no longer in use. When an SSD receives a Trim command for a specific storage block, it will place that block on its to-do list for cleaning. When the drive has time for cleanup operations, it will then clear the corresponding flash cells in the affected blocks. The likelihood that incoming write commands will find immediately usable free blocks increases, so write operations should be executed as fast as possible.
In a default configuration, OS X won’t send Trim commands to all SSDs, but only to flash storage drives provided by Apple, because in this case the operating system is safe to assume that the Trim commands are implemented correctly by the drive, so the commands won’t lead to data loss or data corruption.
Very old SSDs (from a time before Trim was standardized) can have internal design flaws, and as a result may not handle Trim commands correctly. This is dangerous, because it can actually lead to situations were the drive clears the wrong block. This could result in 512 bytes of zeros overwriting the actual data within a file. To avoid this danger of data loss or corruption, macOS, by default, only sends Trim commands to Apple flash drives, because it knows that the commands will be implemented correctly.
However, Apple lets you decide whether to use Trim commands with all third-party solid state drives (SSD) attached to your system via a SATA bus and a bus interface based on the AHCI standard (Intel Advanced Host Controller Interface). Changing the mode of operation can be done with Apple’s program trimforce which must be executed on the UNIX command line. System Integrity Protection ensures that only Apple software can be used to either enable or disable this setting. We won’t describe the usage of trimforce here. For more information, please see Apple’s documentation.
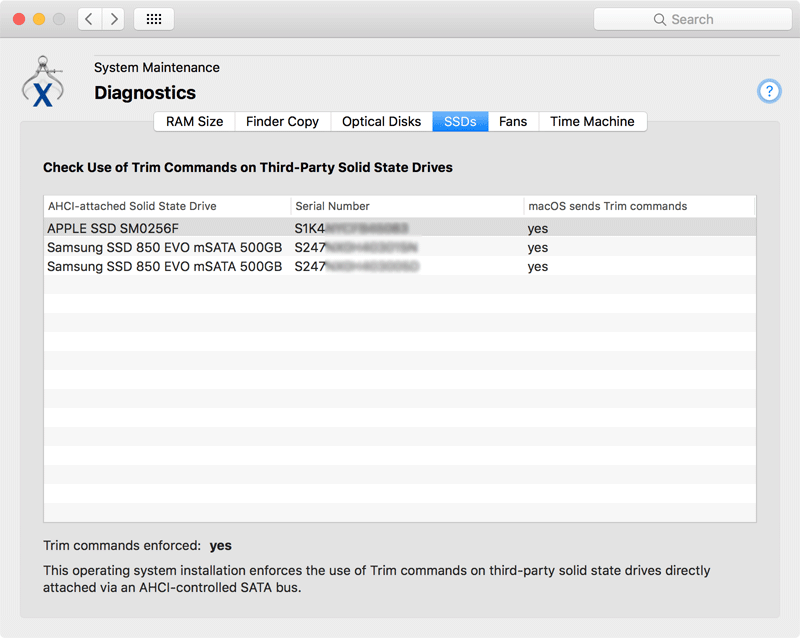
TinkerTool System can check the actual mode of operation currently chosen by macOS to communicate with solid state drives. Open the tab item SSDs on the pane Diagnostics to do that.
The table on this tab item shows you all relevant SSDs currently attached to your Mac, and also lists whether Trim commands are sent by macOS. You may like to verify the status of all SSDs before and after reconfiguring the operating system with trimforce (after the computer is restarted). The status line below the table indicates whether the trimforce setting is currently enabled in the operating system or not.
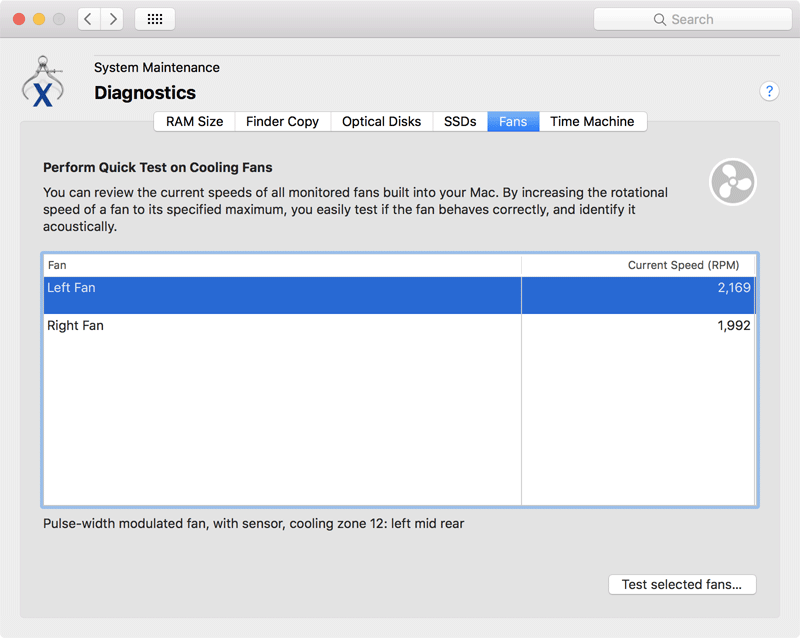
Performing a Quick Test on Cooling Fans
Many Macs need to be cooled constantly, which is done by one or more blowers which pull fresh air into the computer and push out hot air. Most of these fans are continuously monitored and are controlled by an independent auxiliary computer built into your Mac. In older Macs, this is the System Management Controller (SMC), in the latest Macs this is an Apple T2 processor running Apple’s BridgeOS operating system. Fans are mechanical components which are constantly in use when the computer is active, and as such are subject to wear and tear. If you hear unusual noise from your Mac and you suspect that one of its fans is no longer working correctly, it is helpful to quickly test the fans without having to open the Mac.
TinkerTool System can do so by temporarily forcing a fan to accelerate to its specified maximum and showing you the current rotational speed values. By listening to the fan’s response, you can easily identify its location and determine whether it appears to be behaving normally.
As of December 2017, Apple has begun to protect the fan control hardware of some Macintosh model series from access by applications. In this case, TinkerTool System cannot determine the names and locations of the fans.
To run a test on or more fans, perform the following steps:
- Open the tab item Fans on the pane Diagnostics.
- Select one or more fans in the table that should be tested.
- Click the button Test selected fans….
- When you like to end the fan check, click the button Finish test.
The current speed values are shown in table and are updated continuously. If you select a single line in the table, technical details about the fan and its approximate location within the Mac’s case are shown below the table.
If you are using a third-party application to manipulate the built-in standard fan control of the Mac, TinkerTool System will not interfere with that application and an error message is shown in the pane. To run fan tests you will need to deactivate the other application first, then restart TinkerTool System.
Login Time Accounting
macOS is a Unix system, so it has its roots in classic time-sharing computing that was used as of the 1950s and onwards. Users connected to a large central computer via a terminal line, logged in with their accounts, ran some programs, and disconnected again. Use of the computer had to be paid per minute. The connection time statistics necessary for this type of accounting are still kept today. TinkerTool System allows you to get access to the data. You can retrieve either the total connect time per user or the total time the Mac was used per day.

- Open the tab item Usage on the pane Diagnostics.
- Select one of the report types listed in the lower left corner.
- Click the button Compute.
The results are shown in the table. Please consider the following:
- Login intervals are listed in the format hour / minute /seconds, separated by colons (:). If a time interval is longer than one day, the number of days will be shown additionally with the unit d.
- The connect time records are collected automatically by macOS. TinkerTool System has no effect on the accuracy of the data. The operating system may delete the internal statistics at its own discretion. This usually happens during operating system upgrades.
- Login time is the time interval between the event where a user logged in (either automatically via macOS or FileVault, or manually by entering her password) and this user logged out (either automatically during a shutdown of the computer, or manually).
- All logins are considered. This includes working at the Mac’s screen (which is called a console login in time-sharing terms), Fast User Switching, logins via a Terminal session, or remote logins via network. The use of file sharing, however, is usually not counted as login. This can depend on the file server.
- Time intervals are measured based on real wall-clock times. If a user is logged in while the computer is sleeping or in standby mode, the sleep time will still be counted as login time.
- Statistics per user are managed by the short user names which were valid at the times where these users had access to the computer. So old renamed accounts or deleted accounts may still be found in the list. The short user names are called account names in the User pane of System Preferences and are identical to the names of each user’s home folders.
- The statistics can contain records for users called root and _mbsetupuser which are accounts used internally by macOS during system updates.
- Although no privileged operation is necessary in order to use this feature, read permission for the login records is required, because this affects personal data of others. You must be logged in as administrative user to retrieve the data.
Check Time Machine
Time Machine does not usually need any maintenance as long as you don’t replace the source or destination disks. For more information, please also see the chapter on Time Machine. You just define which disk volumes should be included in the backup, what destination drive should be used, and switch Time Machine on. However, there can be certain instances where Time Machine may not run as expected – for example if there is a file system problem on one of the source volumes, or if there was a power failure during a Time Machine run. TinkerTool System can help you to detect possible problems with backups by controlling one of the diagnostic features of Time Machine with a few simple clicks.
You can select two different backup sets and compare all their files. This will show the “true,” incremental contents of a Time Machine backup, rather than the simulated view in the Finder or the Time Machine user interface, which always shows the entire effective backup set at a selected point in time. If some part of Time Machine is failing, this will mean that although specific files have been modified, they have not been included in the next incremental backup copy corresponding to the Time Machine snapshot taken immediately after the modification time. For typical Time Machine problems, the updates for an entire folder would be missing, which can be detected easily when comparing the two backups preceding and following the modification of files in that folder.
You can also use this feature to determine which files have changed on your computer at a particular point in time, or to assess how many files with what storage size are typically part of your backups every hour.
Alternatively, it is also possible to compare the current data on your computer (that is, all files which are selected to be handled by Time Machine) with a specific backup session. This feature is helpful to detect implementation errors in Time Machine. You can immediately see whether the data that should be copied has actually been copied. Note that this type of compare operation takes a significant amount of time, because all files on your computer have to be checked.
To start the comparison of two Time Machine backups, perform the following steps:
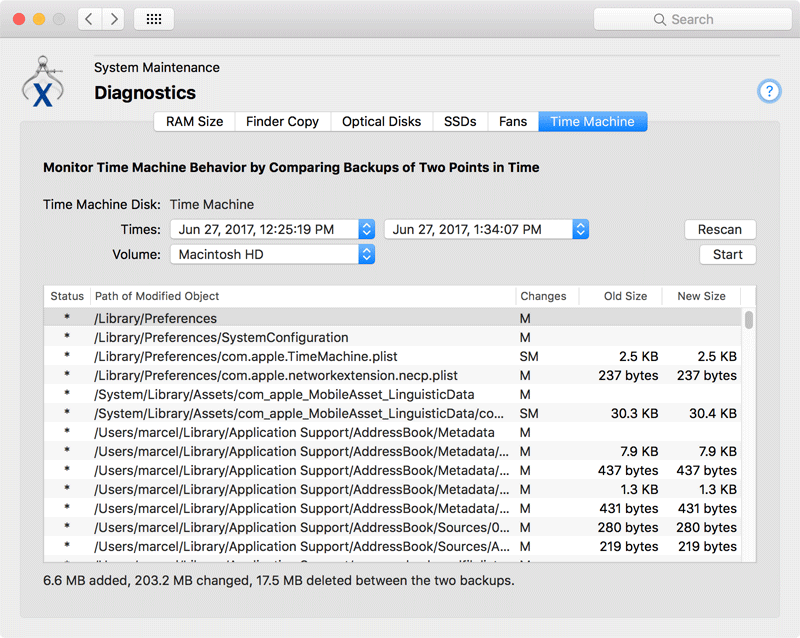
- Open the tab item Time Machine on the pane Diagnostics.
- Ensure that the correct backup destination disk is shown at Time Machine Disk. This is the disk currently considered active by Time Machine. You cannot influence this automatic selection via TinkerTool System. In case Time Machine has been configured to use a network file server instead of a local disk drive (this includes the Apple Time Capsule), click the button Connect to network disk. TinkerTool System will then establish the connection to the server and scan the remote data. For a slow WLAN network, this scan may take several minutes.
- At Times, select the two points in time for which the backup sets should be compared. The times must be different, but their order doesn’t matter. To choose the “live” data on your computer for comparison, select the last item —All backup items—.
- If Time Machine is configured to create backup copies of multiple disk volumes, select the desired disk to compare, using the pop-up menu Volume. (This won’t be necessary if you had selected —All backup items—).
- Click the button Start.
Depending on the size of your backup and the amount of data differing between the two selected backup sets, the compare operation may need a few seconds or several minutes to complete. The results will be shown in the table.
- The column Status uses a single marker to indicate the overall status of each difference that has been found. The markers have the following meaning:
- +: This object has been added.
- -: This object has been removed.
- *: This object has been modified.
- Path of Modified Object shows the UNIX path of the file or folder where a difference was detected. The path must be interpreted relative to the volume you had selected for comparison.
- Changes indicates the exact type of modification:
- A: The Access Control List has changed.
- C: The creation time has changed.
- D: The data stored in the object has changed.
- G: The group owner has changed.
- M: The modification time has changed.
- O: The owner has changed.
- P: The POSIX permissions have changed.
- S: The size has changed.
- T: The object type has changed.
- X: The Extended Attributes have changed.
- If the object is a file and the file has been modified, the column Old Size shows the storage size required by the file for the older of the two selected points in time.
- Similarly, the column New Size displays the storage size at the later of the two selected times.
If you move the mouse cursor over an entry in the column Changes, TinkerTool System will display a short textual explanation, so you don’t need to learn the abbreviations.
TinkerTool System can rescan the Time Machine disks connected to your computer when you change the configuration or replace the destination disk. To do so, click the button Rescan.
In the event that Time Machine is using a network volume for its backups, the connection to the remote drive will still be held open after the compare operation has completed. In fact the connection will remain after you have quit TinkerTool System. This allows you to quickly start a new scan operation later. However, if you do not want this persistent connection (for example if you have a mobile computer and wish to leave the network), click the button Eject network disk after you completed your work with Time Machine diagnostics.