Working with the application
Setting Up a Time Machine Server
File Sharing
To set up a Time Machine server on a Mac in your local network, it is necessary to enable the SMB file server of macOS that will share the data for access. SMB is the Server Message Block protocol recommended by Apple for file sharing. It is also being used by other operating systems such as Microsoft Windows® or Linux®. As of OS X 10.9 Mavericks, this protocol has become the standard for file services on the Mac.
If SMB file sharing is not enabled yet on your Mac, perform the following steps:
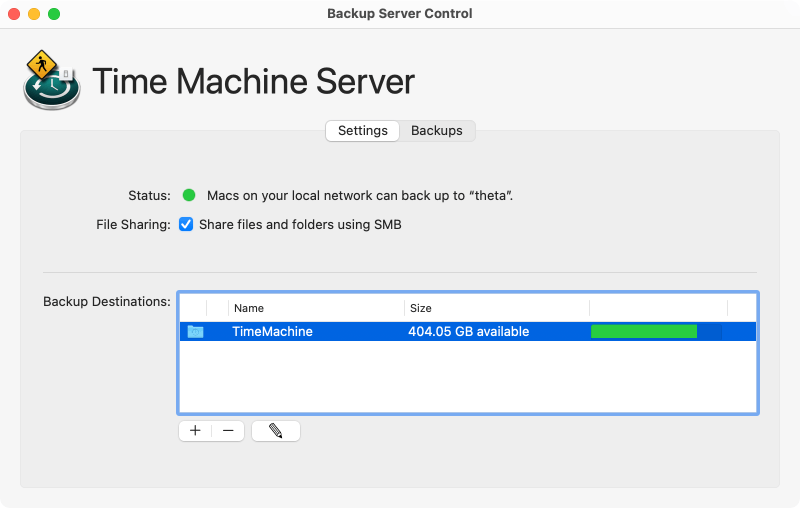
- Switch to the tab item Settings in the main window of Backup Server Control.
- Set a check mark at File Sharing: Share files and folders using ….
- Identify yourself as administrator if macOS should ask for it.
Important: Enabling macOS file services may also share other files with the network, not only the folder(s) for the Time Machine server. You can review the complete list of shared objects using the table at System Settings > General > Sharing > File Sharing > i > Shared Folders. Remove all items which should not be accessible from the network.
Preparing a Destination Folder
All disk volumes formatted with either the Apple File System (APFS) or the older format Mac OS Extended (Journaled), also called HFS+, can be used as target for network-based Time Machine backups. It is recommended to use an empty disk which does not contain any other data as work folder for your Time Machine server. You must never use a local Time Machine volume (a disk where the server itself stores its own Time Machine backups) as destination for the network backups of other Macs. Always use separate volumes, or even better, separate disk drives for local Time Machine and network-based Time Machine.
You can use Disk Utility to prepare a new disk for use with the Time Machine server. It can also convert a used volume which contains data in Mac OS Extended (Journaled) format to APFS if necessary.
Preparing a new empty disk drive for use with the Time Machine server
If you have an empty disk that should store the backups of the Macs in your network, you can prepare it as follows:
- Launch Disk Utility.
- Use the leftmost button View in the toolbar and switch it to Show all devices.
- Select the empty disk drive in the sidebar. It should appear with its device name. Be sure to choose the correct entry which must be shown left-justified, not indented.
- Press the button Erase in the toolbar.
- In the dialog sheet, specify a name for the new disk in the field Name.
- Select Format: APFS and Scheme: GUID Partition Map. You can alternatively select Format: Mac OS Extended (Journaled), but this is not recommended.
- Press the Erase button.
You don’t need to choose an encrypted format. If you like to enable encryption for network-based Time Machine backups, you will be able to specify this later on the client side.
Ensure that permissions are supported
In some cases, macOS assumes that volumes on external disks are used to transfer data between different Macs. To make this easier, a special preference setting might have been activated that causes file ownership on the entire volume to be ignored. You should make sure that this feature is not enabled on the volume that you plan to be used by the Time Machine server:
- Choose the volume in the Finder.
- Select the menu item File > Get Info.
- In the Info window, make sure the section Sharing & Permissions is fully visible.
- Verify that the option Ignore ownership on this volume is not set. If it is set, click on the lock icon, authenticate as administrator, and remove the check mark.
Backup Destinations
Using the table Backup Destinations you specify into which folders the backups of Macs in your network should be stored on the server. You can share one or more folders for use with Time Machine. They will appear as separate destinations for backups on client computers. The table also shows an overview how much storage space is still available on the respective volumes.
The following technical restrictions must be considered:
- A folder shared for Time Machine must be placed on a disk volume that supports user permissions and is local from the point-of-view of the server computer. A volume of another server cannot be re-shared by this server.
- Even if it is theoretically possible to use other file systems, the volume on which the shared folder is located must be formatted with either the Apple File System (APFS) or Mac OS Extended (Journaled).
See the previous section for detailed information on both items.
It is recommended to use the Finder to create a new, empty folder which should be used as backup destination. The permissions of this folder must be set in a way so that the user account (or multiple accounts) of the server that will later be used by the client Macs for access has write permission at that location.
If you like to use a folder as backup destination for Time Machine in the network, perform the following steps:
- Switch to the tab item Settings in the main window of Backup Server Control.
- Press the button + below the table Backup Destinations or select the menu item Configuration > Add Backup Destination….
- Choose the desired folder.
To quit sharing a folder for Time Machine, select its entry in the table. Press the button – below the table or select the menu item Configuration > Remove Backup Destination…. Backup Server Control will ask for an additional confirmation. Please note that no backups will be erased. Only sharing in the network will stop.
Configuring Time Machine on a Mac in the Network
After sharing protocol and backup destination have been set up appropriately, you will see a respective note in the line Status together with a green marker. Now Macs in the local network can create Time Machine backups on the server. Such Macs only need to run the operating system macOS 10.12 Sierra or later. The following steps need to be performed on each respective client computer:
- Open System Settings.
- Go to General > Time Machine.
- Click the + button below the table.
- Choose the right backup destination from the list. It is shown with a network share icon and the name pattern Folder on “Server” where Folder is the name of the shared folder and Server is the name of the server computer.
To get permission to access the backup destination, the client Mac has to authenticate with a user account of the Time Machine server. This account needs to have write permission for the folder of the backup destination on the server. If needed, new accounts can be created with System Settings on the server side. It is recommended to create a sharing only account, so the account can only be used for file sharing purposes, but cannot be abused for login at the server computer.
Further instructions can be found in Apple’s online help of the respective operating system.
Setting Up Quota for a Backup Destination
In theory, an unlimited number of computers in the network can use a single backup destination. The computers compete with each other for the space available on the shared volume. To prevent consuming more storage that intended and to guarantee that each Mac receives the same, “fair” amount of available space, a quota can be set up if needed. For each Mac using a certain backup destination, this will define a maximum amount of how much storage space can be used. This maximum value will be equal for all participants of the same destination.
After creating a new backup destination, Backup Server Control automatically shows a dialog to define the optional quota value. You can also enable this feature at a later time:
- Switch to the tab item Settings in the main window of Backup Server Control.
- Choose a line in the table Backup Destination where you like to review or change the quota.
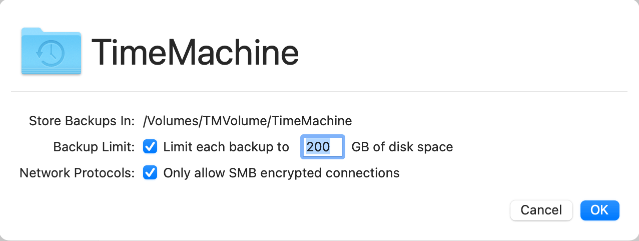
- Press the button with the pen icon below the table.
- Enable or disable the quota or specify a new storage limit. The maximum value must be specified in Gigabytes.
- Close the dialog with the OK button.
Enforce encryption of network traffic
For enhanced security, you may like to ensure that all network traffic associated with access to the remote Time Machine backup is sent encrypted over the network. This is independent of the question whether the network client is already encrypting the backup files on the server. To enforce encryption of the network traffic, set a check mark at Only allow SMB encrypted connections.