Working with the Control Window
General Controls
NFS Manager displays the complete NFS configuration of your computer within a clearly laid out control window. The picture below shows a typical example.
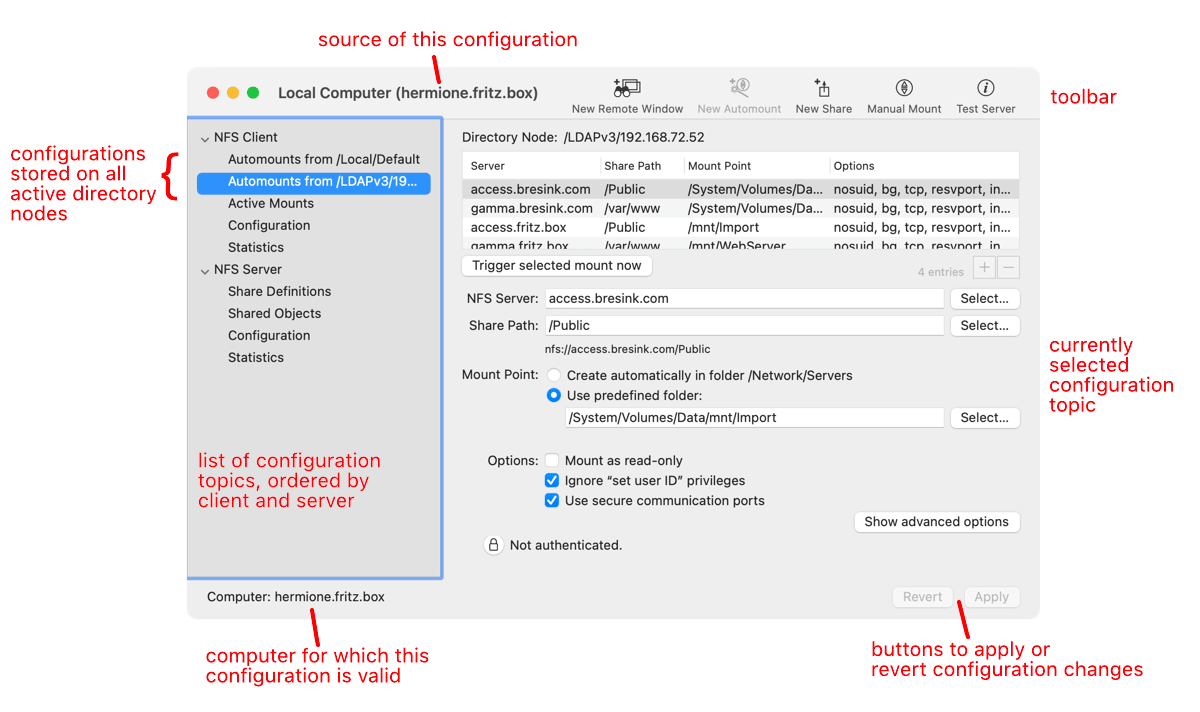
The left half of the window shows the different functional areas relating to the configuration of NFS on the respective computer. The areas are divided into the categories NFS Client and NFS Server. The subtopics will vary depending on situation and network environment.
When you click on a configuration topic, the right half of the window will change and display the currently configured operational data of the selected functional area. You can review the data and change the configuration as desired. If the data is stored on a directory node, you may have to login to the directory node first by clicking on the lock symbol before you can make any changes. After changes have been made, the two buttons in the lower right bottom will become active.
- By clicking the button Apply, the changes will be saved and they will become active immediately if technically possible.
- By clicking the button Revert, the changes will be discarded and the previous values will be restored.
Whether changes have been made to the currently selected configuration topic is also visible through the usual dot marker in the red close button of the window. The sidebar of the window can be enlarged by dragging its divider line.
The toolbar of the window contains icons for features typically used most often. Each function will be activated after clicking its respective icon. You can use the menu items View > Hide Toolbar and View > Show Toolbar or the key combination ⌘ + ⌥ + T to disable or enable this area, respectively.
The title bar of the window shows you where the currently displayed configuration comes from, e.g. whether it has been loaded from file, or if the data of a certain computer is currently shown live. Because NFS Manager can be used to remotely configure other macOS systems, the monitored computer is additionally displayed at the lower left corner. This will avoid confusion and misunderstandings if you have data of multiple computers or configuration files on screen.
Finding Entries
NFS configurations can become rather large. In professional networks, installation with dozens, or in special cases even thousands of share entries and mounts are not unusual. To search for an entry containing a specific server name or share path, NFS Manager provides a simple Find panel supporting the typical macOS features. Perform the following steps to search for an entry:
- Make sure the correct configuration topic is selected in the control window.
- Ensure the caret is currently not in a text field. (This would indicate to macOS you’d want to search for contents in that field only.) The easiest way to do this is to click into the table of entries usually displayed at the top of the configuration topic.
- Select the menu item Edit > Find > Find… or press the key combination ⌘ + F. The Find panel opens.
- Enter the text you like to search for into the field of the Find panel. The search will not be case-sensitive.
- Click the button Next or hit ↵ to start the search. The next matching occurrence will be selected in the table of entries.
You can also search backwards by clicking the button Previous, or using the menu item Edit > Find > Find Previous (⇧ + ⌘ + G). To find the next occurrence of the same text, just press ⌘ + G or select the menu item Edit > Find > Find Next. You can transfer any text into the Find panel by selecting it and then using the menu item Edit > Find > Use Selection for Find (⌘ + E).
Finding entries is supported for the following configuration topics:
- NFS Client: Automounts
- NFS Client: Active Mounts
- NFS Server: Share Definitions
Refetching Entries from the System
Under special circumstances, you might use alternative programs, like text editors to modify parts of the NFS configuration while NFS Manager is running. Although this is not recommended because it could create update conflicts between the different applications, NFS Manager can be forced to re-read configuration records (which might have been changed “behind the back” of NFS Manager) from the operating system.
- Make sure a configuration topic displaying NFS configuration data is selected in the control window.
- Select the menu item View > Refresh or press ⌘ + R.
All entries will be updated with the current records kept by the operating system. To protect you from losing edited data, you cannot use this feature if there are unsaved changes in the window.